- 2005 Mercedes-Benz M Class Owners Manuals
- Mercedes-Benz M Class Owners Manuals
- 2007 Mercedes-Benz M Class Owners Manuals
- Mercedes-Benz M Class Owners Manuals
- 2003 Mercedes-Benz M Class Owners Manuals
- Mercedes-Benz M Class Owners Manuals
- 2001 Mercedes-Benz M Class Owners Manuals
- Mercedes-Benz M Class Owners Manuals
- 2000 Mercedes-Benz M Class Owners Manuals
- Mercedes-Benz M Class Owners Manuals
- 2009 Mercedes-Benz M Class Owners Manuals
- Mercedes-Benz M Class Owners Manuals
- 2013 Mercedes-Benz M Class Owners Manuals
- Mercedes-Benz M Class Owners Manuals
- 2006 Mercedes-Benz M Class Owners Manuals
- Mercedes-Benz M Class Owners Manuals
- 2012 Mercedes-Benz M Class Owners Manuals
- Mercedes-Benz M Class Owners Manuals
- 2010 Mercedes-Benz M Class Owners Manuals
- Mercedes-Benz M Class Owners Manuals
- 2008 Mercedes-Benz M Class Owners Manuals
- Mercedes-Benz M Class Owners Manuals
- 2011 Mercedes-Benz M Class Owners Manuals
- Mercedes-Benz M Class Owners Manuals
- 2002 Mercedes-Benz M Class Owners Manuals
- Mercedes-Benz M Class Owners Manuals
- 2004 Mercedes-Benz M Class Owners Manuals
- Mercedes-Benz M Class Owners Manuals
- Download PDF Manual
-
According to accident statistics, children are safer when properly restrained in the rear seating positions than in the front seat- ing position. Thus, we strongly recommend that children be placed in the rear seats whenever possible. Regardless of seating position, children 12 years old and under must be seated and properly secured in an appropriately sized infant restraint, toddler restraint, or booster seat recommended for the size and weight of the child. For addi- tional information, see “Children in the vehi- cle” (컄 page 89). A child’s risk of serious or fatal injuries is significantly increased if the child restraints are not properly secured in the vehicle and/or the child is not properly secured in the child restraint.
44
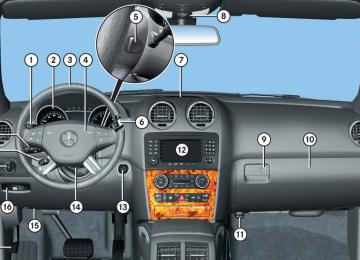
Seat adjustment The seat adjustment switch is located on the entry side of each front seat base.
1 Head restraint height (vehicles with
memory function)*
2 Seat cushion tilt 3 Seat height 4 Backrest tilt 5 Seat fore and aft adjustment
! When moving the seats, make sure there are no items in the footwell or behind the seats; otherwise you could damage the seats.
! When the rear seats are folded forward, e.g. for cargo compartment expansion (컄 page 269), the front seats may not be moved to the rear- most position. Otherwise you could damage the front and rear seats.
! When adjusting the seat backrest tilt and head restraint height, make sure the sun visor is folded up (컄 page 201). If the head restraint is in the uppermost position, it could hit and damage the sun visor.
i Vehicles without memory function*: The seats can be adjusted within 5 minutes after either front door has been opened. The counter resets each time 앫 you open or close a front door 앫 you insert the SmartKey into the starter
switch
앫 you remove the SmartKey from the starter
switch
앫 you switch the ignition on or off
i The memory function* (컄 page 133) lets you store the settings for the seat positions together with the settings for the steering wheel and the exterior rear view mirrors.
Seat fore and aft adjustment 왘 Press the switch forward or backward
in direction of arrow 5.
Seat height 왘 Press the switch up or down in
direction of arrow 3.
Seat cushion tilt 왘 Press the switch up or down in
direction of arrow 2 until your upper legs are lightly supported.
Seat backrest tilt 왘 Press the switch forward or backward
in direction of arrow 4.
Head restraint height
Warning!
Do not drive the vehicle without the seat head restraints. Head restraints are intend- ed to help reduce injuries during an accident.
With a rear seat occupied, make sure to move the respective head restraint up from the lowest non-use position and have the occupant adjust the head restraint properly.
For your protection, drive only with properly positioned and engaged head restraints.
Adjust the head restraint so that it is as close to the head as possible and the center of the head restraint supports the back of the head at eye level. This will reduce the po- tential for injury to the head and neck in the event of an accident or similar situation.
Getting started Adjusting
! Do not attempt to remove front seat head restraints. They can only be removed by qualified technicians. We recommend that you have this work carried out by an authorized Mercedes-Benz Light Truck Center.
Vehicles with memory function*: 왘 Press switch 1 (컄 page 44) up or
down in direction of arrow.
Vehicles without memory function*:
1 Head restraint 2 Release button
45
Getting started Adjusting
Raising: 왘 Manually adjust the height of head
restraint 1 by pulling it upward. If head restraint 1 is fully retracted, push release button 2 in direction of arrow and pull head restraint 1 up- ward. Lowering: 왘 To lower head restraint 1, push
release button 2 in direction of arrow and press down on head restraint 1.
46
Head restraint fore and aft adjustment
Steering wheel
Easy-entry/exit feature* This feature allows for easier entry into and exit from the vehicle. When entering and exiting the vehicle, the steering wheel is in its uppermost position. The easy-entry/exit feature can be activated or deactivated in the Comfort submenu of the control system (컄 page 176).
Warning!
You must make sure no one can become trapped or injured by the moving steering wheel when the easy-entry/exit feature is activated.
To stop steering wheel movement, do one of the following: 앫 Move steering wheel adjustment stalk*
(컄 page 49).
Manually adjust the angle of the head restraint. 왘 While seated, reach behind you with
both hands and find lower edge of the head restraint.
왘 Adjust the head restraint to the desired
position by pushing or pulling on the lower edge of the head restraint cush- ion.
For more information, see “Seats” (컄 page 127).
앫 Press one of the stored position buttons* or memory button M* (컄 page 133).
Do not leave children unattended in the ve- hicle, or with access to an unlocked vehicle. Children could open the driver’s door and unintentionally activate the easy-entry/exit feature, which could result in an accident and/or serious personal injury.
With the easy-entry/exit feature activated, the steering wheel will return to its last set position when you 앫 close the driver’s door with the ignition
switched on or
앫 insert the SmartKey into the starter
switch or press the KEYLESS-GO* start/stop button (컄 page 41) once with the driver’s door closed
i The last set steering wheel position is stored when 앫 the ignition is switched off (컄 page 39) 앫 the position is stored in memory
(컄 page 133)
With the easy-entry/exit feature activated, the steering wheel tilts upwards when you 앫 remove the SmartKey from the starter
switch or
앫 open the driver’s door with the
SmartKey in starter switch position 0 or 1 or the KEYLESS-GO* start/stop button in position 1 (컄 page 41)
i If the current position for the steering wheel is in the uppermost tilt position, the steering wheel will no longer be able to move upward when the easy-entry/exit feature is activated. The adjustment procedure is briefly interrupted, when the engine is started.
Getting started Adjusting
Warning!
Let the system complete the adjustment procedure before setting the vehicle in mo- tion. All steering wheel adjustment must be completed before setting the vehicle in mo- tion. Driving off with the steering wheel still adjusting could cause the driver to lose con- trol of the vehicle.
Steering wheel adjustment, manual
Warning!
Only adjust the steering wheel with the vehi- cle at a standstill and make sure the steer- ing wheel is securely locked in place before driving off.
컄컄
47
Getting started Adjusting
컄컄
Driving without the steering wheel adjust- ment locked may cause an unexpected steering wheel movement which could cause the driver to lose control of the vehi- cle. Make sure the steering wheel is secure- ly locked by trying to move it up and down, and in and out before driving off.
Make sure that 앫 you can reach the steering wheel with
your arms slightly bent at the elbows
앫 you can move your legs freely 앫 all displays (including malfunction and
indicator lamps) on the instrument cluster are clearly visible
The steering wheel adjustment release handle is located on the lower left of the steering column.
48
Steering wheel adjustment, electrical*
Warning!
Do not adjust the steering wheel while driv- ing. Adjusting the steering wheel while driv- ing could cause the driver to lose control of the vehicle.
When leaving the vehicle, always remove the SmartKey or SmartKey with KEYLESS-GO* from the starter switch, take it with you, and lock the vehicle.
Even with the SmartKey or SmartKey with KEYLESS-GO* removed from the starter switch or the SmartKey with KEYLESS-GO* removed from the vehicle, the steering wheel adjustment feature can be operated.
Therefore, do not leave children unattended in the vehicle, or with access to an unlocked vehicle. A child’s unsupervised access to a vehicle could result in an accident and/or serious personal injury.
1 Release handle 왘 To unlock the steering column, pull
release handle 1 out to its stop limit.
왘 Move steering wheel to the desired
position.
왘 Push release handle 1 back to its
original position to relock the steering column. The steering column is locked into po- sition again.
왘 Make sure the steering column is
securely locked by trying to move the steering wheel up and down as well as in and out before driving off.
i The memory function* (컄 page 133) lets you store the settings for the steering wheel together with the settings for seat positions and the exterior rear view mirrors.
Make sure that 앫 you can reach the steering wheel with
your arms slightly bent at the elbows
앫 you can move your legs freely 앫 all displays (including malfunction and
indicator lamps) on the instrument cluster are clearly visible
The steering wheel adjustment stalk is located on the lower left of the steering column.
1 Adjusting steering wheel, in or out 2 Adjusting steering wheel, up or down
Adjusting steering column in or out 왘 Move stalk forward or back in direction
of arrow 1.
Adjusting steering column up or down 왘 Move stalk up or down in direction of
arrow 2.
Getting started Adjusting
Mirrors
Adjust the interior and exterior rear view mirrors before driving so that you have a good view of the road and traffic condi- tions.
Interior rear view mirror 왘 Manually adjust the interior rear view
mirror.
For more information, see “Rear view mir- rors” (컄 page 199).
Exterior rear view mirrors
Warning!
Exercise care when using the passenger-side exterior rear view mirror. The mirror surface is convex (outwardly curved surface for a wider field of view). Ob- jects in mirror are closer than they appear. Check your interior rear view mirror or glance over your shoulder before changing lanes.
49
Getting started Adjusting
The buttons are located on the driver’s door.
1 Driver’s side exterior rear view mirror
button
2 Adjustment button 3 Passenger-side exterior rear view mir-
ror button
왘 Switch on the ignition (컄 page 40). 왘 Press button 1 for the driver’s side ex- terior rear view mirror or button 3 for the passenger-side exterior rear view mirror. The indicator lamp on the respective button comes on for approximately 15 seconds.
50
i If you do not make adjustments to the selected exterior rear view mirror within 15 seconds, the indicator lamp goes out. You will then have to select the desired exterior rear view mirror again before any adjustments can be made. Adjustments can only be made with the indicator lamp for the respective exterior rear view mirror button illuminated. 왘 Push adjustment button 2 up, down, left, or right according to the desired setting.
! If an exterior rear view mirror was forcibly pushed forward (hit from the rear) or forcibly pushed rearward (hit from the front), reposition it by applying firm pressure until it snaps into place. The mirror housing is then properly posi- tioned and you can adjust the mirror in the usual manner.
! Vehicle with power folding exterior rear view mirrors*: If an exterior rear view mirror housing is forcibly pushed forward (hit from the rear) or forcibly pushed rearward (hit from the front), press fold button 1 (컄 page 201) to fold mirrors in, then press fold button 1 (컄 page 201) again to fold mirrors out. Do not force mirrors by hand as this may damage the adjustment mechanism. The mirror housing is then properly positioned and you can adjust the mirror in the usual man- ner. i The memory function* (컄 page 133) lets you store the settings for the exterior rear view mirrors together with the setting for the steering wheel and the seat positions.
i At low ambient temperatures, the exterior rear view mirrors will be heated automatically.
For more information, see “Rear view mir- rors” (컄 page 199).
Getting started Driving
Failure to wear and properly fasten and po- sition your seat belt greatly increases your risk of injuries and their likely severity in an accident. You and your passengers should always wear seat belts.
If you are ever in an accident, your injuries can be considerably more severe without your seat belt properly buckled. Without your seat belt buckled, you are much more likely to hit the interior of the vehicle or be ejected from it. You can be seriously injured or killed.
In the same crash, the possibility of injury or death is lessened if you are wearing your seat belt. The air bags can only provide the protection they were designed to afford if the occupants are using their seat belts (컄 page 84).
Warning!
According to accident statistics, children are safer when properly restrained in the rear seating positions than in the front seat- ing position. Thus, we strongly recommend that children be placed in the rear seats. Regardless of seating position, children 12 years old and under must be seated and properly secured in an appropriately sized infant restraint, toddler restraint, or booster seat recommended for the size and weight of the child. For additional information, see “Children in the vehicle” (컄 page 89). A child’s risk of serious or fatal injuries is significantly increased if the child restraints are not properly secured in the vehicle and/or the child is not properly secured in the child restraint.
왔 Driving
Warning!
Make sure that absolutely no objects are ob- structing the pedal’s range of movement. Keep the driver’s footwell clear of all obsta- cles. If there are any floormats or carpets in the footwell, make sure that the pedals still have sufficient clearance.
During sudden driving or braking maneu- vers, the objects could get caught between the pedals. You could then no longer brake or accelerate. This could lead to accidents and injury.
Fastening the seat belts
Warning!
Always fasten your seat belt before driving off. Always make sure your passengers are properly restrained.
51
Getting started Driving
Warning!
Warning!
Never ride in a moving vehicle with the seat backrest in an excessively reclined position as this can be dangerous. You could slide under the seat belt in a collision. If you slide under it, the belt would apply force at the ab- domen or neck. That could cause serious or even fatal injuries. The seat backrest and seat belt provide the best restraint when the wearer is in a position that is as upright as possible and the belt is properly positioned on the body.
Never let more people ride in the vehicle than there are seat belts available. Make sure everyone riding in the vehicle is cor- rectly restrained with a separate seat belt. Never use a seat belt for more than one per- son at a time.
Warning!
Read and observe the additional warning no- tices printed in the “Safety and Security” section (컄 page 76) and (컄 page 84).
1 Seat belt outlet 2 Latch plate 3 Buckle 4 Release button
52
Getting started Driving
왘 With a smooth motion, pull the belt out
왘 Press release button 1 and move the
앫 Never use a seat belt for more than one
of seat belt outlet 1.
왘 Place the shoulder portion of the belt across the top of your shoulder and the lap portion across your hips.
왘 Push latch plate 2 into buckle 3
(컄 page 52) until it clicks.
왘 If necessary, tighten the lap portion to
a snug fit by pulling shoulder portion up.
Seat belt height adjustment
person at a time.
앫 Do not fasten a seat belt around a
person and another object at the same time. When using a seat belt to secure infant or toddler restraints or children in booster seats, always follow the child seat manufacturer’s instructions.
앫 Check your seat belt periodically
during travel to make sure that it is properly positioned.
앫 Make sure the seat belt is always fitted snugly. Take special care of this when wearing loose clothing.
seat belt height adjuster upward or downward.
Proper use of seat belts 앫 Do not twist the belt when fastening. 앫 Adjust seat belt so that the shoulder
portion is located as close as possible to the middle of the shoulder (it should not touch the neck). Never pass the shoulder portion of the belt under your arm. For this purpose, you can adjust the height of the belt outlet (컄 page 53).
앫 Position the lap belt as low as possible
on your hips (over hip joint) and not across the abdomen.
앫 Place the seat backrest in a position
that is as upright as possible.
1 Release button
53
Getting started Driving
Warning!
Do not pass belts over sharp edges. They could tear.
Do not allow the belt to get caught in the door or in the seat adjustment mechanism. This could damage the belt.
Never attempt to make modifications to seat belts. This could impair the effective- ness of the belts.
Do not bleach or dye seat belts as this may severely weaken them. In a crash, they may not be able to provide adequate protection.
Damaged seat belts or belts that were highly stressed in an accident must be replaced. Contact an authorized Mercedes-Benz Light Truck Center.
54
Starting the engine
Automatic transmission
Warning!
Inhalation of exhaust gas is hazardous to your health. All exhaust gas contains carbon monoxide (CO), and inhaling it can cause un- consciousness and possible death.
Do not run the engine in confined areas (such as a garage) which are not properly ventilated. If you think that exhaust gas fumes are entering the vehicle while driving, have the cause determined and corrected immediately. If you must drive under these conditions, drive only with at least one win- dow fully open.
Gearshift pattern for automatic transmission P Park position R Reverse gear N Neutral D Drive position For more information on how to operate the gear selector lever, see “Automatic transmission” (컄 page 183).
Getting started Driving
Starting with the SmartKey For information on turning off the engine with the SmartKey, see “Turning off the en- gine” (컄 page 66).
Gasoline engine 왘 Make sure the automatic transmission
is set to P. The transmission position indicator in the multifunction display should be on P (컄 page 147).
왘 Do not depress the accelerator. 왘 Turn the SmartKey in the starter switch to position 3 (컄 page 39) and hold until the engine starts.
i You can also use the “touch-start” function. Turn the SmartKey to position 3 and release it again immediately. The engine then starts auto- matically.
Diesel engine 왘 Make sure the automatic transmission
is set to P. The transmission position indicator in the multifunction display should be on P (컄 page 147).
왘 Do not depress the accelerator. 왘 Turn the SmartKey in the starter switch
to position 2 (컄 page 40). Preglow indicator lamp q in the instrument cluster comes on. 왘 As soon as preglow indicator
lamp q goes out, turn the SmartKey in the starter switch to position 3 (컄 page 40) and release it. The engine starts automatically.
i If the engine is at operating temperature, preglow indicator lamp q may not stay on and you can start the engine without preglowing.
Starting with KEYLESS-GO*
Warning!
As long as the SmartKey with KEYLESS-GO is in your vehicle, the vehicle can be started. Therefore, never leave children unattended in the vehicle, as they could otherwise acci- dentally start the engine.
When leaving the vehicle, always take the SmartKey with KEYLESS-GO with you and lock the vehicle. Do not leave children unat- tended in the vehicle, or with access to an unlocked vehicle.
You can start your vehicle without the SmartKey in the starter switch using the KEYLESS-GO start/stop button in the starter switch. The SmartKey with KEYLESS-GO must be located in the vehicle.
55
Getting started Driving
KEYLESS-GO start/stop button 1 USA only 2 Canada only 왘 Make sure KEYLESS-GO start/stop button 1 is inserted in the starter switch (컄 page 41).
i If you wish to start the engine using the SmartKey instead of the KEYLESS-GO feature, remove the KEYLESS-GO start/stop button from the starter switch (컄 page 41). For information on turning off the engine with KEYLESS-GO, see “Turning off with KEYLESS-GO*” (컄 page 67).
56
Gasoline engine 왘 Make sure the automatic transmission
Diesel engine 왘 Make sure the automatic transmission
is set to P. The transmission position indicator in the multifunction display should be on P (컄 page 147).
is set to P. The transmission position indicator in the multifunction display should be on P.
왘 Depress the brake pedal during the
왘 Depress the brake pedal during the
starting procedure.
starting procedure.
왘 Do not depress the accelerator. 왘 Press KEYLESS-GO start/stop
왘 Do not depress the accelerator. 왘 Press KEYLESS-GO start/stop
button 1 once. The engine starts if the SmartKey with KEYLESS-GO is in the vehicle.
button 1 once. The engine preglows and starts if the SmartKey with KEYLESS-GO is in the vehicle.
i If the engine is at operating temperature, the time the engine needs to preglow is reduced.
Getting started Driving
왘 Get a jump start (컄 page 497). If the engine does not start after several starting attempts, there could be a mal- function in the engine electronics or in the fuel supply system. 왘 Contact an authorized Mercedes-Benz
Light Truck Center or call Roadside Assistance.
Parking brake
Warning!
When leaving the vehicle, always remove the SmartKey or SmartKey with KEYLESS-GO* from the starter switch, take it with you and lock the vehicle. Do not leave children unat- tended in the vehicle, or with access to an unlocked vehicle. Children could release the parking brake, which could result in an acci- dent and/or serious personal injury.
왘 Release the parking brake by pulling on
release handle 1. The warning lamp ; (USA only) or 3 (Canada only) in the instrument cluster goes out.
1 Release handle
Starting difficulties If the engine does not start as described, carry out the following steps: 왘 If you are starting the engine with the
SmartKey, turn SmartKey in starter switch to position 0 and repeat starting procedure.
왘 If you are starting the engine with
KEYLESS-GO*: Close any doors that may be open to allow for better detection of the SmartKey with KEYLESS-GO*. Or:
왘 Remove KEYLESS-GO* start/stop
button from starter switch (컄 page 41). 왘 Start the engine with the SmartKey as radio signals from another source may be interfering with the SmartKey with KEYLESS-GO*.
왘 Repeat the starting procedure
(컄 page 54). Remember that extended starting attempts can drain the battery.
57
Getting started Driving
Driving off
왘 Depress the brake pedal.
The gear selector lever can now be used.
왘 Shift automatic transmission to D or R
(컄 page 185).
i Wait for the gear selection process to com- plete before setting the vehicle in motion.
i Shifting from gear position P to position R, N, or D is only possible with the brake pedal depressed. Without the brake pedal depressed, the gear selector lever can be moved, but the parking pawl remains engaged, not allowing shifting to occur. 왘 Release the brake pedal. 왘 Carefully depress the accelerator
pedal.
58
! If you hear a warning signal and the message Release Parking Brake appears in the multifunction display when driving off, you have forgotten to release the parking brake. Release the parking brake (컄 page 57).
i Once the vehicle is in motion, the automatic central locking system engages and the locking knobs drop down. The automatic door lock feature can be deactivated (컄 page 175). You can open a locked door from the inside. Open door only when conditions are safe to do so.
After a cold start, the automatic transmis- sion shifts at a higher engine revolution. This allows the catalytic converter (gaso- line engine) or the oxidation catalyst (die- sel engine) to reach its operating temperature earlier.
Warning!
On slippery road surfaces, never downshift in order to obtain braking action. This could result in drive wheel slip and reduced vehi- cle control. Your vehicle’s ABS will not pre- vent this type of loss of control.
Warning!
It is dangerous to shift the automatic trans- mission out of P or N if the engine speed is higher than idle speed. If your foot is not firmly on the brake pedal, the vehicle could accelerate quickly forward or in reverse. You could lose control of the vehicle and hit someone or something. Only shift into gear when the engine is idling normally and when your right foot is firmly on the brake pedal.
! Shift the automatic transmission to position P or R only when the vehicle is stopped in order to avoid damaging the transmission.
! Do not run cold engine at high engine speeds. Running a cold engine at high engine speeds may shorten the service life of the engine. ML 63 AMG: At engine temperatures below 68°F (20°C), the engine’s maximum speed is restricted in order to protect it from damage. Avoid driving your vehi- cle at full speed when the engine is cold to pre- vent premature engine wear and/or diminished comfort.
! Simultaneously depressing the accelerator pedal and applying the brakes reduces engine performance and causes premature brake and drivetrain wear.
For more information, see “Driving instruc- tions” (컄 page 311). For information on off-road driving, see “Off-road driving” (컄 page 319).
Getting started Driving
Switching on headlamps
Low beam headlamps The exterior lamp switch is located on the dashboard to the left of the steering wheel.
High beam The combination switch is located on the left of the steering column.
Exterior lamp switch 1 Off 2 Low beam headlamps on 왘 Switch on the ignition (컄 page 39). 왘 Turn the exterior lamp switch to
position B. The low beam headlamps come on.
Combination switch 1 High beam 2 High beam flasher 왘 Push the combination switch in
direction of arrow 1. The high beam headlamp indicator lamp A in the instrument cluster comes on (컄 page 26).
For more information on headlamps, see “Lighting” (컄 page 135).
59
Getting started Driving
Turn signals
The combination switch is located on the left of the steering column.
The combination switch resets automati- cally after major steering wheel move- ment.
i To signal minor directional changes such as changing lanes, press combination switch only to point of resistance and release. The corre- sponding turn signal will flash three times.
Windshield wipers
The combination switch is located on the left of the steering column.
Combination switch 1 Turn signals, right 2 Turn signals, left 왘 Press the combination switch in
direction of arrow 1 or 2. The corresponding turn signal indicator lamp L or K in the instrument cluster flashes (컄 page 26).
60
Combination switch 1 Single wipe
Wiping with windshield washer fluid
2 Switching on windshield wipers
왘 Switch on the ignition (컄 page 40).
! Do not operate the windshield wipers when the windshield is dry. Dust that accumulates on a windshield might scratch the glass and/or damage the wiper blades when wiping occurs on a dry windshield. If it is necessary to operate the windshield wipers in dry weather conditions, always operate the windshield wipers with windshield washer fluid (컄 page 62).
! If anything blocks the windshield wipers (leaves, snow, etc.), switch them off immediate- ly. 앫 For safety reasons, stop the vehicle in a safe
location and 앫 remove SmartKey from starter switch or 앫 turn off the engine by pressing the
KEYLESS-GO* start/stop button and open the driver’s door (with the driver’s door open, starter switch is in position 0, same as with SmartKey removed from starter switch)
before attempting to remove any blockage.
앫 Remove blockage. 앫 Turn the windshield wipers on again.
If windshield wipers fail to function at all in the combination switch position U or V, 앫 set the combination switch to the next
higher wiper speed
앫 have the windshield wipers checked at the
nearest authorized Mercedes-Benz Light Truck Center
Switching on windshield wipers 왘 Turn the combination switch to the desired position depending on the intensity of the rain. M Windshield wipers off U Slow intermittent wiping
Rain sensor operation with low sensitivity.
V Fast intermittent wiping
Rain sensor operation with high sensitivity.
u Slow continuous wiping t Fast continuous wiping
Intermittent wiping Only switch on intermittent wiping under wet weather conditions or in the presence of precipitation. When you select intermittent wiping, the rain sensor is activated. The rain sensor automatically sets a suitable wiping interval depending on the wetness of the sensor surface.
! Do not leave windshield wipers on an inter- mittent setting when the vehicle is taken to an automatic car wash or during windshield clean- ing. Wipers will operate in the presence of water sprayed on the windshield, and windshield wipers may be damaged as a result.
! If you have set intermittent wiping, dirt on the surface of the rain sensor or optical effects may cause the windshield wipers to wipe in an undesired fashion. This could then damage the windshield wiper blades or scratch the windows. You should therefore switch off the windshield wipers when weather conditions are dry. 왘 Turn the combination switch to
position U or V.
Getting started Driving
After the initial wipe, pauses between wipes are automatically controlled by the rain sensor.
i Intermittent wiping is interrupted when the vehicle is at a standstill and a front door is opened. This protects persons getting into or out of the vehicle from being sprayed. Intermittent wiping will be continued when all doors are closed and 앫 the automatic transmission is set to
position D or R or
앫 the wiper setting is changed using the
combination switch
Single wipe 왘 Press the combination switch briefly in direction of arrow 1 to the resistance point. The windshield wipers wipe one time without washer fluid.
61
Getting started Driving
Wiping with windshield washer fluid 왘 Press the combination switch in direc-
tion of arrow 1 past the resistance point. The windshield wipers operate with washer fluid.
i To prevent smears on the windshield or noisy/chattering wiper blades, wipe with windshield washer fluid every now and then even when it is raining.
For information on cleaning the headlamps with washer fluid, see “Headlamp cleaning system*” (컄 page 199). For information on filling up the washer reservoir, see “Windshield/rear window washer system and headlamp cleaning system*” (컄 page 346).
62
Rear window wiper/washer
The combination switch is located on the left of the steering column.
6 Rear window wiper indicator 왘 Switch on the ignition (컄 page 40).
i The rear window wiper engages automatical- ly when the automatic transmission is shifted to position R with the windshield wipers switched on.
Activating intermittent wipe 왘 Turn rear window wiper switch 1 to
position 3 (컄 page 62). In the lower multifunction display you will see indicator 6, indicating that the rear window wiper is activated.
Combination switch 1 Rear window wiper switch 2 Wiping rear window with washer fluid 3 Intermittent wiping 4 Rear window wiper off 5 Wiping rear window with washer fluid
Deactivating intermittent wipe 왘 Turn rear window wiper switch 1 to
position 4 (컄 page 62). Indicator 6 (컄 page 62) for the rear window wiper is cleared from the lower multifunction display, indicating that the rear window wiper is deactivated.
Wiping with windshield washer fluid 왘 Turn and hold rear window wiper
switch 1 in position 2 or 5 (컄 page 62) until the rear window is clean. The rear window wiper operates with washer fluid.
For information on filling up the washer reservoir, see “Windshield/rear window washer system and headlamp cleaning system*” (컄 page 346).
Problems while driving
The engine runs erratically and misfires 앫 An ignition cable may be damaged
(gasoline engine only).
앫 The engine electronics may not be
operating properly.
앫 Unburned gasoline may have entered the catalytic converter and damaged it (gasoline engine only).
왘 Give very little gas. 왘 Have the problem repaired by an
authorized Mercedes-Benz Light Truck Center as soon as possible.
Getting started Driving
The coolant temperature is above 248°F (120°C) The coolant is too hot and is no longer cooling the engine. 왘 Stop the vehicle in a safe location as soon as possible and turn off the en- gine. Allow engine and coolant to cool off.
왘 Check the coolant level and add cool-
ant if necessary (컄 page 345).
63
Getting started Driving
In case of accident If the vehicle is leaking fuel: 왘 Do not start the engine under any
circumstances.
왘 Notify local fire and/or police authori-
ties.
If the extent of the damage cannot be de- termined: 왘 Contact an authorized Mercedes-Benz
Light Truck Center or call Roadside Assistance.
If no damage can be determined on the 앫 major assemblies 앫 fuel system 앫 engine mount: 왘 Start the engine in the usual manner.
64
왔 Parking and locking You have now completed your first drive. You have properly stopped and parked your vehicle. End your drive as follows.
Warning!
With the engine not running, there is no power assistance for the brake and the steering system. In this case, it is important to keep in mind that a considerably higher degree of effort is necessary to brake and steer the vehicle.
Warning!
Do not park this vehicle in areas where com- bustible materials such as grass, hay or leaves can come into contact with the hot exhaust system, as these materials could be ignited and cause a vehicle fire.
To reduce the risk of personal injury, or dam- age to the vehicle drivetrain, as a result of vehicle movement, before turning off the en- gine and leaving the vehicle always: 앫 Keep right foot on brake pedal. 앫 Firmly depress parking brake pedal. 앫 Shift the automatic transmission to
position P.
앫 Slowly release brake pedal. 앫 When parked on an incline, turn front
wheel towards the road curb.
앫 Turn the SmartKey in the starter switch to position 0 and remove the SmartKey from the starter switch, or press the start/stop button (vehicles with KEYLESS-GO*).
앫 Take the SmartKey or the SmartKey with
KEYLESS-GO* and lock vehicle when leaving.
Getting started Parking and locking
Parking brake
Warning!
Engaging the parking brake while the vehicle is in motion can cause the rear wheels to lock up. You could lose control of the vehicle and cause an accident. In addition, the vehi- cle’s brake lights do not light up when the parking brake is engaged.
1 Parking brake pedal
65
Getting started Parking and locking
왘 Step firmly on parking brake pedal 1.
When the engine is running, the warning lamp ; (USA only) or 3 (Canada only) in the instrument cluster comes on.
Warning!
When leaving the vehicle, always remove the SmartKey or SmartKey with KEYLESS-GO* from the starter switch, take it with you and lock the vehicle. Do not leave children unat- tended in the vehicle, or with access to an unlocked vehicle. Children could release the parking brake and/or shift the automatic transmission out of position P, either of which could result in an accident and/or serious personal injury.
66
Warning!
Turning off the engine
Getting out of your vehicle with the automatic transmission not fully engaged in position P is dangerous. Also, when parked on an incline, position P alone may not prevent your vehicle from moving, possibly hitting people or objects.
Always set the parking brake in addition to shifting to position P (컄 page 185). When parked on an incline, also turn front wheel towards the road curb.
Switching off headlamps
왘 Turn the exterior lamp switch to M
(컄 page 59).
For more information, see “Lighting” (컄 page 135).
i If the engine cannot be turned off as described, see “Emergency engine shut-down” (컄 page 506). 왘 Shift the automatic transmission to
position P (컄 page 185).
Warning!
Do not turn off the engine before the vehicle has come to a complete stop. With the en- gine not running, there is no power assis- tance for the brake and steering systems. In this case, it is important to keep in mind that a considerably higher degree of effort is nec- essary to brake and steer the vehicle.
왘 Apply the parking brake (컄 page 65).
i Always set the parking brake in addition to shifting the automatic transmission to position P (컄 page 185). When parked on an incline, also turn front wheel towards the road curb.
! Observe instructions when taking the vehicle through an automatic conveyor type car wash (컄 page 392).
Turning off with the SmartKey 왘 Turn the SmartKey in the starter switch
to position 0 (컄 page 39).
왘 Remove the SmartKey from the starter
switch. The immobilizer is activated.
! If you turn off the engine using the SmartKey and 앫 remove the SmartKey from the starter
switch or
앫 open a front door the automatic transmission will shift to park position P automatically. Keep in mind that turning off the engine with the SmartKey alone only will automatically shift the automatic transmission to neutral position N.
Turning off with KEYLESS-GO* 왘 Press the KEYLESS-GO start/stop button (컄 page 41) to turn off the engine. With the driver’s door closed, the start- er switch is now in position 1. With the driver’s door opened, the starter switch is set to position 0, same as SmartKey removed from starter switch (컄 page 39).
i In an emergency you can turn off the engine while driving by pressing and holding the KEYLESS-GO start/stop button for approximately 3 seconds.
! If you turn off the engine using the KEYLESS-GO start/stop button and open a front door, the automatic transmission will shift to park position P automatically. Keep in mind that turning off the engine using the KEYLESS-GO start/stop button alone only will automatically shift the automatic transmis- sion to neutral position N.
Getting started Parking and locking
If you have started the engine with the KEYLESS-GO start/stop button and can- not turn it off as described above: 왘 Remove the KEYLESS-GO start/stop
button from the starter switch.
왘 Insert the SmartKey with KEYLESS-GO
into the starter switch. The engine turns off. The starter switch is in position 0 (컄 page 39).
67
Getting started Parking and locking
Releasing seat belts
Locking
왘 Press the seat belt release button
(컄 page 52). Allow the retractor to completely re- wind the seat belt by guiding the latch plate.
! Make sure the seat belt retracts fully so that the seat belt and/or latch plate cannot get caught or pinched in the door or in the seat mechanism. This can damage the seat belt and impair the effectiveness of the seat belt, and/or cause damage to the door and/or door trim panel. Such damage is not covered by the Mercedes-Benz Limited Warranty. Damaged seat belts must be replaced. Contact an authorized Mercedes-Benz Light Truck Center.
Warning!
To prevent possible personal injury, always keep hands and fingers away from the door openings when closing the doors. Be espe- cially careful when small children are around.
Before closing doors, make sure there is no possibility of someone getting caught in a door during closing.
Warning!
When leaving the vehicle, always remove the SmartKey from the starter switch, take the SmartKey with KEYLESS-GO* with you, and lock your vehicle. Do not leave children un- attended in the vehicle, or with access to an unlocked vehicle. A child’s unsupervised access to a vehicle could result in an accident and/or serious personal injury.
68
i The exterior lamps switch off automatically when you remove the SmartKey from the starter switch or open the driver’s door. When the parking lamps or the rear fog lamp are switched on and you remove the SmartKey from the starter switch and open the driver’s door, an acoustic signal sounds. In addition the message Switch Off Lights appears in the multifunction display. Switch off the parking lamps or the rear fog lamp.
! Failure to switch off the parking lamps or the rear fog lamp when leaving the vehicle may result in a discharged battery. 왘 Exit the vehicle and close all doors and
the tailgate.
Locking with the SmartKey 왘 Press lock button ‹ on the
SmartKey (컄 page 38). With the tailgate and all doors closed, the turn signal lamps flash three times. The locking knobs on the doors move down. The anti-theft alarm system is armed.
For more information, see “Locking and unlocking” (컄 page 110).
Getting started Parking and locking
Locking with KEYLESS-GO*
1 Lock button on the outside door handle 왘 Press lock button 1 on an outside
door handle. With the tailgate and all doors closed, the turn signal lamps flash three times. The locking knobs on the doors move down. The anti-theft alarm system is armed.
For more information, see “Locking and unlocking” (컄 page 110).
69
70
Safety and Security
Occupant safety Panic alarm Driving safety systems Anti-theft systems
71
Safety and Security Occupant safety
In this section you will learn the most im- portant facts about the restraint systems of the vehicle. The restraint systems are 앫 Seat belts (컄 page 84) 앫 Child restraints (컄 page 94) 앫 Lower Anchors and Tethers for CHildren (LATCH) (컄 page 93)
Additional protection potential provide 앫 Supplemental Restraint System (SRS)
with 앫 Air bags (컄 page 74) 앫 Air bag control unit (with crash
sensors)
앫 Emergency Tensioning Device (ETD) for seat belts (컄 page 87)
앫 Seat belt force limiter (컄 page 87)
앫 Active head restraints (컄 page 88)
72
Air bag system components with 앫 Front passenger front air bag off
indicator lamp (컄 page 83)
앫 Front passenger seat with Occupant
Classification System (OCS) (컄 page 79)
Although independent systems, their protective functions work in conjunction with each other.
i For information on infants and children traveling with you in the vehicle and restraint systems for infants and children, see “Children in the vehicle” (컄 page 89).
The SRS system conducts a self-test when the ignition is switched on and in regular intervals while the engine is running. This facilitates early detection of malfunctions. The 1 indicator lamp in the instrument cluster (컄 page 28) comes on when the ignition is switched on and goes out no later than a few seconds after the engine was started. The SRS components are in operational readiness if the 1 indicator lamp is not lit when the engine is running. A malfunction in the system has been detected if the 1 indicator lamp: 앫 fails to go out not later than approxi-
mately 4 seconds after the engine was started
앫 does not come on at all 앫 comes on after the engine was started
or while driving
Warning!
Warning!
Modifications to or work improperly con- ducted on restraint systems (such as seat belts and anchors, emergency tensioning devices, seat belt force limiters or air bags) or their wiring, as well as tampering with in- terconnected electronic systems, can lead to the restraint systems no longer function- ing as intended.
Air bags or emergency tensioning devices, for example, could deploy inadvertently or fail to deploy in accidents although the de- celeration threshold for air bag deployment is exceeded. Therefore, never modify the re- straint systems. Do not tamper with elec- tronic components or their software.
In the event that the 1 indicator lamp comes on during driving or does not come on at all, the SRS self-check has detected a malfunction. For your safety, we strongly recommend that you visit an authorized Mercedes-Benz Light Truck Center immedi- ately to have the system checked; otherwise the SRS may not deploy when needed in an accident, which could result in serious or fa- tal injury, or it might deploy unexpectedly and unnecessarily which could also result in injury.
In addition, improper work on the SRS creates a risk of rendering the SRS inopera- tive or causing unintended air bag deploy- ment. Work on the SRS must therefore only be performed by qualified technicians. Contact an authorized Mercedes-Benz Light Truck Center.
Safety and Security Occupant safety
If it is necessary to modify an air bag system to accommodate a person with disabilities, contact a local authorized Mercedes-Benz Light Truck Center or call our Customer Assistance Center at 1-800-FOR-MERCedes (1-800-367-6372) for details.
73
Safety and Security Occupant safety
Air bags
Warning!
Air bags are designed to reduce the poten- tial of injury and fatality in certain frontal impacts (front air bags), side impacts (side impact air bags and window curtain air bags) or rollovers (window curtain air bags). However, no system available today can completely eliminate injuries and fatalities.
The deployment of the air bags temporarily releases a small amount of dust from the air bags. This dust, however, is neither injurious to your health, nor does it indicate a fire in the vehicle. The dust might cause some tem- porary breathing difficulty for people with asthma or other breathing trouble. To avoid this, you may wish to get out of the vehicle as soon as it is safe to do so. If you have any breathing difficulty but cannot get out of the vehicle after the air bag inflates, then get fresh air by opening a window or door.
74
Warning!
To reduce the risk of injury when the front air bags inflate, it is very important for the driver and front passenger to always be in a properly seated position and to wear their respective seat belt.
For maximum protection in the event of a collision always be in normal seated position with your back against the seat backrest. Fasten your seat belt and make sure it is properly positioned on your body (컄 page 51). Since the air bag inflates with considerable speed and force, a proper seating and hands on steering wheel position will help to keep you at a safe distance from the air bag. Occupants who are unbelted, out of position or too close to the air bag can be seriously injured or killed by an air bag as it inflates with great force in the blink of an eye: 앫 Sit properly belted in a position that is as
upright as possible with your back against the seat backrest.
앫 Adjust the driver’s seat as far as possi- ble rearward, still permitting proper op- eration of vehicle controls. The distance from the center of the driver’s breast- bone to the center of the air bag cover on the steering wheel must be at least 10 inches (25 cm) or more. You should be able to accomplish this by a combina- tion of adjustments to the seat and steering wheel. If you have any problems, please see an authorized Mercedes-Benz Light Truck Center.
앫 Do not lean your head or chest close to
the steering wheel or dashboard.
앫 Keep hands on the outside of steering wheel rim. Placing hands and arms in- side the rim can increase the risk and potential severity of hand/arm injury when driver’s front air bag inflates.
앫 Adjust the front passenger seat as far as possible rearward from the dashboard when the seat is occupied.
앫 Always sit as upright as possible, prop- erly use the seat belts and use an appro- priately sized infant restraint, toddler restraint, or booster seat recommended for the size and weight of the child. Failure to follow these instructions can result in severe injuries to you or other occupants.
If you sell your vehicle, it is important that you make the buyer aware of this safety information. Be sure to give the buyer this Operator’s Manual.
Warning!
Accident research shows that the safest place for children in an automobile is in the rear seat.
It should be noted that with respect to both, front side impact air bags or the rear side impact air bags*, there is a possibility for a side impact air bag related injury if occu- pants, especially children, are not properly seated or restrained when next to a side impact air bag which needs to deploy rapidly in a side impact in order to do its job.
To help avoid the possibility of injury, please follow these guidelines:
(1) Always sit as upright as possible,
properly use the seat belts, and for all children 12 years old and under, use an appropriately sized infant restraint, toddler restraint, or booster seat recom- mended for the size and weight of the child.
(2) Always wear seat belts properly.
Safety and Security Occupant safety
i Air bags are designed to deploy only in certain frontal impacts (front air bags), and in side impacts (side impact and window curtain air bags) which exceed preset thresholds, and in certain rollovers (window curtain air bags). Only during these events will they provide their sup- plemental protection. The driver and passengers should always wear their seat belts. Otherwise it is not possible for air bags to provide their supplemental protec- tion. In case of other types of impacts and impacts be- low air bag deployment thresholds, air bags will not deploy. The driver and passenger will then be protected to the extent possible by a properly fastened seat belt. A properly fastened seat belt is also needed to provide the best possible pro- tection in a rollover. We caution you not to rely on the presence of the air bags in order to avoid wearing your seat belt. It is important to your safety and that of your pas- sengers that you replace deployed air bags and repair any malfunctioning air bags to make sure the vehicle will continue to provide supplemental crash protection for occupants.
75
Safety and Security Occupant safety
Safety guidelines for the seat belt, emergency tensioning device and air bag
Warning!
앫 Damaged seat belts or belts that were highly stressed in an accident must be replaced and their anchoring points must also be checked. Only use belts in- stalled or supplied by an authorized Mercedes-Benz Light Truck Center.
앫 Air bags and pyrotechnic Emergency
Tensioning Devices (ETDs) are designed to function on a one-time-only basis. An air bag or ETD that is deployed must be replaced.
앫 Do not pass belts over sharp edges.
They could tear.
앫 Do not make any modification that could
change the effectiveness of the belts. 앫 Do not bleach or dye seat belts as this may severely weaken them. In a crash they may not be able to provide ade- quate protection.
76
앫 No modifications of any kind may be made to any components or wiring of the SRS. This includes changing or removing any component or part of the SRS, the installation of additional trim material, badges, etc. over the steering wheel hub, front passenger front air bag cover, outboard sides of the seat back- rests, door trim panels, or door frame trims, and installation of additional electrical/electronic equipment on or near SRS components and wiring. Keep area between air bags and occupants free from objects (e.g. packages, purs- es, umbrellas, etc.).
앫 Do not hang items such as coat hangers from the coat hooks or handles over the door. These items may turn into projec- tiles and cause head and other injuries when the window curtain air bag is deployed.
앫 Air bag system components will be hot
after an air bag has inflated. Do not touch.
앫 Never place your feet on the instrument panel, dashboard, or on the seat. Always keep both feet on the floor in front of the seat.
앫 In addition, improper repair work on the SRS creates a risk of rendering the SRS inoperative or causing unintended air bag deployment. Work on the SRS must therefore only be performed by qualified technicians. Contact an authorized Mercedes-Benz Light Truck Center.
앫 For your protection and the protection of others, when scrapping the air bag unit or emergency tensioning device, our safety instructions must be fol- lowed. These instructions are available from any authorized Mercedes-Benz Light Truck Center.
앫 Given the considerable deployment
speed, required inflation volume, and the textile structure of the air bags, there is the possibility of abrasions or other potentially more serious injuries resulting from air bag deployment.
Warning!
Front air bags
Only use seat covers which have been tested and approved by Mercedes-Benz for your vehicle model. Using other seat covers may interfere with or prevent the deployment of the front side impact air bags or the rear side impact air bags*. Contact an authorized Mercedes-Benz Light Truck Center for availability.
When you sell your vehicle we strongly urge you to give notice to the subsequent owner that it is equipped with an SRS by alerting them to the applicable section in the Operator’s Manual.
1 Driver air bag 2 Passenger air bag Driver and front passenger front air bags are deployed: 앫 in the event of certain frontal impacts 앫 if impact exceeds a preset deployment
threshold
앫 independently of the side impact air
bags
Safety and Security Occupant safety
i The front air bags in this vehicle have been designed to inflate in two stages. This allows the air bag to have different rates of inflation that are based on the rate of relevant vehicle decelera- tion as assessed by the air bag control unit. On the front passenger-side, the front air bag deployment is additionally influenced by the passenger’s weight category as identified by the Occupant Classification System (OCS) (컄 page 79). The lighter the front passenger side occupant, the higher the vehicle deceleration rate required for the second stage inflation of the air bag.
77
Safety and Security Occupant safety
The air bags will not deploy in impacts which do not exceed the system’s deploy- ment thresholds. You will then be protec- ted by the fastened seat belts. The front passenger front air bag will only be deployed if: 앫 the system senses that the front
passenger seat is occupied
앫 the 59 indicator lamp in
the center console is not lit (컄 page 83)
앫 the impact exceeds a preset deploy-
ment threshold
Side impact air bags, window curtain air bags
Warning!
The pressure sensors for side impact air bag control are located in the doors. Do not modify any components of the doors or door trim panels including, for example, the addi- tion of door speakers.
Improper repair work on the doors or the modification or addition of components to the doors create a risk of rendering the side impact air bags inoperative or causing unintended air bag deployment. Work on the doors must therefore only be performed by qualified technicians. Contact an authorized Mercedes-Benz Light Truck Center.
78
1 Front side impact air bag 2 Window curtain air bag 3 Rear side impact air bag* The side impact air bags and window curtain air bags are deployed: 앫 on the impacted side of the vehicle 앫 in impacts exceeding a preset deploy-
ment threshold
앫 independently of the front air bags In addition, the window curtain air bags 2 are deployed in certain vehicle rollovers.
The side impact air bags and window cur- tain air bags are not deployed in impacts which do not exceed the system’s deploy- ment threshold. The front passenger side impact air bag will not deploy if the OCS senses that the front passenger seat is empty and the front passenger seat belt is not fastened (latch plate is not inserted into the buckle). With an empty front passenger seat and the seat belt fastened (latch plate properly in- serted into buckle) the front passenger side impact air bag will deploy indepen- dently of the empty seat.
Warning!
Only use seat covers which have been test- ed and approved by Mercedes-Benz for your vehicle model. Using other seat covers may interfere with or prevent the deployment of the front side impact air bags or the rear side impact air bags*. Contact your autho- rized Mercedes-Benz Light Truck Center for availability.
Safety and Security Occupant safety
Occupant Classification System
The Occupant Classification System (OCS) automatically turns the front passenger front air bag on or off based on the classi- fied occupant weight category determined by weight sensor readings from the front passenger seat.
i The system does not deactivate the front passenger side impact air bag, the window curtain air bag, and the emergency tensioning device.
Occupants must sit properly belted in a position that is as upright as possible with their back against the seat backrest and feet on the floor to be correctly classified. If the occupant’s weight is transferred to another object in the vehicle (e.g. by lean- ing on armrests), the OCS may not be able to properly approximate the occupant’s weight category.
Furthermore, the occupant weight may appear to increase or decrease due to objects hanging on the seat, other passen- gers pushing on the seat, objects lodged underneath the seat or stuffed between seat and middle console or between seat and door or due to objects applying pres- sure on the back of the seat. Always make sure that the seat has clearance in all directions at all times.
i If your seat, including your trim cover and cushion needs to be serviced in any way, take the vehicle to an authorized Mercedes-Benz Light Truck Center. Only seat accessories approved by Mercedes-Benz may be used.
Both, driver and the front passenger should always use the 59 indicator lamp as an indi- cation of whether or not the front passen- ger is properly positioned.
79
Safety and Security Occupant safety
Warning!
If the 59 indicator lamp illumi- nates when an adult or someone larger than a small individual is in the front passenger seat, have the front passenger re-position himself or herself in the seat until the 59 indicator lamp goes out, or check whether objects are caught under or around the seat.
More information about air bag display mes- sages (컄 page 421). In the event of a collision, the air bag control unit will not allow front passenger front air bag deployment when the OCS classified the front passenger seat occupant as being up to or less than the weight of a typical 12-month-old child in a standard child re- straint or if the front passenger seat is sensed as being empty.
80
When the OCS senses that the front passen- ger seat occupant is classified as being up to or less than the weight of a typical 12-month-old child in a standard child restraint, the 59 indicator lamp will illuminate when the engine is start- ed and remain illuminated, indicating that the front passenger front air bag is deacti- vated.
When the OCS senses that the front passen- ger seat is classified as being empty, the 59 indicator lamp will illumi- nate when the engine is started and remain illuminated, indicating that the front passenger front air bag is deactivated.
When the OCS senses that the front passen- ger seat occupant is classified as being heavier than the weight of a typical 12-month-old child seated in a standard child restraint or as being a small individual (such as a young teenager or a small adult), the 59 indicator lamp will illu- minate for approximately 6 seconds when the engine is started and then, depending on occupant weight sensor readings from the seat, remain illuminated or go out. With the 59 indicator lamp illuminated, the front passenger front air bag is deacti- vated. With the 59 indicator lamp out, the front passenger front air bag is activated.
When the OCS senses that the front passen- ger seat occupant is classified as an adult or someone larger than a small individual, the 59 indicator lamp will illumi- nate for approximately 6 seconds when the engine is started and then go out, indicating that the front passenger front air bag is activated.
If the 59 indicator lamp is illu- minated, the front passenger front air bag is deactivated and will not be deployed.
If the 59 indicator lamp is not illuminated, the front passenger front air bag is activated and will be deployed: 앫 in the event of certain frontal impacts 앫 if impact exceeds a preset deployment
threshold
앫 independently of the side impact air
bags.
If the front passenger front air bag is de- ployed, the rate of inflation will be influ- enced by: 앫 the rate of vehicle deceleration as assessed by the air bag control unit
앫 the front passenger’s weight category as identified by the Occupant Classifica- tion System (OCS)
Warning!
According to accident statistics, children are safer when properly restrained in the rear seating positions than in the front seat- ing position. Thus, we strongly recommend that children be placed in the rear seats whenever possible. Regardless of seating position, children 12 years old and under must be seated and properly secured in an appropriate infant or child restraint recommended for the size and weight of the child.
The infant or child restraint must be properly secured with the vehicle’s seat belt, the seat belt and top tether strap, or lower anchors and top tether strap, fully in accordance with the child seat manufacturer’s instructions.
Safety and Security Occupant safety
Children can be killed or seriously injured by an inflating air bag. Note the following important information when circumstances require you to place a child in the front pas- senger seat: 앫 Your vehicle is equipped with air bag
technology designed to turn off the front passenger front air bag in your vehicle when the system senses the weight of a typical 12-month-old child or less along with the weight of a standard appropri- ate child restraint on the front passen- ger seat.
앫 A child in a rear-facing child restraint on the front passenger seat will be serious- ly injured or even killed if the front passenger front air bag inflates in a collision which could occur under some circumstances, even with the air bag technology installed in your vehicle. The only means to completely eliminate this risk is to never place a child in a rear-fac- ing child restraint in the front seat. We therefore strongly recommend that you always place a child in a rear-facing child restraint in the back seat.
컄컄
81
Safety and Security Occupant safety
컄컄