- 2012 Mercedes-Benz G Class Owners Manuals
- Mercedes-Benz G Class Owners Manuals
- 2005 Mercedes-Benz G Class Owners Manuals
- Mercedes-Benz G Class Owners Manuals
- 2013 Mercedes-Benz G Class Owners Manuals
- Mercedes-Benz G Class Owners Manuals
- 2009 Mercedes-Benz G Class Owners Manuals
- Mercedes-Benz G Class Owners Manuals
- 2003 Mercedes-Benz G Class Owners Manuals
- Mercedes-Benz G Class Owners Manuals
- 2004 Mercedes-Benz G Class Owners Manuals
- Mercedes-Benz G Class Owners Manuals
- 2011 Mercedes-Benz G Class Owners Manuals
- Mercedes-Benz G Class Owners Manuals
- 2002 Mercedes-Benz G Class Owners Manuals
- Mercedes-Benz G Class Owners Manuals
- 2007 Mercedes-Benz G Class Owners Manuals
- Mercedes-Benz G Class Owners Manuals
- Download PDF Manual
-
X Connect a trickle charger. i You can obtain information about trickle
chargers from a qualified specialist workshop, e.g. an authorized Mercedes- Benz Center.
If you leave the vehicle parked up for longer than six weeks, the vehicle may suffer damage as a result of lack of use. X Visit a qualified specialist workshop and
seek advice.
Driving tips General driving tips Important safety notes G Warning! Please do not forget that your primary responsibility is to drive the vehicle. A driver’s attention to the road must always be his/her primary focus when driving. For your safety and the safety of others, we recommend that you pull over to a safe location and stop before placing or taking a telephone call. If you choose to use the telephone11 while driving, please use the hands-free device and only use the telephone when road, weather and traffic conditions permit. Some jurisdictions prohibit the driver from using a mobile telephone while driving a vehicle. Only operate the COMAND11 (Cockpit Management and Data System) if road, weather and traffic conditions permit. Otherwise, you may not be able to observe traffic conditions and could endanger yourself and others. Bear in mind that at a speed of just 30 mph (approximately 50 km/h), your vehicle is covering a distance of 44 feet (approximately 14 m) every second.
11 Observe all legal requirements.
Drive sensibly – save fuel Observe the following tips to save fuel: X The tires should always be inflated to the
recommended tire pressure. X Remove unnecessary loads. X Remove roof carriers when they are not
needed.
X Warm up the engine at low engine speeds. X Avoid frequent acceleration or braking. X Have all maintenance work performed at
the service intervals specified in the Service Booklet or indicated by the service interval indicator.
Fuel consumption also increases when driving in cold weather, in stop-and-go traffic and in mountainous terrain.
Drinking and driving G Warning Drinking and driving and/or taking drugs and driving are very dangerous combinations. Even a small amount of alcohol or drugs can affect your reflexes, perceptions and judgment. The possibility of a serious or even fatal accident are greatly increased when you drink or take drugs and drive. Do not drink or take drugs and drive or allow anyone to drive who has been drinking or taking drugs.
Pedals G Warning Make sure absolutely no objects are obstructing the pedals' range of movement. Keep the driver's footwell clear of all obstacles. If there are any floormats or carpets in the footwell, make sure that the pedals still have sufficient clearance. During sudden driving or braking maneuvers, the objects could get caught between the
Driving tips
137
pedals. You could then no longer brake or accelerate. This could lead to accidents and injury.
Rolling with the engine switched off G Warning! There is no power assistance for the steering and the brake when the engine is not running. Steering and braking requires significantly more effort and you could lose control of the vehicle and cause an accident as a result. Do not turn off the engine while the vehicle is in motion.
Exhaust check G Warning Inhalation of exhaust gas is hazardous to your health. All exhaust gas contains carbon monoxide (CO), and inhaling it can cause unconsciousness and possible death. Do not run the engine in confined areas (such as a garage) which are not properly ventilated. If you think that exhaust gas fumes are entering the vehicle while driving, have the cause determined and corrected immediately. If you must drive under these conditions, drive only with at least one window fully open at all times.
Certain engine systems are designed to keep the level of poisonous components in exhaust fumes within legal limits. These systems only work at peak efficiency when they are maintained exactly in accordance with the manufacturer's specifications. For this reason, all work on the engine must be carried out only by qualified and authorized Mercedes-Benz technicians. The engine settings must not be changed in any circumstances. Furthermore, all specific service work must be carried out at regular intervals and in accordance with the Mercedes-Benz service requirements. Details can be found in the Service Booklet.
Brakes Important safety notes G Warning! On slippery road surfaces, never downshift in order to obtain braking action. This could result in drive wheel slip and reduced vehicle control. Your vehicle’s ABS will not prevent this type of control loss. Do not engage the transfer case in position LOW when driving on ice or packed snow. At speeds below 18 mph (30 km/h) vehicle steering is adversely affected by the Off-road ABS.
Downhill gradients ! On long and steep gradients, you must reduce the load on the brakes by shifting early to a lower gear. This allows you to take advantage of the engine braking effect and helps avoid overheating and excessive wear of the brakes. When you take advantage of the engine braking effect, a drive wheel may not turn for some time, e.g. on a slippery road surface. This could cause damage to the drive train. This type of damage is not covered by the Mercedes-Benz warranty.
Heavy and light loads G Warning Depressing the brake pedal constantly results in excessive and premature wear to the brake pads. It may also cause the brakes to overheat, seriously impairing their effectiveness. It may then not be possible to stop the vehicle in sufficient time to avoid an accident.
If the brakes have been subjected to a heavy load, do not stop the vehicle immediately, but drive on for a short while. This allows the airflow to cool the brakes more quickly.
138 Driving tips
Wet road surface G Warning After driving in heavy rain for some time without applying the brakes or through water deep enough to wet brake components, the first braking action may be somewhat reduced. You have to depress the brake pedal more firmly. Maintain a safe distance from vehicles in front.
After driving on a wet road or having the vehicle washed, brake firmly while paying attention to the traffic conditions. This will warm up the brake discs, thereby drying them more quickly and protecting them against corrosion. G Warning Make sure that you do not endanger other road users when you apply the brakes.
Limited braking performance on salt treated roads G Warning The layer of salt on the brake discs and the brake pads/linings may cause a delay in the braking effect, resulting in a significantly longer braking distance, which could lead to an accident. To avoid this danger, you should: Roccasionally brake carefully, without
putting other road users at risk, when you are driving on salted roads. This helps to remove any salt that may have started to build up on the brake discs and the brake pads/linings.
Rmaintain a greater distance to the vehicle
ahead and drive with particular care.
Rcarefully apply the brakes at the end of a trip and immediately after commencing a new trip, so that salt residues are removed from the brake discs.
Brake maintenance ! If the brake warning lamp lights up in the instrument cluster and you hear a warning tone, even though the parking brake has been released, the brake fluid level may be too low. Observe additional warning messages in the multifunction display. The brake fluid level may be too low due to brake pad wear or leaking brake lines. Have the brake system checked immediately. This work should be carried out at an authorized Mercedes-Benz Center.
All checks and maintenance work on the brake system must be carried out at a qualified specialist workshop only. Consult an authorized Mercedes-Benz Center for this purpose. Have the brake pads and the brake fluid replaced at a qualified specialist workshop, e.g. an authorized Mercedes-Benz Center. G Warning If other than recommended brake pads are installed, or other than recommended brake fluid is used, the braking properties of the vehicle can be degraded to an extent that safe braking is substantially impaired. This could result in an accident.
! A function or performance test may only be carried out on a two-axle dynamometer. If you are planning to have the vehicle tested on such a dynamometer, contact an authorized Mercedes-Benz Center to obtain further information first. Otherwise, the drive train or the brake system may suffer damage.
! As the ESP® system operates
automatically, the engine and the ignition must be switched off (the key must be in position 0 or 1 in the ignition lock) if the parking brake is tested on a brake dynamometer (for a maximum of ten seconds).
Driving tips
139
Braking applications triggered automatically by ESP® may otherwise seriously damage the brake system. If your brake system is subject only to moderate loads, you should test the functionality of your brakes at regular intervals by pressing firmly on the brake pedal at high speeds. This improves the grip of the brake pads. G Warning Make sure that you do not endanger other road users when you apply the brakes.
You can find a description of Brake Assist (BAS) on (Y page 56).
High-performance brake system for AMG vehicles The high-performance brake system is installed only on the G 55 AMG. G Warning New vehicle brake pads and discs, and replacement brake pads and discs may take several hundred miles of driving until they provide optimum braking efficiency. Until that time, you may need to use increased brake pedal pressure while braking. Please be aware of this and adjust your driving and braking accordingly during this break-in period. Excessive high-demand braking will cause correspondingly high brake wear. Please be attentive to the brake warning lamp in the instrument cluster and brake condition messages in the multifunction display. Especially for high performance driving, it is important to maintain and have the brake system checked regularly.
The high-performance brake system is designed for heavy loads. This may lead to noise when braking. This will depend on: Rspeed Rbraking force Renvironmental conditions, such as
temperature and humidity
The wear of individual components of the brake system, such as the brake pads/linings or brake discs, depends on the individual driving style and operating conditions. For this reason, it is impossible to state a mileage that will be valid under all circumstances. An aggressive driving style will lead to high wear. You can obtain further information about this from your authorized Mercedes-Benz Center.
Parking brake G Warning! While performing this procedure please assure that the vehicle is stopped before applying the parking brake. Otherwise the rear wheels could lock up. You could lose control of the vehicle and cause an accident. In addition, the vehicle’s brake lights do not light up when the parking brake is engaged. Make sure not to endanger any other road users when you engage the parking brake.
To maintain the braking effect of the parking brake between the service intervals, you can briefly apply the parking brake while driving. X Drive about 20 mph (30 km/h) on a dry,
even road.
X Pull the parking brake upwards with the release button depressed (Y page 135), until the vehicle brakes noticeably.
X Hold the lever in this position for
approximately ten seconds and then push it all the way down again.
! Do not drive faster than 25 mph
(40 km/h). Otherwise, you could damage the brakes.
140 Driving tips
Driving on wet roads Hydroplaning If water has accumulated to a certain depth on the road surface, there is a danger of hydroplaning occurring, even if: Ryou drive at low speeds. Rthe tires have adequate tread depth. For this reason, in the event of heavy rain or in conditions in which hydroplaning can occur you must drive in the following manner: Rreduce your speed Ravoid ruts Rbrake carefully
Driving on flooded roads ! Do not drive through flooded areas.
Check the depth of any water before driving through it. Drive slowly through standing water. Otherwise, water may enter the vehicle interior or the engine compartment. This can damage the electronic components in the engine or AUTOTRONIC. Water can also be drawn in by the engine's air suction nozzles and this can cause engine damage.
If you have to drive on stretches of road on which water has collected, please bear in mind that: Rthe maximum permissible still water depth
is 50 cm.
Ryou should drive no faster than at walking
pace.
Off-road fording
: Fording depth, 20 in (50 cm) The fording depth must not exceed 20 in (50 cm) when the vehicle is loaded and ready to drive. ! The water depth must not exceed 20 in
(50 cm). Note that the possible fording depth is less in flowing water.
i You may only drive through freshwater. RObserve the safety notes (Y page 142) and the general notes (Y page 142) on off-road driving.
REstablish how deep the water is and the
characteristics of the body of water before fording.
RSwitch off the auxiliary heating and the air-
conditioning system.
RShift the transfer case to
LOW (Y page 126).
REngage the differential locks, if necessary
RRestrict the shift range to 1 or 2
(Y page 129).
(Y page 123).
RAvoid high engine speeds. REnter and exit the water at a flat place and
at a steady walking pace.
! Under no circumstances should you
accelerate before entering the water. The bow wave could cause water to enter and damage the engine and other assemblies.
Driving tips
141
RDrive slowly and at an even speed through
the water.
RDo not stop and do not switch off the
engine.
! Do not open any of the vehicle's doors while fording. Otherwise, water could get into the vehicle interior and damage the vehicle's electronics and interior equipment.
RWater offers a high degree of resistance,
and the ground is slippery and in some cases unstable. Therefore, it is difficult and dangerous to pull away in the water.
REnsure that a bow wave does not form as
you drive.
RClean any mud from the tire tread after
fording.
RApply the brakes to dry them after fording.
Winter driving General notes G Warning If the vehicle becomes trapped in snow, ensure that snow is kept away from the exhaust pipe and from around the vehicle as long as the engine is running. Otherwise, poisonous carbon monoxide (CO) may enter the vehicle, resulting in loss of consciousness and even death. To assure sufficient fresh air ventilation, open a window slightly on the side of the vehicle not facing the wind.
Have your vehicle winterproofed at a qualified specialist workshop, e.g. an authorized Mercedes-Benz Center, at the onset of winter. Observe the notes in the "Winter operation" section (Y page 248).
Driving with summer tires Observe the notes in the "Winter operation" section (Y page 248).
Slippery road surfaces G Warning! The outside temperature indicator is not designed to serve as an ice-warning device and is therefore unsuitable for that purpose. Indicated temperatures just above the freezing point do not guarantee that the road surface is free of ice. The road may still be icy, especially in wooded areas or on bridges. G Warning! On slippery road surfaces, never downshift in order to obtain braking action. This could result in drive wheel slip and reduced vehicle control. Your vehicle’s ABS will not prevent this type of control loss. Do not engage the transfer case in position LOW when driving on ice or packed snow. At speeds below 18 mph (30 km/h) vehicle steering is adversely affected by the Off-road ABS.
Drive particularly carefully on slippery road surfaces. Avoid sudden acceleration, steering and braking maneuvers. Do not use cruise control. If the vehicle threatens to skid or cannot be stopped when moving at low speed: X Shift the transmission to position N. X Try to bring the vehicle under control using
corrective steering.
i For more information on driving with
snow chains, see (Y page 248). G Warning Make sure that you do not endanger other road users when you apply the brakes.
142 Driving tips
Off-road driving Important safety notes G Warning! Sand, dirt, mud and other material having friction property can cause exceptional wear and tear as well as brake failure. Have the brakes checked for dirt build-up and cleaned. There is otherwise a risk that full braking power may not be available in an emergency. G Warning! Do not load items on the basic carrier bars. It may cause instability during some maneuvers which could result in an accident. Drive slowly in unknown terrain. This will make it easier to recognize unexpected obstacles and avoid damage to the vehicle. To help avoid the vehicle rolling over, never turn it around on steep inclines. If the vehicle cannot complete the attempted climb, back it down in reverse gear. Do not drive along the side of a slope. The vehicle might otherwise rollover. If in doing so the vehicle begins to show a tendency to roll, immediately steer into a line of gravity (straight up or downhill). Never let the vehicle roll backwards in idle. You may lose control of the vehicle if you use only the service brake. For information on driving downhill, see "Driving downhill". G Warning! Do not reduce the tire inflation pressure before driving through sand. However, if you do so, remember to correct the tire inflation pressure before continuing your trip. Driving with reduced tire inflation pressure increases the risk of losing control of the vehicle and rolling over.
General notes Read this section carefully before driving your vehicle off-road. Practice by driving over more gentle off-road terrain first. Familiarize yourself with the characteristics of your vehicle and the gear shift operation before driving through difficult terrain. The following driving systems are specially adapted to off-road driving: R4ETS (Y page 58) Rtransfer case (Y page 126) Rdifferential locks (Y page 129) Observe the following notes: Rstop your vehicle and, if necessary, shift the transfer case to LOW (Y page 126) before driving off-road.
Rengage the differential locks, if necessary
(Y page 129).
i ABS, 4ETS, ESP® and BAS are deactivated
while the differential locks are engaged. This allows the front wheels to lock briefly, so that these can dig into a loose surface. However, please note that locked wheels skid and can no longer steer.
RCheck that items of luggage and loads are
stowed safely and are well secured (Y page 196).
RMake sure there is always sufficient ground
clearance to prevent damage to the vehicle.
RAlways keep the engine running and in gear
when driving on a downhill gradient.
RAlways keep the engine running and in gear
when driving on a slope.
RDrive slowly and evenly, if necessary at a
walking pace.
REnsure that the wheels are in contact with
the ground at all times.
RDrive with extreme care on unknown off-
road routes where visibility is poor. For safety reasons, get out of the vehicle first and survey the off-road route.
RCheck the depth of water before fording
rivers and streams.
RWhen fording, do not stop and do not
switch off the engine.
RLook out for obstacles such as rocks, holes,
tree stumps and furrows.
RAlways keep the doors, rear door, windows
and the sliding sunroof closed while the vehicle is in motion.
RSwitch off cruise control. RDo not stray from marked routes or paths. RAdapt your speed to the terrain. The rougher, steeper or more ruts on the terrain, the slower your speed should be. RDrive slowly and at an even speed through the water. Ensure that a bow wave does not form as you drive.
ROn sand, drive quickly to overcome the rolling resistance. Otherwise, the vehicle could dig itself into the sand.
RDo not jump with the vehicle as this will
interrupt the vehicle's propulsion. RAvoid high engine speeds. Drive at
reasonable engine speeds (maximum 3000 rpm).
RDo not shift the automatic transmission to
transmission position N.
RAlways check the vehicle for damage after
off-road driving.
i Information about retrofitting special all-
terrain tires is available from any authorized Mercedes-Benz Center. H Environmental note Protection of the environment is of primary importance. Treat nature with respect. Observe all prohibiting signs.
Checklist before driving off-road X Engine oil level: check the engine oil and
top it up if necessary. Only then does the engine receive enough oil when the vehicle is standing on a steep incline.
Driving tips
143
! If the engine oil warning lamp lights up
while the vehicle is in motion, stop the vehicle in a safe place as soon as possible. Check the engine oil level. The engine oil warning lamp warning must not be ignored. Continuing the journey while the symbol is displayed could lead to engine damage. X Wheel-changing tool kit: check that the jack is working and make sure you have the wheelbrace, a robust tow cable and a folding spade in the vehicle.
X Wheels and tires: check the tire tread
depth and tire pressure.
X Check for damage and remove any foreign
objects, e.g. small stones, from the wheels/tires.
X Replace any missing valve caps. X Replace dented or damaged wheels. X Carry a sound spare wheel.
Checklist after driving off-road G Warning If you feel a sudden significant vibration or ride disturbance, or you suspect that possible damage to your vehicle has occurred, you should turn on the hazard warning flashers, carefully slow down, and drive with caution to an area which is a safe distance from the road. Inspect the tires and the vehicle underbody for possible damage. If the vehicle appears unsafe, have the vehicle towed to the nearest authorized Mercedes-Benz Center or tire dealer for repairs.
Driving over rough terrain places greater demands on your vehicle than driving on normal roads. After driving off-road, check the vehicle. This allows you to detect damage promptly and reduce the risk of an accident to yourself and other road users. X Shift the transfer case to HIGH
X Disengage the differential locks
(Y page 126).
(Y page 129).
144 Driving tips
X Clean the headlamps and rear lights and
check for damage.
X Clean the front and rear license plates. X Clean the wheels and tires with a water jet
and remove any foreign objects.
X Clean the wheels, tires, wheel arches and
the vehicle underside with a water jet; check for any foreign objects and damage.
X Check whether twigs or other parts of
plants have become trapped. These increase the risk of fire and can damage fuel pipes, brake hoses or the rubber bellows of the axle joints and propeller shafts.
X After the trip, examine without fail the
entire undercarriage, wheels, tires, brakes, bodywork structure, steering, chassis and exhaust system for damage.
X After driving for extended periods across sand, mud, gravel, water or in similarly dirty conditions, have the brake discs, wheels, brake pads/linings and axle joints checked and cleaned.
X If you detect strong vibrations after off-road
driving, check for foreign objects in the wheels and drivetrain and remove any that you find. Foreign objects can disturb the balance and cause vibrations.
X Test the brakes.
Driving on sand G Warning! Do not reduce the tire inflation pressure before driving through sand. However, if you do so, remember to correct the tire inflation pressure before continuing your trip. Driving with reduced tire inflation pressure increases the risk of losing control of the vehicle and rolling over.
Observe the following rules when driving on sand: Rshift the transfer case to
LOW (Y page 126).
Ravoid high engine speeds. Rlimit the shift range of the automatic
transmission according to the off-road conditions.
Rdrive quickly to overcome the rolling
resistance. Otherwise, the vehicle could dig itself into the sand.
Rdrive in the tracks of other vehicles if
possible. Make sure that the ruts are not too deep, that the sand is firm enough and that your vehicle has sufficient ground clearance.
Tire ruts and gravel roads Observe the following rules when driving along ruts in off-road terrain or on roads with loose gravel: ! Check that the ruts are not too deep and that your vehicle has sufficient clearance. Otherwise, your vehicle could be damaged or bottom out and get stuck.
Rshift the transfer case to
LOW (Y page 126).
Ravoid high engine speeds. Robserve the safety notes (Y page 142) and the general notes (Y page 142) on off-road driving.
Rrestrict the shift range of the automatic
transmission to 1 (Y page 123).
Rdrive slowly. Rwhere ruts are too deep, drive with the wheels of one side on the center grassy area, if possible.
Driving over obstacles
Driving in mountainous terrain Approach/departure angle
Driving tips
145
: Approach/departure angle, front ; Approach/departure angle, rear
G 550
G 55 AMG: ; 31° 37° 33° 28°
RObserve the safety notes (Y page 142) and the general notes (Y page 142) on off-road driving.
RDo not drive at an angle on slopes, inclines or gradients, but instead follow the direct line of fall. The maximum gradient-climbing capability of your vehicle is 80%, which corresponds to an approach/departure angle of 38°. Note that the vehicle's gradient-climbing capability depends on the off-road conditions.
RBefore driving on extreme uphill and
downhill gradients, shift the transfer case to LOW (Y page 126).
REngage the differential locks, if necessary
(Y page 129). RDrive slowly. RAccelerate gently and make sure that the
wheels are gripping.
RAvoid high engine speeds, except when driving on sandy and muddy routes with high driving resistance.
! Obstacles could damage the floor of the vehicle or components of the chassis. Ask passengers for guidance when driving over large obstacles. The passenger should always keep a safe distance from the vehicle when doing so in order to avoid injury as a result of unexpected vehicle movements. After driving off-road or over obstacles, check the vehicle for possible damage, especially to the underbody and the components of the chassis.
Observe the following rules when driving over tree stumps, large stones and other obstacles: Robserve the safety notes (Y page 142) and the general notes (Y page 142) on off-road driving.
Rshift the transfer case to
LOW (Y page 126).
Ravoid high engine speeds. Rselect shift range 1 (Y page 123). Rmake sure that you have enough ground
clearance before driving across an obstacle.
Rdrive very slowly. Rtry to drive straight over the center of obstacles: front wheel first, then rear wheel.
! Drive with particular care when driving over an obstacle while driving up or down a steep slope. The vehicle could otherwise tilt and slide sideways or tip over.
146 Driving tips
RAvoid high engine speeds – drive at
appropriate engine speeds (no more than 3000 rpm).
RUse the braking power of the engine when driving down a slope. Observe the engine speed, do not overrev the engine.
i Further information on the maximum
engine speed can be found in the "Tachometer" and "Technical Data" sections.
RSelect a shift range appropriate to the
gradient.
RBefore tackling steep downhill gradients,
select shift range 1 (Y page 123).
RCheck the brakes after driving off-road for
a long time. G Warning! Never turn the vehicle around on steep inclines. The vehicle might roll over. If the vehicle cannot complete the attempted climb, back it down in reverse gear.
i Hill start assist will aid you when pulling
away on a hill. For more information, see "Hill start assist" (Y page 118).
Maximum gradient-climbing capability Do not drive at an angle on slopes, inclines or gradients, but instead follow the direct line of fall. The maximum gradient-climbing capability of your vehicle is 80%, which corresponds to an approach/departure angle of 38°. Note that the vehicle's gradient- climbing capability depends on the off-road conditions. Accelerate carefully and make sure that the wheels do not spin when driving on steep terrain. i If the load on the front axle is reduced
when pulling away on a steep uphill slope, the front wheels have a tendency to spin. 4ETS detects this and brakes the wheels
accordingly. The rear wheel torque is increased, making it easier to drive off.
Brow of hill When driving on an uphill gradient, reduce pressure slightly on the accelerator immediately before reaching the top of the hill (do not shift the transmission to position N). Use the vehicle's own impetus to drive over the top of the hill. This style of driving prevents: Rthe vehicle from lifting off the ground on the
brow of a hill
Rloss of traction Rthe vehicle from traveling too quickly down
the other side
Driving downhill RBefore tackling steep downhill gradients,
select shift range 1 (Y page 123). This way you use the engine's braking effect to reduce the speed. If this is not sufficient, brake gently. When doing so, make sure that the vehicle is facing in the direction of the line of fall.
RObserve the notes on driving in
mountainous terrain (Y page 146).
RDrive slowly. RDo not drive at an angle down steep
inclines. Steer into the line of fall and drive with the front wheels aligned straight. Otherwise, the vehicle could slip sideways, tip and rollover.
RCheck that the brakes are working normally
after a long downhill stretch.
i The special off-road ABS(Y page 56) enables accurate, brief and repeated locking of the front wheels, causing them to dig into the loose ground. Note that when the front wheels are fully braked, they slide easily over the surface of the ground, making it difficult to steer.
Driving systems Cruise control Important safety notes Cruise control maintains a constant road speed for you. On long and steep downhill gradients, especially if the vehicle is laden, you must select shift range 1, 2 or 3 in good time. By doing so, you will make use of the braking effect of the engine, which relieves the load on the brake system and prevents the brakes from overheating and wearing too quickly. Use cruise control only if road and traffic conditions make it appropriate to maintain a steady speed for a prolonged period. You can store any road speed above 20 mph (30 km/h). G Warning The cruise control is a convenience system designed to assist the driver during vehicle operation. The driver is and must always remain responsible for the vehicle's speed and for safe brake operation. Only use the cruise control if the road, traffic, and weather conditions make it advisable to travel at a constant speed. RThe use of the cruise control can be
dangerous on winding roads or in heavy traffic because conditions do not allow safe driving at a constant speed.
RThe use of the cruise control can be dangerous on slippery roads. Rapid changes in tire traction can result in wheel spin and loss of control.
RDeactivate the cruise control when driving
in fog.
The "Resume" function should only be operated if the driver is fully aware of the previously set speed and wishes to resume this particular preset speed.
Driving systems
147
Cruise control lever
: To store the current speed or a higher
speed
; To store the current speed or a lower
speed
= To deactivate cruise control ? To call up the last speed stored When you activate cruise control, the stored speed is shown in the multifunction display for five seconds. If an DEF® display message is shown in the multifunction display, you will no longer be able to use the full range of cruise control functions. The full range of cruise control functions will become available again once you confirm the DEF® display message: X Briefly press the V, U, & or
* button on the multifunction steering wheel.
or X Briefly press the reset button on the
instrument cluster.
Storing and maintaining the current speed You can store the current speed if you are driving faster than 20 mph (30 km/h).
148 Driving systems
X Accelerate the vehicle to the desired
speed.
X Briefly press the cruise control lever
up : or down ;.
X Remove your foot from the accelerator
pedal. Cruise control is activated. The vehicle automatically maintains the stored speed. i Cruise control may be unable to maintain
the stored speed on uphill and downhill gradients. The stored speed is resumed when the gradient levels out.
Calling up the last speed stored G Warning The set speed stored in memory should only be set again if prevailing road conditions and legal speed limits permit. Possible acceleration or deceleration differences arising from returning to the preset speed could cause an accident and/or serious injury to you and others.
X Briefly pull the cruise control lever towards
you ?.
X Remove your foot from the accelerator
pedal. Cruise control is activated and adjusts the vehicle's speed to the last speed stored. i G 350 CDI: if no speed is stored, cruise
control stores the current speed and maintains it.
Setting a speed G Warning Keep in mind that it may take a brief moment until the vehicle has made the necessary adjustments. Increase or decrease the set vehicle speed to a value that the prevailing road conditions and legal speed limits permit. Otherwise, sudden and unexpected acceleration or deceleration
of the vehicle could cause an accident and/ or serious injury to you and others.
X Press the cruise control lever up : for a higher speed or down ; for a lower speed. X Keep the cruise control lever pressed until
the desired speed is reached.
X Release the cruise control lever.
The new speed is stored.
i Cruise control is not deactivated if you
depress the accelerator pedal. For example, if you accelerate briefly to overtake, cruise control adjusts the vehicle's speed to the last speed stored after you have finished overtaking.
Setting in 1 mph (Canada: 1 km/h) increments X Briefly press the cruise control lever
up : for a higher speed or down ; for a lower speed. The last speed stored is increased or reduced.
Deactivating cruise control There are several ways to deactivate cruise control: X Briefly press the cruise control lever
forwards =.
or X Brake. Cruise control is automatically deactivated if: Ryou apply the parking brake. Ryou are driving below 20 mph (30 km/h). RESP® intervenes or you deactivate ESP®. Ryou shift the transmission to position N
while driving.
RG 350 CDI: you engage a differential lock. i The last speed stored is cleared when you
switch off the engine.
Driving systems
149
4MATIC (permanent all-wheel drive) 4MATIC ensures that all four wheels are permanently driven. Together with ESP® and 4ETS, it improves the traction of your vehicle whenever a drive wheel spins due to insufficient grip. G Warning! If a drive wheel is spinning due to insufficient traction: RWhile driving off, apply as little throttle as
possible.
RWhile driving, ease up on the accelerator
pedal.
RAdapt your speed and driving style to the
prevailing road conditions.
Failure to observe these guidelines could cause the vehicle to skid. The 4MATIC cannot prevent accidents resulting from excessive speed.
! Never tow the vehicle with one axle
raised. This may damage the transfer case. Damage of this sort is not covered by the Mercedes-Benz Limited Warranty. All wheels must remain either on the ground or be fully raised. Observe the instructions for towing the vehicle with all wheels in full contact with the ground.
i In wintry driving conditions, the maximum
effect of 4MATIC can only be achieved if you use winter tires (M+S tires), with snow chains if necessary.
! When testing the parking brake, operate the vehicle only briefly (for a maximum of ten seconds) on a brake test dynamometer. When doing this, turn the key to position 0 or 1 in the ignition. Failure to do this can cause damage to the drive train or the brake system.
! Function or performance tests may only be performed on a 2-axle dynamometer. If you wish to operate the vehicle on such a dynamometer, please consult an authorized Mercedes-Benz Center
beforehand. You could otherwise damage the drive train or the brake system.
For information about driving off-road, see (Y page 142).
Ultrasonic reversing aid Important safety notes G Warning! Make sure no persons or animals are in or near the area in which you are parking/ maneuvering. Otherwise, they could be injured. G Warning Rear Parking Assist is a supplemental system. It is not intended to, nor does it replace, the need for extreme care. The responsibility during parking and other critical maneuvers always remains with the driver.
The ultrasonic backing up aid is an electronic parking aid. It indicates visually and audibly the distance between the rear area of your vehicle and an object. The ultrasonic backing up aid is activated automatically when you switch on the ignition and engage reverse gear. The ultrasonic backing up aid monitors the rear area of your vehicle using four sensors in the rear bumper.
: Sensors in the rear bumper
150 Driving systems
or a pneumatic drill could cause the ultrasonic backing up aid to malfunction.
Minimum distance
Center
Corners
Approx. 8 in (approx. 20 cm) Approx. 8 in (approx. 20 cm)
If there is an obstacle within this range, all warning displays flash and a warning tone sounds. If the distance falls below the minimum, the distance may no longer be shown.
Warning displays The warning display shows the distance between the sensors and the obstacle. The warning display is in the rear compartment next to the rear door.
The warning display is divided into four yellow and two red segments :. The ultrasonic backing up aid is ready for use when you hear a warning tone and segment ; lights up briefly. One or more segments : light up as the vehicle approaches an obstacle, depending on the distance from the obstacle.
Range of the sensors The sensors must be free of dirt, ice and slush; otherwise they may not function correctly. Clean the sensors regularly, taking care not to scratch or damage them (Y page 224).
Side view
Top view Sensors
Center
Corners
Approx. 59 in (approx. 150 cm) Approx. 40 in (approx. 100 cm)
! When parking, pay particular attention to objects above or below the sensors, such as flower pots or trailer towbars. The ultrasonic backing up aid does not detect such objects when they are in the immediate vicinity of the vehicle. You could damage the vehicle or the objects. Ultrasonic sources such as an automatic car wash, a lorry's compressed-air brakes
Driving systems
151
From the: Rfourth segment you will hear an
intermittent warning tone
Rfifth segment you will hear a faster
intermittent warning tone
Rsixth segment you will hear a very fast
intermittent warning tone. This indicates that you have now reached the minimum distance.
152 Driving systems
Problems with ultrasonic reversing aid
Problem You hear a warning signal when backing up.
You hear a warning tone when backing up or you do not hear a warning tone and none of the segments light up.
Possible causes/consequences and M Solutions The ultrasonic backing up aid sensors are dirty or there is interference. X Clean the ultrasonic backing up aid sensors (Y page 224). X Switch the ignition back on. The problem may be caused by an external source of radio or ultrasound waves. The ultrasonic backing up aid has switched off automatically. X See if the ultrasonic backing up aid functions in a different
location.
The ultrasonic backing up aid is malfunctioning and has switched itself off. X Have the ultrasonic backing up aid checked at a qualified
specialist workshop as soon as possible.
Rear view camera Important safety notes The rear view camera is an optical parking aid. It shows the area behind your vehicle in the COMAND display. G Warning! Make sure no persons or animals are in or near the area in which you are parking/ maneuvering. Otherwise, they could be injured.
The rear view camera is in the tailgate above the rear window wiper.
: Rear view camera
View through the camera The area behind the vehicle is displayed as a mirror image, as in the rear-view mirror. G Warning! The rear view camera is only an aid and may display obstacles Rfrom a distorted perspective Rinaccurately Rmay not display obstacles at all
Driving systems
153
Activating the rear view camera X Make sure that the SmartKey is in
position 2 in the ignition lock.
X Make sure that the "rear view camera"
function is selected in COMAND (see the separate operating instructions for COMAND).
X Engage reverse gear.
The area behind the vehicle is shown in the COMAND display.
The rear view camera does not relieve you of the responsibility to be cautious. Take care and pay careful attention. The rear view camera may not show objects which are Rvery close to the rear bumper Runder the rear bumper Runder the spare wheel Rnearby behind the spare wheel You are responsible for safety at all times and must continue to pay attention to the immediate surroundings when parking and maneuvering. This includes the area behind, in front of, and beside the vehicle. Otherwise you could endanger yourself and/or others. G Warning! The rear view camera either will not function or will not function to its full capability if Rthe tailgate is open Rit is raining very hard, snowing or foggy Rit is night or you are parking/maneuvering your vehicle in an area where it is very dark Rthe camera is exposed to a very bright white
light
Rthe immediate surroundings are
illuminated with fluorescent light (the display may flicker)
Rthere is a sudden change in temperature, e.g. if you drive into a heated garage from the cold (lens condensation)
Rthe camera lens is dirty or covered Rthe rear of your vehicle is damaged
In this case, have the position and setting of the camera checked by a qualified specialist workshop. Mercedes-Benz recommends that you contact a Mercedes- Benz Center for this purpose.
Do not use the rear view camera in these situations. Otherwise you could injure yourself or others and/or damage property including your vehicle while parking/ maneuvering.
154
Vehicle equipment ............................ 156
Important safety notes .................... 156
Displays and operation .................... 156
Menus and submenus ...................... 159
Display messages ............................. 169
Warning and indicator lamps in the instrument cluster ............................ 183155
156 Displays and operation
Vehicle equipment
i This manual describes all the standard and optional equipment of your vehicle which was available at the time of purchase. Country-specific differences are possible. Please note that your vehicle may not be equipped with all features described. This also applies to safety- relevant systems and functions.
Important safety notes
You will find an illustration of the instrument cluster in the "At a glance" section (Y page 26). G Warning A driver's attention to the road and traffic conditions must always be his/her primary focus when driving. For your safety and the safety of others, selecting features through the multifunction steering wheel should only be done by the driver when traffic and road conditions permit it to be done safely. Bear in mind that at a speed of just 30 mph (approximately 50 km/h ), your vehicle is covering a distance of 44 feet (approximately 14 m) every second. G Warning! No messages will be displayed if either the instrument cluster or the multifunction display is inoperative. As a result, you will not be able to see information about your driving conditions, such as Rspeed Routside temperature Rwarning/indicator lamps Rmalfunction/warning messages Rfailure of any systems Driving characteristics may be impaired.
If you must continue to drive, do so with added caution. Contact an authorized Mercedes- Benz Center as soon as possible. G Warning Malfunction and warning messages are only indicated for certain systems and are intentionally not very detailed. The malfunction and warning messages are simply a reminder with respect to the operation of certain systems. They do not replace the owner's and/or driver's responsibility to maintain the vehicle's operating safety. Have all required maintenance and safety checks performed on the vehicle. Bring the vehicle to an authorized Mercedes-Benz Center to address the malfunction and warning messages.
Displays and operation Tachometer The red band in the tachometer indicates the engine's overrevving range. ! Do not drive in the overrevving range, as
this could damage the engine.
The fuel supply is interrupted to protect the engine when the red band is reached.
Displaying the coolant temperature G Warning Driving when your engine is overheated can cause some fluids which may have leaked into the engine compartment to catch fire. You could be seriously burned. Steam from an overheated engine can cause serious burns which can occur just by opening the engine hood. Stay away from the engine if you see or hear steam coming from it. Stop the vehicle in a safe location away from other traffic. Turn off the engine, get out of the vehicle and do not stand near the vehicle until the engine has cooled down.
Displays and operation 157
The coolant temperature gauge is in the instrument cluster on the left-hand side. Under normal driving conditions, with the correct anti-corrosion and antifreeze additive concentration, the reading may rise to 248 ‡(120 †). ! If the coolant temperature exceeds
248 ‡(120 †) do not continue driving. The engine will otherwise be damaged.
Outside temperature display The outside temperature display is in the multifunction display (Y page 158). G Warning! The outside temperature indicator is not designed to serve as an ice-warning device and is therefore unsuitable for that purpose. Indicated temperatures just above the freezing point do not guarantee that the road surface is free of ice. The road may still be icy, especially in wooded areas or on bridges.
Changes in the outside temperature are displayed after a short delay.
Operating the on-board computer The on-board computer is activated as soon as you turn the SmartKey to position 1 in the ignition lock. You can control the multifunction display and the settings in the on-board computer using the buttons on the multifunction steering wheel.
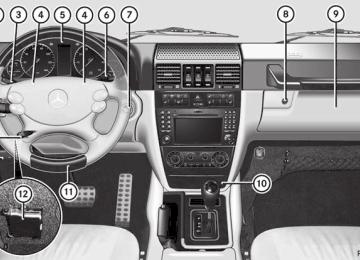
: Multifunction display
; WX
Selects submenus in the Settings menu Changes values Adjusts the volume
= ~
Rejects or ends a call Exits phone book/redial memory Makes or accepts a call Switches to the redial memory
? VU
Selects a menu: scrolls back and forth
158 Displays and operation
Further information on displaying the transmission position (Y page 122).
A &*
Press briefly: Scrolls back and forth within a menu In the Audio menu: selects a stored station, an audio track or a video scene In the Telephone menu: switches to the phone book and selects a name or a telephone number
&* Press and hold: In the Audio menu: selects the previous/next station or selects an audio track using rapid scrolling In the Telephone menu: starts rapid scrolling through the phone book
Multifunction display To activate the multifunction display: Rswitch on the ignition. Rswitch on the lights. Ropen the door. Rpress the reset button on the instrument
cluster.
The multifunction display shows you values and settings as well as possible messages.
: Display area for menus or submenus ; Status bar with outside temperature or
speed (Y page 163)
= Transfer case position ? Selector lever position/shift range
Menus and submenus
159
Menus and submenus Overview of menus The number of menus shown depends on the optional equipment in the vehicle.
Function Standard display menu (Y page 160) Rtire pressure monitor (Y page 253) Rservice interval display (Y page 219) RG 55 AMG: oil level (Y page 215) Audio menu (Y page 160) Navigation menu (Y page 162) Message memory12 menu (Y page 169) Settings menu (Y page 162) Trip computer menu (Y page 166) Telephone menu (Y page 167)
12 The menu is only visible when there is a display message.
160 Menus and submenus
Standard display menu Standard display X Press the V or U button on the steering wheel to select the standard display.
Indicated temperatures just above the freezing point do not guarantee that the road surface is free of ice. The road may still be icy, especially in wooded areas or on bridges.
Standard display : Trip odometer ; Odometer You can select the following functions in the Standard display menu using the & or * button: Rtire pressure monitor (Y page 253) Rdigital speedometer or outside
temperature (Y page 160)
RService display (Y page 219) RG 55 AMG: oil level (Y page 215) X To reset the trip odometer: press and hold the reset button in the instrument cluster until the trip odometer is reset.
Displaying the digital speedometer or outside temperature If you have selected the digital speedometer as the status line (Y page 163), the outside temperature is displayed here13. G Warning! The outside temperature indicator is not designed to serve as an ice-warning device and is therefore unsuitable for that purpose.
Digital speedometer (example)
Outside temperature (example) X Press the V or U button on the steering wheel to select the standard display.