- Download PDF Manual
-
problem with the Ultrasonic Rear Parking Assist (URPA) system. Do not use this system to help you park. See Ultrasonic Parking Assist on page 9-40. See your dealer for service. SERVICE SIDE DETECTION SYSTEM If this message appears, the system needs service. Take the vehicle to your dealer. SIDE BLIND ZONE ALERT OFF This message indicates that the driver has turned the system off. SIDE DETECTION SYSTEM UNAVAILABLE This message indicates that the SBZA system is disabled because the sensor is blocked and cannot detect vehicles in the blind zone. The sensor may be blocked by mud, dirt, snow, ice, or slush. This
message may also activate during heavy rain or due to road spray. The vehicle does not need service.
however, you do not have the benefit of StabiliTrak, so reduce your speed and drive accordingly.
Ride Control System Messages
SERVICE TRACTION CONTROL This message displays when there is a problem with the Traction Control System (TCS). When this message is displayed, the system will not limit wheel spin. Adjust your driving accordingly. See your dealer for service. SERVICE STABILITRAK This message displays if there is a problem with the StabiliTrak system. If this message appears, try to reset the system. Stop; turn off the engine for at least 15 seconds; then start the engine again. If this message still comes on, it means there is a problem. See your dealer for service. The vehicle is safe to drive;
Security Messages
THEFT ATTEMPTED This message displays if the vehicle detects a tamper condition.
Service Vehicle Messages
SERVICE AC SYSTEM This message displays if there is a problem with the air conditioning system. Take the vehicle to your dealer for service. SERVICE POWER STEERING This message displays if there is a problem with the power steering system. Take the vehicle to your dealer for service. SERVICE VEHICLE SOON This message displays if there is a problem with the vehicle. Take the vehicle to your dealer for service.
Chevrolet Malibu Owner Manual 6081487) - 2014 - CRC - 11/19/13
(GMNA-Localizing-U.S./Canada/Mexico-
Black plate (33,1)
Instruments and Controls
5-33
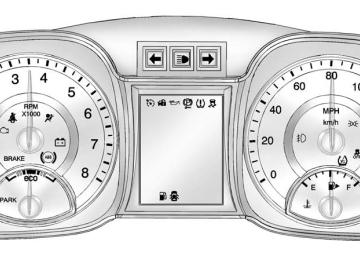
Starting the Vehicle Messages
JUMP START ACTIVE WAIT TO START This message displays while performing an on-board jump start of the vehicle. See “Jump Starting (On-board with eAssist Only).” JUMP START COMPLETE ATTEMPT START This message displays while performing an on-board jump start of the vehicle. See “Jump Starting (On-board with eAssist Only).” JUMP START DISABLED SEE OWNERS MANUAL This message displays if there is a problem with the on-board jump start system, or the 12 volt battery is too low to perform an on-board jump start. Try using jumper cables and performing a normal jump start. See “Jump Starting (On-board with
eAssist Only).” Take the vehicle to your dealer for service if this message continues to be displayed.
Tire Messages
SERVICE TIRE MONITOR SYSTEM This message displays if there is a problem with the Tire Pressure Monitor System (TPMS). See Tire Pressure Monitor Operation on page 10-56. TIRE LEARNING ACTIVE This message displays when the system is learning new tires. See Tire Pressure Monitor Operation on page 10-56. TIRE PRESSURE LOW ADD AIR TO TIRE On vehicles with the Tire Pressure Monitor System (TPMS), this message displays when the pressure in one or more of the vehicle's tires is low.
The low tire pressure warning light will also come on. See Tire Pressure Light on page 5-20. If a tire pressure message displays, inflate the tires until the tire pressure is equal to the values shown on the Tire and Loading Information label. See Tires on page 10-44, Vehicle Load Limits on page 9-10, and Tire Pressure on page 10-53. More than one tire pressure message can be received at a time. The DIC also shows the tire pressure values. See Driver Information Center (DIC) on page 5-24.
Transmission Messages
SERVICE TRANSMISSION This message displays if there is a problem with the transmission. See your dealer.
Chevrolet Malibu Owner Manual 6081487) - 2014 - CRC - 11/19/13
(GMNA-Localizing-U.S./Canada/Mexico-
Black plate (34,1)
5-34
Instruments and Controls
SHIFT DENIED This message displays when attempting to use the automatic transmission manual mode to shift to too low or too high of a gear. See Manual Mode on page 9-29. SHIFT TO PARK This message displays when the transmission needs to be shifted to P (Park). This may appear when attempting to remove the key from the ignition or from the vehicle if the vehicle is not in P (Park). TRANSMISSION HOT — IDLE ENGINE This message displays and a chime sounds if the transmission fluid in the vehicle gets hot. Driving with the transmission fluid temperature high can cause damage to the vehicle. Stop the vehicle and let it idle to allow the transmission to cool. This message clears when the fluid temperature reaches a safe level.
Vehicle Reminder Messages
ICE POSSIBLE DRIVE WITH CARE This message displays when ice conditions are possible.
Washer Fluid Messages
WASHER FLUID LOW ADD FLUID This message may display when the washer fluid level is low. See Washer Fluid on page 10-21.
Window Messages
OPEN, THEN CLOSE DRIVER/ PASSENGER WINDOW This message is displayed when the window needs to be reprogrammed. If the vehicle's battery has been recharged or disconnected, you will need to program each front window for the express-up feature to work. See Power Windows on page 2-21.
Vehicle Personalization Use the audio system controls to access the personalization menus for customizing vehicle features. The following are all possible personalization features. Depending on the vehicle, some may not be available. CONFIG (Configuration): Press to access the Configuration Settings menu. TUNE/MENU: Turn to scroll through the menus. Press to enter the menus and select the menu items. BACK / : Press to exit or move backward in a menu.
Entering the Personalization Menus 1. Press CONFIG to access the Configuration Settings menu.
2. Turn the TUNE/MENU knob to
highlight Vehicle Settings.
Chevrolet Malibu Owner Manual 6081487) - 2014 - CRC - 11/19/13
(GMNA-Localizing-U.S./Canada/Mexico-
Black plate (35,1)
Instruments and Controls
5-35
3. Press TUNE/MENU to select the
Vehicle Settings menu.
The following list of menu items will be available: . Climate and Air Quality . Collision/Detection Systems . Comfort and Convenience
Language Lighting
. Power Door Locks . Remote Locking, Unlocking,
Starting
. Return to Factory Settings Turn the TUNE/MENU knob to highlight the menu. Press TUNE/ MENU to select it. Each of the menus is detailed in the following information. Climate and Air Quality Select the Climate and Air Quality menu and the following may be displayed: . Auto Fan Speed
. Remote Start Heated Seats . Auto Defog . Auto Rear Defog
Auto Fan Speed This allows for selecting the automatic fan speed. It can be adjusted to run lower or higher than normal. Press TUNE/MENU when Auto Fan Speed is highlighted to open the menu. Turn the TUNE/MENU knob to highlight High, Medium, or Low. Press TUNE/MENU to confirm the selection and move back to the last menu.
Remote Start Heated Seats When turned on, this feature will turn the heated seats on when using remote start on cold days. Press TUNE/MENU when Remote Start Heated Seats is highlighted. Turn the TUNE/MENU knob to select On or Off. Press TUNE/ MENU to confirm the selection and move back to the last menu.
Auto Defog Only vehicles with dual automatic climate control will have this option. This allows for turning the auto defog on or off. Press TUNE/MENU when Auto Defog is highlighted to open the menu. Turn the TUNE/MENU knob to highlight On or Off. Press TUNE/ MENU to confirm the selection and move back to the last menu.
Auto Rear Defog This will allow for turning the auto rear defog on or off. This feature will automatically turn on the rear window defogger when it is cold outside. Press TUNE/MENU when Auto Rear Defog is highlighted to open the menu. Turn the TUNE/MENU knob to highlight On or Off. Press TUNE/MENU to confirm the selection and move back to the last menu.
Chevrolet Malibu Owner Manual 6081487) - 2014 - CRC - 11/19/13
(GMNA-Localizing-U.S./Canada/Mexico-
Black plate (36,1)
5-36
Instruments and Controls
Collision/Detection Systems Select the Collision/Detection Systems menu and the following may be displayed: . Park Assist . Side Blind Zone Alert (SBZA)
Park Assist This allows the Park Assist feature to be turned on or off. Press TUNE/MENU when Park Assist is highlighted to open the menu. Turn the TUNE/MENU knob to highlight On or Off. Press TUNE/ MENU to confirm the selection and move back to the last menu. See Ultrasonic Parking Assist on page 9-40.
Side Blind Zone Alert (SBZA) This allows the SBZA feature to be turned on or off. Press TUNE/MENU when Side Blind Zone Alert is highlighted to open the menu. Turn the TUNE/ MENU knob to highlight On or Off.
Press TUNE/MENU to confirm the selection and move back to the last menu. See Side Blind Zone Alert (SBZA) on page 9-41. Comfort and Convenience Select the Comfort and Convenience menu and the following may be displayed: . Easy Exit Driver Seat . Chime Volume . Reverse Tilt Mirror
Easy Exit Driver Seat This feature automatically recalls the current driver’s previously stored EXIT button position when exiting the vehicle. See “Easy Exit Driver Seat” under Memory Seats on page 3-6. Press TUNE/MENU when Easy Exit Driver Seat is highlighted. Turn the TUNE/MENU knob to select On or Off. Press TUNE/MENU to confirm and go back to the last menu.
Chime Volume This allows selection of the chime volume level. Press TUNE/MENU when Chime Volume is highlighted. Turn the TUNE/MENU knob to select Normal or High. Press TUNE/MENU to confirm and go back to the last menu.
Reverse Tilt Mirror When on, both the driver and passenger mirrors will tilt downward when the vehicle is shifted to R (Reverse) to improve visibility of the ground near the rear wheels. They will return to their previous driving position when the vehicle is shifted out of R (Reverse), the ignition is turned to OFF, or the vehicle is left in R (Reverse). See Reverse Tilt Mirrors on page 2-20. Press TUNE/MENU when Reverse Tilt Mirror is highlighted. Turn the TUNE/MENU knob to select On or Off. Press TUNE/MENU to confirm and go back to the last menu.
Chevrolet Malibu Owner Manual 6081487) - 2014 - CRC - 11/19/13
(GMNA-Localizing-U.S./Canada/Mexico-
Black plate (37,1)
Language Select Language, then select from the available language(s). Press TUNE/MENU when Language is highlighted. Turn the TUNE/ MENU knob to select the desired language. Press TUNE/MENU to confirm and go back to the last menu. Lighting Select the Lighting menu and the following may be displayed: . Vehicle Locator Lights . Exit Lighting
Vehicle Locator Lights This allows the vehicle locator lights to be turned on or off. The vehicle locator lights come on when unlocking the vehicle with the RKE transmitter. Press TUNE/MENU when Vehicle Locator Lights is highlighted. Turn the TUNE/MENU knob to select On
Instruments and Controls
5-37
or Off. Press TUNE/MENU to confirm and go back to the last menu.
Exit Lighting This allows for selecting how long the exterior lamps stay on when leaving the vehicle and it is dark outside. Press TUNE/MENU when Exit Lighting is highlighted. Turn the TUNE/MENU knob to select Off, 30 Seconds, 1 Minute, or 2 Minutes. Press TUNE/MENU to confirm and go back to the last menu. Power Door Locks Select Power Door Locks and the following may be displayed: . Unlocked Door Anti Lock Out . Auto Door Unlock . Delayed Door Lock . Auto Door Lock
Unlocked Door Anti Lock Out When on, this feature will keep the driver door from locking when the door is open. If Off is selected, the Delayed Door Lock menu will be available and the door will lock as programmed through this menu. Press TUNE/MENU when Unlocked Door Anti Lock Out is highlighted. Turn the TUNE/MENU knob to select On or Off. Press TUNE/ MENU to confirm and go back to the last menu.
Auto Door Unlock This allows selection of which of the doors will automatically unlock when the vehicle is shifted into P (Park). Press TUNE/MENU when Auto Door Unlock is highlighted. Turn the TUNE/MENU knob to select All Doors, Driver Door, or Off. Press TUNE/MENU to confirm and go back to the last menu.
Chevrolet Malibu Owner Manual 6081487) - 2014 - CRC - 11/19/13
(GMNA-Localizing-U.S./Canada/Mexico-
Black plate (38,1)
5-38
Instruments and Controls
Delayed Door Lock When on, this feature will delay the locking of the doors until five seconds after the last door is closed. Three chimes will signal delayed locking is in use. Press either the power lock button or Q on the RKE transmitter twice to override the delayed locking feature and immediately lock all of the doors. Press TUNE/MENU when Delayed Door Lock is highlighted. Turn the TUNE/MENU knob to select On or Off. Press TUNE/MENU to confirm and go back to the last menu.
Auto Door Lock This allows selection of which of the doors will automatically lock when the vehicle is shifted out of P (Park). Press TUNE/MENU when Auto Door Lock is highlighted. Turn the TUNE/MENU knob to select All Doors, Driver Door, or Off. Press TUNE/MENU to confirm and go back to the last menu.
Remote Locking, Unlocking, Starting Select Remote Locking, Unlocking, Starting and the following may be displayed: . Unlock Feedback (Lights)
Locking Feedback
. Door Unlock Options . Memory Remote Recall . Remote Left in Vehicle Reminder . Relock Remote Door . Passive Door Unlock . Passive Door Lock
Unlock Feedback (Lights) When on, the exterior lamps will flash when unlocking the vehicle with the RKE transmitter. Press TUNE/MENU when Unlock Feedback (Lights) is highlighted. Turn the TUNE/MENU knob to select On or Off. Press TUNE/ MENU to confirm and go back to the last menu.
Locking Feedback This allows selection of what type of feedback is given when locking the vehicle with the RKE transmitter. Press TUNE/MENU when Locking Feedback is highlighted. Turn the TUNE/MENU knob to select Lights and Horn, Lights Only, Horn Only, or Off. Press TUNE/MENU to confirm and go back to the last menu.
Door Unlock Options This allows selection of which doors will unlock when pressing K on the RKE transmitter. Press TUNE/MENU when Door Unlock Options is highlighted. Turn the TUNE/MENU knob to select All Doors or Driver Door Only. When set to Driver Door Only, the driver door will unlock the first time K is pressed and all doors will unlock when K is pressed a second time. When set to All Doors, all of the
Chevrolet Malibu Owner Manual 6081487) - 2014 - CRC - 11/19/13
(GMNA-Localizing-U.S./Canada/Mexico-
Black plate (39,1)
Instruments and Controls
5-39
doors will unlock at the first press of K. Press TUNE/MENU to confirm and go back to the last menu.
Memory Remote Recall This allows the Memory Remote Recall feature to be turned on or off. When on, this feature will recall the current driver's last seat and outside mirror positions upon unlocking the driver door with the RKE transmitter, and opening that door. The current driver is identified when the RKE transmitter is used to unlock the driver door. If equipped with Keyless Access, the recall will occur upon opening the driver door. See “Recalling RKE Memory Positions” under Memory Seats on page 3-6. Press TUNE/MENU when Memory Remote Recall is highlighted. Turn the TUNE/MENU knob to select On or Off. Press TUNE/MENU to confirm and go back to the last menu.
Remote Left in Vehicle Reminder This allows the Remote Left in Vehicle Reminder feature to be turned on or off. If on, the horn will chirp if a remote is left in the vehicle. Press TUNE/MENU when Remote Left in Vehicle Reminder is highlighted. Turn the TUNE/MENU knob to select On or Off. Press TUNE/MENU to confirm and go back to the last menu.
Relock Remote Door When on, the doors will automatically lock after a period of time if the vehicle is not entered or exited. Press TUNE/MENU when Relock Remote Door is highlighted. Turn the TUNE/MENU knob to select On or Off. Press TUNE/MENU to confirm and go back to the last menu.
Passive Door Unlock This allows selection of which doors are unlocked by pressing the button on the outside door handle. Press TUNE/MENU when Passive Door Unlock is highlighted. Turn the TUNE/MENU knob to select All Doors or Driver Door. Press TUNE/ MENU to confirm and go back to the last menu.
Passive Door Lock This allows for turning Passive Locking off, on, or on with feedback. Press TUNE/MENU when Passive Door Lock is highlighted. Turn the TUNE/MENU knob to select Off, On, or On with Active Horn Chirp. Press TUNE/MENU to confirm and go back to the last menu.
Chevrolet Malibu Owner Manual 6081487) - 2014 - CRC - 11/19/13
(GMNA-Localizing-U.S./Canada/Mexico-
Black plate (40,1)
5-40
Instruments and Controls
Return to Factory Settings Select Return to Factory Settings for the option to return all vehicle personalization to the default settings. Turn the TUNE/MENU knob to select Yes or No. Press TUNE/MENU to confirm and go back to the last menu.
Universal Remote System See Radio Frequency Statement on page 13-15.
Universal Remote System Programming
If equipped, these buttons are in the overhead console. This system can replace up to three remote control transmitters used to activate devices such as garage door openers, security systems, and home automation devices. These instructions refer to a garage door opener, but can be used for other devices.
Do not use the Universal Remote system with any garage door opener that does not have the stop and reverse feature. This includes any garage door opener model manufactured before April 1, 1982. Read these instructions completely before programming the Universal Remote system. It may help to have another person assist with the programming process. Keep the original hand-held transmitter for use in other vehicles as well as for future programming. Erase the programming when vehicle ownership is terminated. See “Erasing Universal Remote System Buttons” later in this section. To program a garage door opener, park outside directly in line with and facing the garage door opener receiver. Clear all people and objects near the garage door.
Chevrolet Malibu Owner Manual 6081487) - 2014 - CRC - 11/19/13
(GMNA-Localizing-U.S./Canada/Mexico-
Black plate (41,1)
Instruments and Controls
5-41
Make sure the hand-held transmitter has a new battery for quick and accurate transmission of the radio-frequency signal. Programming the Universal Remote System For questions or help programming the Universal Remote system, call 1-800-355-3515 or see www.homelink.com. Programming involves time-sensitive actions, and may time out causing the procedure to be repeated. To program up to three devices: 1. Hold the end of the hand-held
transmitter about 3 to 8 cm (1 to 3 in) away from the Universal Remote system buttons with the indicator light in view. The hand-held transmitter was supplied by the manufacturer of the garage door opener receiver.
2. At the same time, press and
hold both the hand-held transmitter button and one of the three Universal Remote system buttons to be used to operate the garage door. Do not release either button until the indicator light changes from a slow to a rapid flash. Then release both buttons. Some garage door openers may require substitution of Step 2
with the procedure under “Radio Signals for Canada and Some Gate Operators” later in this section.3. Press and hold the newly
programmed Universal Remote system button for five seconds while watching the indicator light and garage door activation.
If the indicator light stays on continuously or the garage door moves when the button is pressed, then
programming is complete. There is no need to complete Steps 4–6. If the indicator light does not come on or the garage door does not move, a second button press may be required. For a second time, press and hold the newly programmed button for five seconds. If the light stays on or the garage door moves, programming is complete. If the indicator light blinks rapidly for two seconds, then changes to a solid light and the garage door does not move, continue with programming Steps 4–6.
Chevrolet Malibu Owner Manual 6081487) - 2014 - CRC - 11/19/13
(GMNA-Localizing-U.S./Canada/Mexico-
Black plate (42,1)
5-42
Instruments and Controls
enough for the Universal Remote system to pick up the signal during programming. If the programming did not work, replace Step 2 under “Programming the Universal Remote System” with the following: Press and hold the Universal Remote system button while pressing and releasing the hand-held transmitter button every two seconds until the signal has been successfully accepted by the Universal Remote system. The Universal Remote system indicator light will flash slowly at first and then rapidly. Proceed with Step 3 under “Programming the Universal Remote System” to complete.
does not flash, press and hold the same button a second time for two seconds, then release it. Again, if the door does not move or the garage door lamp does not flash, press and hold the same button a third time for two seconds, then release it.
The Universal Remote system should now activate the garage door. Repeat the process for programming the two remaining buttons. Radio Signals for Canada and Some Gate Operators For questions or programming help call 1-800-355-3515 or see www.homelink.com. Canadian radio-frequency laws and some U.S. gate operators require transmitter signals to time out or quit after several seconds of transmission. This may not be long
Learn or Smart Button
4. After completing Steps 1–3 ,
locate the Learn or Smart button inside garage on the garage door opener receiver. The name and color of the button may vary by manufacturer.
5. Press and release the Learn or
6.
Smart button. Step 6 must be completed within 30 seconds of pressing this button. Inside the vehicle, press and hold the newly programmed Universal Remote system button for two seconds and then release it. If the garage door does not move or the lamp on the garage door opener receiver
Chevrolet Malibu Owner Manual 6081487) - 2014 - CRC - 11/19/13
(GMNA-Localizing-U.S./Canada/Mexico-
Black plate (43,1)
Instruments and Controls
5-43
Reprogramming a Single Universal Remote System Button To reprogram any of the system buttons: 1. Press and hold any one of the
buttons. Do not release the button.
2. The indicator light will begin to flash after 20 seconds. Without releasing the button, proceed with Step 1 under “Programming the Universal Remote System.”
Universal Remote System Operation
Using the Universal Remote System Press and hold the appropriate Universal Remote system button for at least one-half second. The indicator light will come on while the signal is being transmitted. Erasing Universal Remote System Buttons Erase all programmed buttons when vehicle ownership is terminated. To erase: 1. Press and hold the two outside buttons until the indicator light begins to flash. This should take about 10 seconds.
2. Release both buttons.
Chevrolet Malibu Owner Manual 6081487) - 2014 - CRC - 11/19/13
(GMNA-Localizing-U.S./Canada/Mexico-
Black plate (44,1)
5-44
Instruments and Controls
2 NOTES
Chevrolet Malibu Owner Manual 6081487) - 2014 - CRC - 11/19/13
(GMNA-Localizing-U.S./Canada/Mexico-
Black plate (1,1)
Lighting
Exterior Lighting
Exterior Lamp Controls . . . . . . . . 6-1
Exterior Lamps OffReminder . . . . . . . . . . . . . . . . . . . . 6-2
Headlamp High/Low-Beam
Changer . . . . . . . . . . . . . . . . . . . . . 6-2
Flash-to-Pass . . . . . . . . . . . . . . . . . 6-2
Daytime RunningLamps (DRL) . . . . . . . . . . . . . . . . 6-2
Automatic Headlamp
System . . . . . . . . . . . . . . . . . . . . . . 6-3
Hazard Warning Flashers . . . . . 6-3
Turn and Lane-ChangeSignals . . . . . . . . . . . . . . . . . . . . . . 6-4
Fog Lamps . . . . . . . . . . . . . . . . . . . . 6-4Interior Lighting
Instrument Panel Illumination
Control . . . . . . . . . . . . . . . . . . . . . . 6-5
Courtesy Lamps . . . . . . . . . . . . . . 6-5
Dome Lamps . . . . . . . . . . . . . . . . . 6-5
Reading Lamps . . . . . . . . . . . . . . . 6-5Lighting Features
Entry Lighting . . . . . . . . . . . . . . . . . 6-6
Exit Lighting . . . . . . . . . . . . . . . . . . . 6-6
Battery Load Management . . . . 6-7Lighting
6-1
Exterior Lighting
Exterior Lamp Controls
The exterior lamp control is on the instrument panel on the left side of the steering wheel. Turn the control to the following positions: O (Off): Turns off the exterior lamps. The knob returns to the AUTO position after it is released. Turn to O again to reactivate the AUTO mode. In Canada, the headlamps will automatically reactivate when the vehicle is shifted out of P (Park).
Chevrolet Malibu Owner Manual 6081487) - 2014 - CRC - 11/19/13
(GMNA-Localizing-U.S./Canada/Mexico-
Black plate (2,1)
6-2
Lighting
AUTO (Automatic): Automatically turns the exterior lamps on and off, depending on outside lighting. ; (Parking Lamps): Turns on the parking lamps including all lamps, except the headlamps. 2 (Headlamps): Turns on the headlamps together with the parking lamps and instrument panel lights.
Exterior Lamps Off Reminder A warning chime sounds if the driver door is opened while the ignition is off and the exterior lamps are on.
Headlamp High/ Low-Beam Changer 2 3 (Headlamp High/Low-Beam Changer): Push the turn signal lever away from you and release, to turn the high beams on. To return to low beams, push the lever again or pull it toward you and release.
The DRL system turns on the low-beam headlamps at a reduced brightness. For vehicles with High Intensity Discharge (HID) headlamps, there is a dedicated DRL. The DRL will come on when all of the following conditions are met:
The ignition is on. The exterior lamp control is in AUTO. The light sensor determines it is daytime. The vehicle is not in P (Park).
When the DRL are on, the taillamps, sidemarker lamps, instrument panel lights, and other lamps will not be on. The DRL turn off when the headlamps are turned to O or the ignition is off.
This indicator light turns on in the instrument cluster when the high-beam headlamps are on.
Flash-to-Pass To flash the high beams, pull the turn signal lever toward you, and release.
Daytime Running Lamps (DRL) DRL can make it easier for others to see the front of your vehicle during the day. Fully functional DRL are required on all vehicles first sold in Canada.
Chevrolet Malibu Owner Manual 6081487) - 2014 - CRC - 11/19/13
(GMNA-Localizing-U.S./Canada/Mexico-
Black plate (3,1)
This vehicle may have a DRL disabling function. When the DRL are on and a turn signal is activated, the DRL on that side will be off until the turn signal goes off.
Automatic Headlamp System When the exterior lamp control is set to AUTO and it is dark enough outside, the headlamps come on automatically.
There is a light sensor on top of the instrument panel. Do not cover the sensor, otherwise the headlamps will come on when they are not needed. The system may also turn on the headlamps when driving through a parking garage or tunnel. When it is bright enough outside, the headlamps will turn off or may change to Daytime Running Lamps (DRL). The automatic headlamp system turns off when the exterior lamp control is turned to O or the ignition is off. Lights On with Wipers If the windshield wipers are activated in daylight with the engine on, and the exterior lamp control is in AUTO, the headlamps, parking lamps, and other exterior lamps come on. The transition time for the lamps coming on varies based on wiper speed. When the wipers are
Lighting
6-3
not operating, these lamps turn off. Move the exterior lamp control to P or ; to disable this feature.
Hazard Warning Flashers
| (Hazard Warning Flashers): Press this button to make the front and rear turn signal lamps flash on and off. Press again to turn the flashers off. The hazard warning flashers turn on automatically if the airbags deploy.
Chevrolet Malibu Owner Manual 6081487) - 2014 - CRC - 11/19/13
(GMNA-Localizing-U.S./Canada/Mexico-
Black plate (4,1)
6-4
Lighting
Turn and Lane-Change Signals
Move the turn signal lever all the way up or down to signal a turn. An arrow on the instrument cluster flashes in the direction of the turn or lane change. Raise or lower the lever until the arrow starts to flash to signal a lane change. Hold it there until the lane change is completed. If the lever is briefly pressed and released, the turn signal flashes three times. The turn signal can be turned off manually by moving the lever back to its original position.
If after signaling a turn or lane change, the arrow flashes rapidly or does not come on, a signal bulb may be burned out. Have any burned out bulbs replaced. If a bulb is not burned out, check the fuse. See Fuses on page 10-38.
Fog Lamps
If the fog lamps are turned on while the exterior lamp control is in the AUTO position, the headlamps come on automatically. # (Fog Lamps, If Equipped): Press to turn on or off. An indicator light on the instrument cluster comes on when the fog lamps are on. Some localities have laws that require the headlamps to be on along with the fog lamps.
To turn on the fog lamps, if equipped, the ignition and the headlamps or parking lamps must be on.
Chevrolet Malibu Owner Manual 6081487) - 2014 - CRC - 11/19/13
(GMNA-Localizing-U.S./Canada/Mexico-
Black plate (5,1)
Interior Lighting
Instrument Panel Illumination Control
Courtesy Lamps The courtesy lamps come on automatically when any door is opened and the dome lamp is in the door position.
Dome Lamps
Lighting
6-5
1 (Door): Turns the lamps on when any door is opened. + (On): Keeps the lamps on all the time.
Reading Lamps There are front and rear reading lamps in the overhead console and the headliner.
The brightness of the instrument panel lighting and steering wheel controls can be adjusted. D (Instrument Panel Illumination): Move and hold the thumbwheel up or down to brighten or dim the lights.
The interior lamps control in the overhead console controls both the front and rear interior lamps. To operate, press the buttons: E (Off): Turns the lamps off.
Front Reading Lamps
Chevrolet Malibu Owner Manual 6081487) - 2014 - CRC - 11/19/13
(GMNA-Localizing-U.S./Canada/Mexico-
Black plate (6,1)
6-6
Lighting
Rear Reading Lamps
# or $ (Reading Lamps): Press the button near each lamp to turn it on or off.
Lighting Features
Entry Lighting The headlamps, taillamps, license plate lamps, back-up lamps, dome lamps, and most of the interior lights turn on briefly when the Remote Keyless Entry (RKE) transmitter K button is pressed. See Ignition Positions (Keyless Access) on page 9-15 or Ignition Positions (Key Access) on page 9-17. After about 30 seconds the exterior lamps turn off, then the dome lamps and remaining interior lights dim to off. Entry lighting can be disabled manually by changing the ignition out of the OFF position, or by pressing the RKE transmitter Q button. This feature can be changed. See Vehicle Personalization on page 5-34.
Exit Lighting The headlamps, taillamps, parking lamps, back-up lamps, and license plate lamps come on at night, or in areas with limited lighting, when the key is removed from the ignition. The dome lamps also come on when the key is removed from the ignition. The exterior lights and dome lamps remain on after the door is closed for a set amount of time, then automatically turn off. For vehicles with Keyless Access, the exterior lamps automatically turn on when a door is opened after the ignition is turned off. The dome lamps come on after the ignition is changed to the OFF position. See Ignition Positions (Keyless Access) on page 9-15 or Ignition Positions (Key Access) on page 9-17. The exterior lamps turn off immediately by turning the exterior lamps control off. This feature can be changed. See Vehicle Personalization on page 5-34.
Chevrolet Malibu Owner Manual 6081487) - 2014 - CRC - 11/19/13
(GMNA-Localizing-U.S./Canada/Mexico-
Black plate (7,1)
Battery Load Management The vehicle has Electric Power Management (EPM), which estimates the battery's temperature and state of charge. It then adjusts the voltage for best performance and extended life of the battery. When the battery's state of charge is low, the voltage is raised slightly to quickly bring the charge back up. When the state of charge is high, the voltage is lowered slightly to prevent overcharging. If the vehicle has a voltage display on the Driver Information Center (DIC), you may see the voltage move up or down. This is normal. If there is a problem, an alert will be displayed.
The battery can be discharged at idle if the electrical loads are very high. This is true for all vehicles. This is because the generator (alternator) may not be spinning fast enough at idle to produce all the power that is needed for very high electrical loads. A high electrical load occurs when several of the following are on, such as: headlamps, high beams, fog lamps, rear window defogger, climate control fan at high speed, heated seats, engine cooling fans, trailer loads, and loads plugged into accessory power outlets.
Lighting
6-7
EPM works to prevent excessive discharge of the battery. It does this by balancing the generator's output and the vehicle's electrical needs. It can increase engine idle speed to generate more power, whenever needed. It can temporarily reduce the power demands of some accessories. Normally, these actions occur in steps or levels, without being noticeable. In rare cases at the highest levels of corrective action, this action may be noticeable to the driver. If so, a DIC message might be displayed and it is recommended that the driver reduce the electrical loads as much as possible. See Battery Voltage and Charging Messages on page 5-27.
Chevrolet Malibu Owner Manual 6081487) - 2014 - CRC - 11/19/13
(GMNA-Localizing-U.S./Canada/Mexico-
Black plate (8,1)
6-8
Lighting
2 NOTES
Chevrolet Malibu Owner Manual 6081487) - 2014 - CRC - 11/19/13
(GMNA-Localizing-U.S./Canada/Mexico-
Black plate (1,1)
Infotainment System 7-1
This system provides access to many audio and non-audio listings. To minimize taking your eyes off the road while driving, do the following while the vehicle is parked: . Become familiar with the
operation and controls of the audio system.
. Set up the tone, speaker
adjustments, and preset radio stations.
See Defensive Driving on page 9-3.
Infotainment System
Introduction
Infotainment . . . . . . . . . . . . . . . . . . . 7-1
Theft-Deterrent Feature . . . . . . . 7-2
Overview . . . . . . . . . . . . . . . . . . . . . . 7-3
Operation . . . . . . . . . . . . . . . . . . . . . 7-5Radio
AM-FM Radio . . . . . . . . . . . . . . . . . 7-9
Satellite Radio . . . . . . . . . . . . . . . 7-11
Radio Reception . . . . . . . . . . . . . 7-13
Backglass Antenna . . . . . . . . . . 7-14
Multi-Band Antenna . . . . . . . . . . 7-14Audio Players
CD Player . . . . . . . . . . . . . . . . . . . 7-15
Auxiliary Devices . . . . . . . . . . . . 7-16Phone
Introduction
Infotainment Determine which radio the vehicle has. For the radio without connectivity, read the following pages to become familiar with its features. For radios with connectivity, see the infotainment manual.
{ Warning
Taking your eyes off the road for extended periods could cause a crash resulting in injury or death to you or others. Do not give extended attention to infotainment tasks while driving.
Bluetooth (Overview) . . . . . . . . 7-21
Bluetooth (InfotainmentControls) . . . . . . . . . . . . . . . . . . . 7-23
Bluetooth (Voice
Recognition) . . . . . . . . . . . . . . . 7-26
Chevrolet Malibu Owner Manual 6081487) - 2014 - CRC - 11/19/13
(GMNA-Localizing-U.S./Canada/Mexico-
Black plate (2,1)
7-2
Infotainment System
{ Caution
{ Caution
Contact your dealer before adding any equipment. Adding audio or communication equipment could interfere with the operation of the engine, radio, or other systems, and could damage them. Follow federal rules covering mobile radio and telephone equipment.
The chime signals related to safety belts, parking brake, and other functions of your vehicle operate through the radio/ entertainment system. If that equipment is replaced or additional equipment is added to your vehicle, the chimes may not work. Make sure that replacement or additional equipment is compatible with your vehicle before installing it. See Accessories and Modifications on page 10-3.
The vehicle has Retained Accessory Power (RAP). With RAP, the audio system can be played even after the ignition is turned off. See Retained Accessory Power (RAP) on page 9-23.
Theft-Deterrent Feature The theft-deterrent feature works by learning a portion of the Vehicle Identification Number (VIN) to the infotainment system. The infotainment system does not operate if it is stolen or moved to a different vehicle.
Chevrolet Malibu Owner Manual 6081487) - 2014 - CRC - 11/19/13
(GMNA-Localizing-U.S./Canada/Mexico-
Black plate (3,1)
Overview
Infotainment System Overview Radio faceplate examples are provided to help identify buttons and to help understand the functions of the radio. Find the faceplate that best matches the vehicle for a description.
Radio with CD
Infotainment System 7-3
1. VOL/ O (Volume/Power)
Turns the system on or off and adjusts the volume.
2. FAV (Favorites)
Opens the favorites list.
3. CD/AUX
Selects the CD player or external audio source. Selects a connected external audio source.
4. Buttons 1 to 6
Saves and selects favorite stations. 5. RADIO/BAND
Changes the band while listening to the radio. Selects the radio when listening to a different audio source.
6. BACK /
Menu: Moves one level back.
Chevrolet Malibu Owner Manual 6081487) - 2014 - CRC - 11/19/13
(GMNA-Localizing-U.S./Canada/Mexico-
Black plate (4,1)
7-4
Infotainment System
Character Input: Deletes the last character.
7. TUNE/MENU
Radio: Manually selects radio stations. CD: Selects tracks.
8. Z (CD Eject)
Removes a disc from the CD slot.
9. v / > (Phone/Mute)
Opens the Phone menu. Mutes the audio system.
10. w j (Play/Pause)
Press to start, pause, and resume playback. See CD Player on page 7-15.
11. CD Slot
Insert a CD.
12. © SEEK ¨
Press © to seek to the beginning of the current or previous track. If the track has been playing for less than five seconds, it seeks the previous track. If longer than five seconds, the current track starts from the beginning. Press and hold © to quickly reverse through a track. Release the button to return to playing speed. See CD Player on page 7-15. For AM or FM, press © to seek to the previous strong station. Press ¨ to seek the next track. Press and hold ¨ to fast forward through a track.
Release ¨ to return to playing speed. See CD Player on page 7-15. For AM or FM, press ¨ to seek to the next strong station.
13. CONFIG (Configuration)
Opens the Configuration menu.
14. TONE
Press to access the Tone Settings menu to adjust bass, midrange, and treble. See Operation on page 7-5.
15.
INFO
Radio: Shows available information about the current station. CD: Shows available information about the current track.
Chevrolet Malibu Owner Manual 6081487) - 2014 - CRC - 11/19/13
(GMNA-Localizing-U.S./Canada/Mexico-
Black plate (5,1)
Configuration Setup Menu Press the CONFIG button to display the Configuration menu. The Configuration menu is used for changing the settings for the audio, phone, vehicle configuration, and time features. Turn the TUNE/MENU knob to scroll through the available setup features. Once the desired feature displays, press the TUNE/MENU knob or press the desired feature on the screen, to display more options within that feature. Languages To change the display language, see Vehicle Personalization on page 5-34. The vehicle supports English, French, and Spanish. The default language is English.
Operation
Controls The infotainment system is operated by using the pushbuttons, multifunction knobs, menus shown on the display, and steering wheel controls, if equipped. Turning the System On or Off VOL/ O (Volume/Power): Press to turn the system on and off.
Automatic Switch-Off If the infotainment system has been turned on after the ignition is turned off, the system will turn off automatically after 10 minutes. Volume Control VOL/ O (Volume/Power): Turn to adjust the volume.
Infotainment System 7-5
v / > (Phone): For vehicles with OnStar, press and hold v / > to mute the infotainment system. Press and hold v / > again, or turn the VOL/ O knob to cancel mute. For vehicles without OnStar®, press v / > to mute the infotainment system. Press v / > again, or turn the VOL/ O knob to cancel mute. Menu System
Controls The TUNE/MENU knob and the BACK / button are used to navigate the menu system. TUNE/MENU: Press to: . Select or activate the highlighted
menu option.
. Confirm a set value.
Turn a system setting on or off.
Turn to: . Enter the menu system.
Chevrolet Malibu Owner Manual 6081487) - 2014 - CRC - 11/19/13
(GMNA-Localizing-U.S./Canada/Mexico-
Black plate (6,1)
7-6
Infotainment System
. Highlight a menu option. . Select a value. BACK / : Press to: . Exit a menu. . Return from a submenu screen
to the previous menu screen. . Delete the last character in a
sequence.
Selecting a Menu Option The base radio displays one line of text at a time.
Submenus
Setting a Value
An arrow on the right-hand edge of the menu indicates that it has a submenu with other options.
1. Turn the TUNE/MENU knob to change the current value of the setting.
Activating a Setting
2. Press TUNE/MENU to confirm
the setting.
Turning a Function On or Off
1. Turn the TUNE/MENU knob to
move the highlighted bar.
2. Press TUNE/MENU to select the
highlighted option.
1. Turn the TUNE/MENU knob to
highlight the setting.
2. Press TUNE/MENU to activate
1. Turn the TUNE/MENU knob to
the setting.
highlight the function.
2. Press TUNE/MENU to turn the
function on or off.
Chevrolet Malibu Owner Manual 6081487) - 2014 - CRC - 11/19/13
(GMNA-Localizing-U.S./Canada/Mexico-
Black plate (7,1)
3. Press and hold TUNE/MENU until the value changes to 0. Press the BACK / button to go back to the Tone Settings menu.
Adjusting the Treble, Midrange, and Bass
1. Press the TONE button. 2. Select Treble, Midrange,
or Bass.
3. Select the value. Press the BACK / button to go back to the Tone Settings menu.
Entering a Character Sequence
1. Turn the TUNE/MENU knob to
highlight the character.
2. Press TUNE/MENU to select the
character.
Press the BACK / button to delete the last character in the sequence or press and hold to delete the entire character sequence. Audio Settings The audio settings can be set for each radio band and each audio player source. To quickly reset an audio setting value to 0: 1. Press the TONE button. 2. Select the audio setting.
Infotainment System 7-7
Adjusting the Fader and Balance
1. Press the TONE button. 2. Select Fader or Balance. 3. Select the value. Press the BACK / button to go back to the Tone Settings menu.
Adjusting the EQ (Equalizer) For vehicles that have an equalizer: 1. Press the TONE button. 2. Select EQ. 3. Select the setting. Press the BACK / button to go back to the Tone Settings menu.
Chevrolet Malibu Owner Manual 6081487) - 2014 - CRC - 11/19/13
(GMNA-Localizing-U.S./Canada/Mexico-
Black plate (8,1)
7-8
Infotainment System
System Settings
Speed Compensated Volume
5. Press BACK / button to go back
to the System Configuration menu.
Configuring the Number of Favorite Pages
The Speed Compensated Volume feature automatically adjusts the radio volume to compensate for road and wind noise as the vehicle speeds up or slows down, so that the volume level is consistent. The level of volume compensation can be selected, or the auto volume feature can be turned off. 1. Press the CONFIG button. 2. Select Radio Settings. 3. Select Speed compensated
volume.
4. Select the setting.
To configure the number of available favorite pages: 1. Press the CONFIG button. 2. Select Radio Settings. 3. Select Radio Favorites. 4. Select the number of available
favorite pages.
5. Press the BACK / button to go
back to the System Configuration menu.
Auto Volume The auto volume feature automatically adjusts the radio volume to compensate for road and wind noise as the vehicle speeds up or slows down, so that the volume level is consistent. The level of volume compensation can be selected, or the auto volume feature can be turned off.
1. Press the CONFIG button. 2. Select Radio Settings. 3. Select Auto Volume. 4. Select the setting. 5. Press the BACK / button to go
back to the System Configuration menu.
Chevrolet Malibu Owner Manual 6081487) - 2014 - CRC - 11/19/13
(GMNA-Localizing-U.S./Canada/Mexico-
Black plate (9,1)
Regionalization RDS stations will broadcast different programs on different frequencies. To set the Regional (REG) feature on or off: 1. Press the CONFIG button. 2. Select Regional (REG). 3. Select On or Off. 4. Press BACK / to go back to the
previous menu.
Maximum Startup Volume The maximum volume played when the radio is first turned on can be set.
1. Press the CONFIG button. 2. Select Radio Settings. 3. Select Maximum Startup
Volume.
4. Select the setting. 5. Press the BACK / button to go
back to the System Configuration menu.
Infotainment System 7-9
Radio
AM-FM Radio
Control Buttons The buttons used to control the radio are: RADIO/BAND: Press to turn the radio on and choose between AM, FM, or SiriusXM if equipped. TUNE/MENU: Press and turn to navigate the available menus. Turn to manually change stations. INFO: Press to display additional information that may be available for the current song. © SEEK ¨ : Press to search for stations. FAV: Press to open the favorites list. 1 to 6: Press to select preset stations.
Chevrolet Malibu Owner Manual 6081487) - 2014 - CRC - 11/19/13
(GMNA-Localizing-U.S./Canada/Mexico-
Black plate (10,1)
7-10
Infotainment System
RDS (Radio Data System) The radio may have RDS. The RDS feature is available for use only on FM stations that broadcast RDS information. This feature only works when the information from the radio station is available. In rare cases, a radio station could broadcast incorrect information that causes the radio features to work improperly. If this happens, contact the radio station. While the radio is tuned to an FM-RDS station, the station name or call letters display. Radio Menus Radio menus are available for AM, FM, or SiriusXM if equipped. Turn the TUNE/MENU knob to open the main radio menu for that frequency.
Selecting a Band Press the RADIO/BAND button to choose AM, FM, or SiriusXM if equipped. The last station that was playing starts playing again. Selecting a Station
Seek Tuning If the radio station is not known: Briefly press © or ¨ to automatically search for the next available station. If a station is not found, the radio switches to a more sensitive search level. If a station still is not found, the frequency that was last active begins to play. If the radio station is known: Press and hold © or ¨ until the station on the display is reached, then release the button.
Manual Tuning Turn the TUNE/MENU knob to select the frequency on the display.
Favorites List 1. Turn the TUNE/MENU knob. 2. Select Favorites List. 3. Select the station.
Station Lists 1. Turn the TUNE/MENU knob. 2. Select AM or FM Station List. All receivable stations in the current reception area are displayed. If a station list has not been created, an automatic station search is done.
3. Select the station.
Category Lists Most stations that broadcast an RDS program type code specify the type of programming transmitted. Some stations change the program type code depending on the content. The system stores the RDS stations sorted by program type in the FM category list.
Chevrolet Malibu Owner Manual 6081487) - 2014 - CRC - 11/19/13
(GMNA-Localizing-U.S./Canada/Mexico-
Black plate (11,1)
To search for a programming type determined by station: 1. Turn the TUNE/MENU knob. 2. Select FM category list. A list of all programming types available displays.
3. Select the programming type. A list of stations that transmit programming of the selected type displays.
4. Select the station.
The category lists are updated when the station lists are updated.
Updating Station & Category Lists If stations stored in the station list can no longer be received: 1. Turn the TUNE/MENU knob. 2. Select Update AM or FM Station List, if the stations stored in the station list are no longer received. A station search will be completed and the first station in the updated list will play.
To cancel the station search, press TUNE/MENU. Storing a Station as a Favorite Stations from all bands can be stored in any order in the favorite pages. Up to six stations can be stored in each favorite page and the number of available favorite pages can be set.
Storing Stations To store the station to a position in the list, press the corresponding button 1 to 6 until a beep is heard.
Retrieving Stations Press the FAV button to open a favorite page or to switch to another favorite page. Briefly press one of the 1 to 6 buttons to retrieve the station.
Infotainment System 7-11
Satellite Radio
SiriusXM® Satellite Radio Service Vehicles with a SiriusXM satellite radio tuner and a SiriusXM satellite radio subscription can receive SiriusXM programming. SiriusXM is a satellite radio service based in the 48 contiguous United States and 10 Canadian provinces. SiriusXM satellite radio has a wide variety of programming and commercial-free music, coast to coast, and in digital-quality sound. A service fee is required to receive the SiriusXM service. For more information, see www.siriusxm.com or 1-866-635-2349 (U.S.), and www.xmradio.ca or 1-877-209-0079
(Canada). When SiriusXM is active, the channel name and number, category name, song title, and artist display on the screen.Chevrolet Malibu Owner Manual 6081487) - 2014 - CRC - 11/19/13
(GMNA-Localizing-U.S./Canada/Mexico-
Black plate (12,1)
7-12
Infotainment System
SiriusXM Categories SiriusXM channels are organized in categories. To customize which SiriusXM categories are used and displayed in the system, see “Adding or Removing SiriusXM Categories” following. Adding or Removing SiriusXM Categories 1. Press the CONFIG button on the
faceplate.
2. Select Radio Settings. 3. Select Add/Remove XM
Categories.
4. From the Add/Remove XM
Categories screen, select or deselect any category to be used in XM mode. A checkmark will indicate that the category is selected.
Turning SiriusXM Channel Graphic On or Off 1. Press the CONFIG button on the
faceplate.
2. Select Radio Settings. 3. Select XM Channel Graphic to
turn on or off.
SiriusXM Messages XM Updating: The encryption code in the receiver is being updated. No action is required. This process should take no longer than 30 seconds. Loading XM: The audio system is acquiring and processing audio and text data. No action is needed. This message should disappear shortly. Channel Off Air: This channel is not currently in service. Tune in to another channel. Channel Unauth: This channel is blocked or cannot be received with your SiriusXM subscription package.
Channel Unavailable: This previously assigned channel is no longer assigned. Tune to another channel. No Artist Info: The system is working properly. No artist information is available at this time on this channel. No Title Info: The system is working properly. No song title information is available at this time on this channel. No CAT Info: The system is working properly. No category information is available at this time on this channel. No Information: The system is working properly. No text or informational messages are available at this time on this channel. No Subscription Please Renew: The SiriusXM subscription needs to be reactivated. Contact SiriusXM at www.siriusxm.com or
Chevrolet Malibu Owner Manual 6081487) - 2014 - CRC - 11/19/13
(GMNA-Localizing-U.S./Canada/Mexico-
Black plate (13,1)
1-866-635-2349 (U.S.), and www.xmradio.ca or 1-877-209-0079
(Canada). No XM Signal: The system is working properly. The vehicle may be in a location where the SiriusXM signal is being blocked. When the vehicle is moved into an open area, the signal should return. CAT Not Found: The system is working properly. There are no channels available for the selected category. XM Radio ID: this message alternates with the SiriusXM Radio eight-digit radio ID label. This label is needed to activate the service. Unknown: received when tuned to channel 0, there could be a receiver fault. Consult with your dealer. Check Antenna: does not clear within a short period of time, the receiver could have a fault. Consult with your dealer.If this message is
If this message
If tuned to channel 0,
Infotainment System 7-13
AM The range for most AM stations is greater than for FM, especially at night. The longer range can cause station frequencies to interfere with each other. Static can also occur when things like storms and power lines interfere with radio reception. When this happens, try reducing the treble on the radio. SiriusXM Satellite Radio Service SiriusXM Satellite Radio Service provides digital radio reception. Tall buildings or hills can interfere with satellite radio signals, causing the sound to fade in and out. In addition, traveling or standing under heavy foliage, bridges, garages,