- 2004 Chevrolet Express Owners Manuals
- Chevrolet Express Owners Manuals
- 2013 Chevrolet Express Owners Manuals
- Chevrolet Express Owners Manuals
- 2000 Chevrolet Express Owners Manuals
- Chevrolet Express Owners Manuals
- 2012 Chevrolet Express Owners Manuals
- Chevrolet Express Owners Manuals
- 1998 Chevrolet Express Owners Manuals
- Chevrolet Express Owners Manuals
- 2002 Chevrolet Express Owners Manuals
- Chevrolet Express Owners Manuals
- 1996 Chevrolet Express Owners Manuals
- Chevrolet Express Owners Manuals
- 2003 Chevrolet Express Owners Manuals
- Chevrolet Express Owners Manuals
- 2007 Chevrolet Express Owners Manuals
- Chevrolet Express Owners Manuals
- 2008 Chevrolet Express Owners Manuals
- Chevrolet Express Owners Manuals
- 1999 Chevrolet Express Owners Manuals
- Chevrolet Express Owners Manuals
- 2006 Chevrolet Express Owners Manuals
- Chevrolet Express Owners Manuals
- 2009 Chevrolet Express Owners Manuals
- Chevrolet Express Owners Manuals
- 2010 Chevrolet Express Owners Manuals
- Chevrolet Express Owners Manuals
- 2011 Chevrolet Express Owners Manuals
- Chevrolet Express Owners Manuals
- 2014 Chevrolet Express Owners Manuals
- Chevrolet Express Owners Manuals
- 2015 Chevrolet Express Owners Manuals
- Chevrolet Express Owners Manuals
- 1997 Chevrolet Express Owners Manuals
- Chevrolet Express Owners Manuals
- 2016 Chevrolet Express Owners Manuals
- Chevrolet Express Owners Manuals
- 2001 Chevrolet Express Owners Manuals
- Chevrolet Express Owners Manuals
- 2005 Chevrolet Express Owners Manuals
- Chevrolet Express Owners Manuals
- Download PDF Manual
-
covered by the vehicle warranty.
Fuels in Foreign Countries If planning to drive in countries outside the U.S. or Canada, the proper fuel might be hard to find. Check regional auto club or fuel retail brand websites for availability in the country where driving. Never use leaded gasoline, fuel containing methanol, manganese, or any other fuel not recommended. Costly repairs caused by use of improper fuel would not be covered by the vehicle warranty.
Fuel Additives To keep fuel systems clean, TOP TIER Detergent Gasoline is recommended. See Fuel on page 9-39. If TOP TIER Detergent Gasoline is not available, one bottle of Fuel System Treatment PLUS added to the fuel tank at every engine oil change can help. Fuel System Treatment PLUS is the only
Chevrolet Express Owner Manual (GMNA-Localizing-U.S./Canada/Mexico- 7707481) - 2015 - CRC - 4/30/14
Black plate (41,1)
Driving and Operating
9-41
gasoline additive recommended by General Motors. It is available at your dealer. Do not use additives with E85 or FlexFuel.
E85 or FlexFuel Vehicles with a yellow fuel cap can use either unleaded gasoline or fuel containing up to 85% ethanol (E85). All other vehicles should use only the unleaded gasoline as described in Fuel on page 9-39. The use of E85 or FlexFuel is encouraged when the vehicle is designed to use it. E85 or FlexFuel is made from renewable sources. To help locate fuel stations that carry E85 or FlexFuel, the U.S. Department of Energy has an alternative fuels website. See www.afdc.energy.gov/afdc/locator/ stations.
E85 or FlexFuel should meet ASTM Specification D 5798 or CAN/CGSB–3.512 in Canada. Do not use the fuel if the ethanol content is greater than 85%. Fuel mixtures that do not meet ASTM or CGSB specifications can affect driveability and could cause the malfunction indicator lamp to come on. After refueling, the vehicle calculates the composition of the fuel. It is not recommended to repeatedly switch between fuels. If fuels are switched frequently, add as much fuel as possible and do not add less than 11 L (3 gal) when refueling. Drive at least 11 km (7 mi) immediately after refueling to allow the vehicle to adapt to the change in ethanol concentration. Because E85 or FlexFuel has less energy per liter (gallon) than gasoline, the vehicle will need to be refilled more often. See Filling the Tank on page 9-42.
{ Caution Some additives are not compatible with E85 or FlexFuel and can harm the vehicle's fuel system. Do not add anything to E85 or FlexFuel. Damage caused by additives would not be covered by the vehicle warranty.
{ Caution
Do not use fuel containing methanol. It can corrode metal parts in the fuel system and also damage plastic and rubber parts. That damage would not be covered under the vehicle warranty.
Chevrolet Express Owner Manual (GMNA-Localizing-U.S./Canada/Mexico- 7707481) - 2015 - CRC - 4/30/14
Black plate (42,1)
9-42
Driving and Operating
Filling the Tank
{ Warning
Fuel vapors and fuel fires burn violently and can cause injury or death.
. To help avoid injuries to you and others, read and follow all the instructions on the fuel pump island.
. Turn off the engine when
refueling.
. Keep sparks, flames, and
smoking materials away from fuel.
. Do not leave the fuel pump
unattended.
. Do not reenter the vehicle
while pumping fuel.
. Keep children away from the
fuel pump and never let children pump fuel.
(Continued)
Warning (Continued)
. Fuel can spray out if the fuel
cap is opened too quickly. This spray can happen if the tank is nearly full, and is more likely in hot weather. Open the fuel cap slowly and wait for any hiss noise to stop then unscrew the cap all the way.
The fuel cap is behind a hinged fuel door on the driver side of the vehicle. If the vehicle has E85 fuel capability, the fuel cap will be yellow and state that E85 or gasoline can be used. See E85 or FlexFuel on page 9-41. To remove the fuel cap, turn it slowly counterclockwise. While refueling, hang the tethered fuel cap from the hook on the fuel door. Be careful not to spill fuel. Do not top off or overfill the tank and wait a few seconds after you have finished pumping before removing the nozzle. Clean fuel from painted surfaces as soon as possible. See Exterior Care on page 10-80. When replacing the fuel cap, turn it clockwise until it clicks. Make sure the cap is fully installed. The diagnostic system can determine if the fuel cap has been left off or improperly installed.
Chevrolet Express Owner Manual (GMNA-Localizing-U.S./Canada/Mexico- 7707481) - 2015 - CRC - 4/30/14
Black plate (43,1)
Driving and Operating
9-43
Warning (Continued)
keep it in contact with the fill opening until filling is complete.
. Fill the container no more than 95% full to allow for expansion.
. Do not smoke, light matches,
or use lighters while pumping fuel.
. Avoid using cell phones or
other electronic devices.
This would allow fuel to evaporate into the atmosphere. See Malfunction Indicator Lamp on page 5-17.
{ Warning
If a fire starts while you are refueling, do not remove the nozzle. Shut off the flow of fuel by shutting off the pump or by notifying the station attendant. Leave the area immediately.
{ Caution
If a new fuel cap is needed, be sure to get the right type of cap from your dealer. The wrong type of fuel cap may not fit properly, may cause the malfunction indicator lamp to light, and could damage the fuel tank and emissions system. See Malfunction Indicator Lamp on page 5-17.
Filling a Portable Fuel Container
{ Warning
Filling a portable fuel container while it is in the vehicle can cause fuel vapors that can ignite either by static electricity or other means. You or others could be badly burned and the vehicle could be damaged. Always:
. Use approved fuel
containers.
. Remove the container from the vehicle, trunk, or pickup bed before filling.
. Place the container on the
ground.
. Place the nozzle inside the fill
opening of the container before dispensing fuel, and
(Continued)
Chevrolet Express Owner Manual (GMNA-Localizing-U.S./Canada/Mexico- 7707481) - 2015 - CRC - 4/30/14
Black plate (44,1)
9-44
Driving and Operating
Trailer Towing
General Towing Information Only use towing equipment that has been designed for the vehicle. Contact your dealer or trailering dealer for assistance with preparing the vehicle for towing a trailer. Read the entire section before towing a trailer. For towing a disabled vehicle, see Towing the Vehicle on page 10-78. For towing the vehicle behind another vehicle such as a motor home, see Recreational Vehicle Towing on page 10-78.
Driving Characteristics and Towing Tips
Driving with a Trailer When towing a trailer: . Become familiar with the state
and local laws that apply to trailer towing.
. Do not tow a trailer during the first 800 km (500 mi) to prevent damage to the engine, axle, or other parts. Then during the first 800 km (500 mi) of trailer towing, do not drive over 80 km/h (50 mph) and do not make starts at full throttle.
. Vehicles can tow in D (Drive).
Shift the transmission to a lower gear if the transmission shifts too often under heavy loads and/ or hilly conditions. Turn off Park Assist when towing.
{ Warning
When towing a trailer, exhaust gases may collect at the rear of the vehicle and enter if the liftgate, trunk/hatch, or rear-most window is open. When towing a trailer:
. Do not drive with the liftgate,
trunk/hatch, or rear-most window open.
. Fully open the air outlets on
or under the instrument panel.
. Also adjust the climate
control system to a setting that brings in only outside air. See “Climate Control Systems” in the Index. For more information about Carbon Monoxide, see Engine Exhaust on page 9-21.
Chevrolet Express Owner Manual (GMNA-Localizing-U.S./Canada/Mexico- 7707481) - 2015 - CRC - 4/30/14
Black plate (45,1)
Towing a trailer requires a certain amount of experience. The combination you are driving is longer and not as responsive as the vehicle itself. Get acquainted with the handling and braking of the rig before setting out for the open road. Before starting, check all trailer hitch parts and attachments, safety chains, electrical connectors, lamps, tires, and mirrors. If the trailer has electric brakes, start the combination moving and then apply the trailer brake controller by hand to be sure the brakes work. During the trip, check occasionally to be sure that the load is secure and the lamps and any trailer brakes still work. Following Distance Stay at least twice as far behind the vehicle ahead as you would when driving the vehicle without a trailer. This can help to avoid heavy braking and sudden turns.
Passing More passing distance is needed when towing a trailer. The combination will not accelerate as quickly and is longer so it is necessary to go much farther beyond the passed vehicle before returning to the lane. Backing Up Hold the bottom of the steering wheel with one hand. To move the trailer to the left, move that hand to the left. To move the trailer to the right, move your hand to the right. Always back up slowly and, if possible, have someone guide you. Making Turns
{ Caution
Making very sharp turns while trailering could cause the trailer to come in contact with the vehicle.
(Continued)
Driving and Operating
9-45
Caution (Continued)
The vehicle could be damaged. Avoid making very sharp turns while trailering.
When turning with a trailer, make wider turns than normal. Do this so the trailer will not strike soft shoulders, curbs, road signs, trees, or other objects. Avoid jerky or sudden maneuvers. Signal well in advance. If the trailer turn signal bulbs burn out, the arrows on the instrument cluster will still flash for turns. It is important to check occasionally to be sure the trailer bulbs are still working. Driving on Grades Reduce speed and shift to a lower gear before starting down a long or steep downgrade. If the transmission is not shifted down, the brakes might get hot and no longer work well.
Chevrolet Express Owner Manual (GMNA-Localizing-U.S./Canada/Mexico- 7707481) - 2015 - CRC - 4/30/14
Black plate (46,1)
9-46
Driving and Operating
Vehicles can tow in D (Drive). Shift the transmission to a lower gear if the transmission shifts too often under heavy loads and/or hilly conditions. The Tow/Haul Mode may be used if the transmission shifts too often. See Tow/Haul Mode on page 9-27. When towing at high altitude on steep uphill grades, consider the following: Engine coolant will boil at a lower temperature than at normal altitudes. If the engine is turned off immediately after towing at high altitude on steep uphill grades, the vehicle may show signs similar to engine overheating. To avoid this, let the engine run while parked, preferably on level ground, with the transmission in P (Park) for a few minutes before turning the engine off. If the overheat warning comes on, see Engine Overheating on page 10-18.
Parking on Hills
{ Warning
Parking the vehicle on a hill with the trailer attached can be dangerous. If something goes wrong, the rig could start to move. People can be injured, and both the vehicle and the trailer can be damaged. When possible, always park the rig on a flat surface.
If parking the rig on a hill: 1. Press the brake pedal, but do not shift into P (Park) yet. Turn the wheels into the curb if facing downhill or into traffic if facing uphill.
2. Have someone place chocks
under the trailer wheels.
3. When the wheel chocks are in
place, release the regular brakes until the chocks absorb the load.
4. Reapply the brake pedal. Then
apply the parking brake and shift into P (Park).
5. Release the brake pedal. Leaving After Parking on a Hill 1. Apply and hold the brake pedal. 2. Start the engine. 3. Shift into a gear. 4. Release the parking brake. 5. Let up on the brake pedal. 6. Drive slowly until the trailer is
clear of the chocks.
7. Stop and have someone pick up
and store the chocks.
Chevrolet Express Owner Manual (GMNA-Localizing-U.S./Canada/Mexico- 7707481) - 2015 - CRC - 4/30/14
Black plate (47,1)
Maintenance when Trailer Towing The vehicle needs service more often when pulling a trailer. See Maintenance Schedule on page 11-3. Things that are especially important in trailer operation are automatic transmission fluid, engine oil, axle lubricant, belts, cooling system, and brake system. It is a good idea to inspect these before and during the trip. Check periodically to see that all hitch nuts and bolts are tight.
Trailer Towing If the vehicle has a diesel engine, see the Duramax diesel supplement.
Driving and Operating
9-47
{ Warning
{ Caution
The driver can lose control when pulling a trailer if the correct equipment is not used or the vehicle is not driven properly. For example, if the trailer is too heavy, the brakes may not work well — or even at all. The driver and passengers could be seriously injured. The vehicle may also be damaged; the resulting repairs would not be covered by the vehicle warranty. Pull a trailer only if all the steps in this section have been followed. Ask your dealer for advice and information about towing a trailer with the vehicle.
Pulling a trailer improperly can damage the vehicle and result in costly repairs not covered by the vehicle warranty. To pull a trailer correctly, follow the advice in this section and see your dealer for important information about towing a trailer with the vehicle.
To identify the trailering capacity of the vehicle, read the information in “Weight of the Trailer” following. Trailering is different than just driving the vehicle by itself. Trailering means changes in handling, acceleration, braking, durability, and fuel economy. Successful, safe trailering takes correct equipment, and it has to be used properly.
Chevrolet Express Owner Manual (GMNA-Localizing-U.S./Canada/Mexico- 7707481) - 2015 - CRC - 4/30/14
Black plate (48,1)
9-48
Driving and Operating
The following information has many time-tested, important trailering tips and safety rules. Many of these are important for your safety and that of your passengers. So please read this section carefully before pulling a trailer.
Weight of the Trailer How heavy can a trailer safely be? It depends on how the rig is used. For example, speed, altitude, road grades, outside temperature, and how much the vehicle is used to pull a trailer are all important. It can depend on any special equipment on the vehicle, and the amount of tongue weight the vehicle can carry. See “Weight of the Trailer Tongue” later in this section.
Maximum trailer weight is calculated assuming only the driver is in the tow vehicle and it has all the required trailering equipment. The weight of additional optional equipment, passengers,and cargo in the tow vehicle must be subtracted from the maximum trailer weight.
Chevrolet Express Owner Manual (GMNA-Localizing-U.S./Canada/Mexico- 7707481) - 2015 - CRC - 4/30/14
Black plate (49,1)
Driving and Operating
9-49
Use the following chart to determine how much the vehicle can weigh, based upon the vehicle model and options.
Vehicle G2500 Cargo Van 2WD Short Wheelbase
Axle Ratio
Maximum Trailer Weight
GCWR*
4.8L V8
6.0L V8G2500 Cargo Van 2WD Long Wheelbase
4.8L V8
6.0L V8G2500 Passenger Van 2WD Short Wheelbase
4.8L V8
6.0L V8G3500 Cargo Van 2WD Short Wheelbase
4.8L V8
6.0L V8G3500 Cargo Van 2WD Long Wheelbase
4.8L V8
6.0L V83.42
3.423.42
3.423.42
3.423.42
3.423.42
3.423 357 kg (7,400 lb) 4 536 kg (10,000 lb)
5 897 kg (13,000 lb) 7 257 kg (16,000 lb)
3 266 kg (7,200 lb) 4 536 kg (10,000 lb)
5 897 kg (13,000 lb) 7 257 kg (16,000 lb)
3 039 kg (6,700 lb) 4 445 kg (9,800 lb)
5 897 kg (13,000 lb) 7 257 kg (16,000 lb)
3 357 kg (7,400 lb) 4 536 kg (10,000 lb)
5 897 kg (13,000 lb) 7 257 kg (16,000 lb)
3 221 kg (7,100 lb) 4 536 kg (10,000 lb)
5 897 kg (13,000 lb) 7 257 kg (16,000 lb)
Chevrolet Express Owner Manual (GMNA-Localizing-U.S./Canada/Mexico- 7707481) - 2015 - CRC - 4/30/14
Black plate (50,1)
9-50
Driving and Operating
Vehicle G3500 Passenger Van 2WD Short Wheelbase
Axle Ratio
Maximum Trailer Weight
GCWR*
6.0L V8
3.42
4 400 kg (9,700 lb)
7 257 kg (16,000 lb)
G3500 Passenger Van 2WD Long Wheelbase
6.0L V8
7 257 kg (16,000 lb) *The Gross Combined Weight Rating (GCWR) is the total allowable weight of the completely loaded vehicle and trailer including any passengers, cargo, equipment, and conversion. The GCWR for the vehicle should not be exceeded.
4 218 kg (9,300 lb)
3.42
Ask your dealer for trailering information or advice. Weight of the Trailer Tongue The tongue load (1) of any trailer is an important weight to measure because it affects the total gross weight of the vehicle. The Gross Vehicle Weight (GVW) includes the curb weight of the vehicle, any cargo carried in it, and the people who will be riding in the vehicle.
If there are a lot of options, equipment, passengers, or cargo in the vehicle, it will reduce the tongue weight the vehicle can carry, which will also reduce the trailer weight the vehicle can tow. If towing a trailer, the tongue load must be added to the GVW because the vehicle will be carrying that weight, too. See Vehicle Load Limits on page 9-9 for more information about the vehicle's maximum load capacity.
The trailer tongue weight (1) should be 10 percent to 15 percent of the total loaded trailer weight (2), up to a
Chevrolet Express Owner Manual (GMNA-Localizing-U.S./Canada/Mexico- 7707481) - 2015 - CRC - 4/30/14
Black plate (51,1)
Driving and Operating
9-51
maximum of 181 kg (400 lb) with a weight carrying hitch. The trailer tongue weight (1) should be 10 percent to 15 percent of the total loaded trailer weight (2), up to a maximum of 454 kg (1,000 lb) with a weight distributing hitch. Do not exceed the maximum allowable tongue weight for the vehicle. Choose the shortest hitch extension that will position the hitch ball closest to the vehicle. This will help reduce the effect of trailer tongue weight on the rear axle. After loading the trailer, weigh the trailer and then the tongue, separately, to see if the weights are proper. If they are not, adjustments might be made by moving some items around in the trailer. Trailering may be limited by the vehicle's ability to carry tongue weight. Tongue weight cannot cause the vehicle to exceed the GVWR (Gross Vehicle Weight Rating) or the RGAWR (Rear Gross Axle Weight Rating). The effect of
additional weight may reduce the trailering capacity more than the total of the additional weight. It is important that the vehicle does not exceed any of its ratings — GCWR, GVWR, RGAWR, Maximum Trailer Rating, or Tongue Weight. The only way to be sure it is not exceeding any of these ratings is to weigh the vehicle and trailer. Total Weight on the Vehicle's Tires Be sure the vehicle tires are inflated to the upper limit for cold tires. These numbers can be found on the Certification label at the rear edge of the driver door, or see Vehicle Load Limits on page 9-9. Make sure not to go over the GVW limit for the vehicle, or the GAWR, including the weight of the trailer tongue. If using a weight distributing hitch, make sure not to go over the rear axle limit before applying the weight distribution spring bars.
Towing Equipment
Hitches The correct hitch equipment helps maintain combination control. Many trailers can be towed with a weight-carrying hitch which simply features a coupler latched to the hitch ball, or a tow eye latched to a pintle hook. Other trailers may require a weight-distributing hitch that uses spring bars to distribute the trailer tongue weight among the two vehicle and trailer axles. See “Weight of the Trailer Tongue” under Trailer Towing on page 9-47 for rating limits with various hitch types. Consider using sway controls with any trailer. Ask a trailering professional about sway controls or refer to the trailer manufacturer's recommendations and instructions.
Chevrolet Express Owner Manual (GMNA-Localizing-U.S./Canada/Mexico- 7707481) - 2015 - CRC - 4/30/14
Black plate (52,1)
9-52
Driving and Operating
Weight-Distributing Hitches and Weight Carrying Hitches A weight distributing hitch may be useful with some trailers. Use the following guidelines to determine if a weight distributing hitch should be used.
1. Body to Ground Distance 2. Front of Vehicle When using a weight-distributing hitch, the hitch must be adjusted so the distance (1) remains the same both before and after coupling the trailer to the tow vehicle.
Safety Chains Always attach chains between the vehicle and the trailer. Cross the safety chains under the tongue of the trailer to help prevent the tongue from contacting the road if it becomes separated from the hitch. Always leave just enough slack so the rig can turn. Never allow safety chains to drag on the ground. Trailer Brakes A loaded trailer that weighs more than 680 kg (1,500 lb) needs to have its own brake system that is adequate for the weight of the trailer. Be sure to read and follow the instructions for the trailer brakes so they are installed, adjusted and maintained properly. Trailer Wiring Harness The optional heavy-duty trailer wiring package includes a wiring harness, with a seven-pin connector at the rear of the vehicle and a four-wire harness assembly under the driver side of the instrument
panel. The four-wire harness assembly comes without a connector. If the vehicle does not have a trailer hitch, the seven-wire harness assembly with connector is taped together and located in a frame pocket at the driver side rear left corner of the frame. If the vehicle has a trailer hitch, the seven-wire harness assembly with connector is attached to a bracket on the hitch platform. In both cases, the seven-wire harness has a connector and includes a 30-amp feed wire. The seven-wire harness connector contains the following trailer circuits:
Light Green: Back-up Lamps (10A fuse)**
. White: Ground . Dark Blue: Trailer Brake Signal . Dark Green: Right Rear Stop
and Turn Signal*
Chevrolet Express Owner Manual (GMNA-Localizing-U.S./Canada/Mexico- 7707481) - 2015 - CRC - 4/30/14
Black plate (53,1)
. Red/Black Stripe: Battery Feed
(30A Fuse)
. Brown: Trailer Park Lamp
Supply Voltage (15A fuse)**
. Yellow: Left Rear Stop and Turn
Signal *
The four-wire harness (without connector) contains the following circuits: . Black: Ground . Red/White: Battery Feed . Dark Blue: Trailer Brake Signal
Light Blue: CHMSL/Stoplamp Supply Voltage
* If the vehicle is a cutaway with trailer provisions, a 15 amp fuse will be shared for both left/stop trailer turn and right/stop trailer turn signals. However, the cutaway lighting connector will have a 10 amp fuse for each signal.
Driving and Operating
9-53
** If the vehicle is a cutaway with trailer provisions, a 15 amp fuse will be shared for trailer park lamps and cutaway rear lighting connector park lamps. Also, a 10 amp fuse will be shared for trailer back-up lamps and cutaway rear lighting connector back-up lamps. Tow/Haul Mode This button is on the instrument panel, to the right of the steering wheel. Pressing this button turns on and off the Tow/Haul Mode.
This indicator light on the instrument cluster comes on when the Tow/ Haul Mode is on.
Tow/Haul is a feature that assists when pulling a heavy trailer or a large or heavy load. See Tow/Haul Mode on page 9-27. Tow/Haul is designed to be most effective when the vehicle and trailer combined weight is at least 75 percent of the vehicle Gross Combined Weight Rating (GCWR). See “Weight of the Trailer” in Trailer Towing on page 9-47. Tow/Haul is most useful under the following driving conditions: . When pulling a heavy trailer or a
large or heavy load through rolling terrain.
. When pulling a heavy trailer or a
large or heavy load in stop-and-go traffic.
. When pulling a heavy trailer or a
large or heavy load in busy parking lots where improved low speed control of the vehicle is desired.
Chevrolet Express Owner Manual (GMNA-Localizing-U.S./Canada/Mexico- 7707481) - 2015 - CRC - 4/30/14
Black plate (54,1)
9-54
Driving and Operating
Operating the vehicle in Tow/Haul Mode when lightly loaded or with no trailer at all will not cause damage. However, there is no benefit to the selection of Tow/Haul when the vehicle is unloaded. Such a selection when unloaded may result in unpleasant engine and transmission driving characteristics and reduced fuel economy. Tow/ Haul is recommended only when pulling a heavy trailer or a large or heavy load.
Conversions and Add-Ons
Add-On Electrical Equipment
{ Caution
Some electrical equipment can damage the vehicle or cause components to not work and would not be covered by the warranty. Always check with your dealer before adding electrical equipment.
Add-on equipment can drain the vehicle's 12-volt battery, even if the vehicle is not operating. The vehicle has an airbag system. Before attempting to add anything electrical to the vehicle, see Servicing the Airbag-Equipped Vehicle on page 3-26 and Adding Equipment to the Airbag-Equipped Vehicle on page 3-26.
Chevrolet Express Owner Manual (GMNA-Localizing-U.S./Canada/Mexico- 7707481) - 2015 - CRC - 4/30/14
Black plate (1,1)
Vehicle Care
General Information
General Information . . . . . . . . . . 10-2
California Proposition65 Warning . . . . . . . . . . . . . . . . . 10-2
California Perchlorate
Materials Requirements . . . . 10-2
Accessories and
Modifications . . . . . . . . . . . . . . . 10-2
Vehicle Checks Doing Your Own
Service Work . . . . . . . . . . . . . . . 10-3
Hood . . . . . . . . . . . . . . . . . . . . . . . . 10-4
Engine CompartmentOverview . . . . . . . . . . . . . . . . . . . 10-5
Engine Oil . . . . . . . . . . . . . . . . . . . 10-6
Engine Oil Life System . . . . . . 10-8
Automatic TransmissionFluid . . . . . . . . . . . . . . . . . . . . . . . 10-9
Engine Air Cleaner/Filter . . . . 10-12
Cooling System . . . . . . . . . . . . 10-14
Engine Coolant . . . . . . . . . . . . . 10-14
Engine Overheating . . . . . . . . 10-18
Engine Fan . . . . . . . . . . . . . . . . . 10-20
Power Steering Fluid . . . . . . . 10-20
Washer Fluid . . . . . . . . . . . . . . . 10-21Brakes . . . . . . . . . . . . . . . . . . . . . 10-22
Brake Fluid . . . . . . . . . . . . . . . . . 10-23
Battery . . . . . . . . . . . . . . . . . . . . . 10-24
Rear Axle . . . . . . . . . . . . . . . . . . 10-25
Noise Control System . . . . . . 10-25
Starter Switch Check . . . . . . . 10-26
Automatic Transmission ShiftLock Control Function Check . . . . . . . . . . . . . . . . . . . . . 10-27
Ignition Transmission Lock
Check . . . . . . . . . . . . . . . . . . . . . 10-27
Park Brake and P (Park)
Mechanism Check . . . . . . . . 10-27
Wiper Blade
Replacement . . . . . . . . . . . . . . 10-28
Headlamp Aiming
Headlamp Aiming . . . . . . . . . . 10-28
Bulb Replacement
Bulb Replacement . . . . . . . . . . 10-29
Halogen Bulbs . . . . . . . . . . . . . . 10-29
Headlamps . . . . . . . . . . . . . . . . . 10-29
Front Turn Signal,Sidemarker, and Parking Lamps . . . . . . . . . . . . . . . . . . . . 10-31
Taillamps . . . . . . . . . . . . . . . . . . . 10-31Vehicle Care
10-1
Center High-Mounted
Stoplamp (CHMSL) . . . . . . . 10-32
License Plate Lamp . . . . . . . . 10-33
Replacement Bulbs . . . . . . . . . 10-33Electrical System
Electrical System
Overload . . . . . . . . . . . . . . . . . . 10-34
Fuses and Circuit
Breakers . . . . . . . . . . . . . . . . . . 10-35
Engine Compartment Fuse
Block . . . . . . . . . . . . . . . . . . . . . 10-35
Floor Console Fuse
Block . . . . . . . . . . . . . . . . . . . . . 10-39
Wheels and Tires
Tires . . . . . . . . . . . . . . . . . . . . . . . . 10-41
All-Season Tires . . . . . . . . . . . . 10-42
Winter Tires . . . . . . . . . . . . . . . . 10-42
All-Terrain Tires . . . . . . . . . . . . 10-43
Tire Sidewall Labeling . . . . . . 10-43
Tire Designations . . . . . . . . . . . 10-46
Tire Terminology andDefinitions . . . . . . . . . . . . . . . . 10-47
Tire Pressure . . . . . . . . . . . . . . . 10-50
Tire Pressure MonitorSystem . . . . . . . . . . . . . . . . . . . 10-51
Tire Pressure Monitor
Operation . . . . . . . . . . . . . . . . . 10-52
Chevrolet Express Owner Manual (GMNA-Localizing-U.S./Canada/Mexico- 7707481) - 2015 - CRC - 4/30/14
Black plate (2,1)
10-2
Vehicle Care
General Information For service and parts needs, visit your dealer. You will receive genuine GM parts and GM-trained and supported service people. Genuine GM parts have one of these marks:
Tire Inspection . . . . . . . . . . . . . . 10-56
Tire Rotation . . . . . . . . . . . . . . . 10-56
Dual Tire Rotation . . . . . . . . . . 10-57
When It Is Time for NewTires . . . . . . . . . . . . . . . . . . . . . . 10-58
Buying New Tires . . . . . . . . . . . 10-59
Different Size Tires andWheels . . . . . . . . . . . . . . . . . . . 10-60
Uniform Tire Quality
Grading . . . . . . . . . . . . . . . . . . . 10-61
Wheel Alignment and Tire
Balance . . . . . . . . . . . . . . . . . . . 10-62
Wheel Replacement . . . . . . . . 10-63
Tire Chains . . . . . . . . . . . . . . . . . 10-63
If a Tire Goes Flat . . . . . . . . . . 10-64
Tire Changing . . . . . . . . . . . . . . 10-66
Full-Size Spare Tire . . . . . . . . 10-74Jump Starting
Jump Starting . . . . . . . . . . . . . . 10-74
Towing the Vehicle
Towing the Vehicle . . . . . . . . . 10-78
Recreational VehicleTowing . . . . . . . . . . . . . . . . . . . . 10-78
Appearance Care
Exterior Care . . . . . . . . . . . . . . . 10-80
Interior Care . . . . . . . . . . . . . . . . 10-85
Floor Mats . . . . . . . . . . . . . . . . . . 10-88California Proposition 65 Warning Most motor vehicles, including this one, contain and/or emit chemicals known to the State of California to
cause cancer and birth defects or other reproductive harm. Engine exhaust, many parts and systems, many fluids, and some component wear by-products contain and/or emit these chemicals.
California Perchlorate Materials Requirements Certain types of automotive applications, such as airbag initiators, safety belt pretensioners, and lithium batteries contained in Remote Keyless Entry transmitters, may contain perchlorate materials. Special handling may be necessary. For additional information, see www.dtsc.ca.gov/hazardouswaste/ perchlorate.
Accessories and Modifications Adding non‐dealer accessories or making modifications to the vehicle can affect vehicle performance and safety, including such things as airbags, braking, stability, ride and
Chevrolet Express Owner Manual (GMNA-Localizing-U.S./Canada/Mexico- 7707481) - 2015 - CRC - 4/30/14
Black plate (3,1)
Vehicle Care
10-3
This vehicle has an airbag system. Before attempting to do your own service work, see Servicing the Airbag-Equipped Vehicle on page 3-26. Keep a record with all parts receipts and list the mileage and the date of any service work performed. See Maintenance Records on page 11-14.
{ Caution Even small amounts of contamination can cause damage to vehicle systems. Do not allow contaminants to contact the fluids, reservoir caps, or dipsticks.
handling, emissions systems, aerodynamics, durability, and electronic systems like antilock brakes, traction control, and stability control. These accessories or modifications could even cause malfunction or damage not covered by the vehicle warranty. Damage to vehicle components resulting from modifications or the installation or use of non‐GM certified parts, including control module or software modifications, is not covered under the terms of the vehicle warranty and may affect remaining warranty coverage for affected parts. GM Accessories are designed to complement and function with other systems on the vehicle. See your dealer to accessorize the vehicle using genuine GM Accessories installed by a dealer technician. Also, see Adding Equipment to the Airbag-Equipped Vehicle on page 3-26.
Vehicle Checks
Doing Your Own Service Work
{ Warning
It can be dangerous to work on your vehicle if you do not have the proper knowledge, service manual, tools, or parts. Always follow owner manual procedures and consult the service manual for your vehicle before doing any service work.
If doing some of your own service work, use the proper service manual. It tells you much more about how to service the vehicle than this manual can. To order the proper service manual, see Service Publications Ordering Information on page 13-11.
Chevrolet Express Owner Manual (GMNA-Localizing-U.S./Canada/Mexico- 7707481) - 2015 - CRC - 4/30/14
Black plate (4,1)
10-4
Vehicle Care
Hood To open the hood:
2. Go to the front of the vehicle and
lift up the secondary hood release, which is underneath the middle of the hood.
1. Pull the handle with this symbol
on it. It is in front of the driver side door frame near the floor.
If the vehicle has an underhood lamp, it will automatically come on and stay on until the hood is closed. Before closing the hood, be sure all of the filler caps are on properly. Then lift the hood to relieve pressure on the hood prop. Remove the hood prop from the slot in the hood and return the prop to its retainer. Let the hood down and close it firmly.
3. Lift the hood, release the hood prop from its retainer, and put the hood prop into the slot in the hood.
Chevrolet Express Owner Manual (GMNA-Localizing-U.S./Canada/Mexico- 7707481) - 2015 - CRC - 4/30/14
Black plate (5,1)
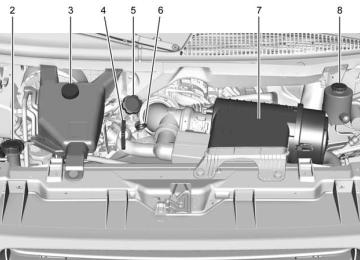
Engine Compartment Overview
Vehicle Care
10-5
6.0L V8 Engine Shown (4.8L V8 Engine Similar)
Chevrolet Express Owner Manual (GMNA-Localizing-U.S./Canada/Mexico- 7707481) - 2015 - CRC - 4/30/14
Black plate (6,1)
10-6
Vehicle Care
1. Battery on page 10-24. 2. Radiator Pressure Cap. See
Cooling System on page 10-14.
3. Coolant Recovery Tank. See
Cooling System on page 10-14.
4. Automatic Transmission Fluid
Dipstick. See “Checking the Fluid Level” under Automatic Transmission Fluid on page 10-9.
5. Engine Oil Fill Cap. See “When to Add Engine Oil” under Engine Oil on page 10-6.
6. Engine Oil Dipstick. See
“Checking Engine Oil” under Engine Oil on page 10-6.
7. Engine Air Cleaner/Filter on
page 10-12.
8. Power Steering Fluid Reservoir.
See Power Steering Fluid on page 10-20.
9. Brake Master Cylinder
Reservoir. See Brake Fluid on page 10-23.
10. Windshield Washer Fluid
Reservoir. See “Adding Washer Fluid” under Washer Fluid on page 10-21.
Engine Oil For diesel engine vehicles, see “Engine Oil” in the Duramax diesel supplement. To ensure proper engine performance and long life, careful attention must be paid to engine oil. Following these simple, but important steps will help protect your investment: . Always use engine oil approved to the proper specification and of the proper viscosity grade. See “Selecting the Right Engine Oil” in this section.
. Check the engine oil level regularly and maintain the proper oil level. See “Checking Engine Oil” and “When to Add Engine Oil” in this section.
. Change the engine oil at the
appropriate time. See Engine Oil Life System on page 10-8.
. Always dispose of engine oil
properly. See “What to Do with Used Oil” in this section.
Checking Engine Oil It is a good idea to check the engine oil level at each fuel fill. In order to get an accurate reading, the vehicle must be on level ground. The engine oil dipstick handle is a loop. See Engine Compartment Overview on page 10-5 for the location of the engine oil dipstick. Obtaining an accurate oil level reading is essential: 1.
If the engine has been running recently, turn off the engine and allow several minutes for the oil to drain back into the oil pan. Checking the oil level too soon after engine shutoff will not provide an accurate oil level reading.
Chevrolet Express Owner Manual (GMNA-Localizing-U.S./Canada/Mexico- 7707481) - 2015 - CRC - 4/30/14
Black plate (7,1)
{ Warning
The engine oil dipstick handle may be hot; it could burn you. Use a towel or glove to touch the dipstick handle.
2. Pull out the dipstick and wipe it
with a clean paper towel or cloth, then push it back in all the way. Remove it again, keeping the tip down, and check the level.
When to Add Engine Oil
If the oil is below the cross-hatched area at the tip of the dipstick, add 1 L (1 qt) of the recommended oil and then recheck the level. See “Selecting the Right Engine Oil” in this section for an explanation of
what kind of oil to use. For engine oil crankcase capacity, see Capacities and Specifications on page 12-2.
{ Caution
Do not add too much oil. Oil levels above or below the acceptable operating range shown on the dipstick are harmful to the engine. If you find that you have an oil level above the operating range, i.e., the engine has so much oil that the oil level gets above the cross-hatched area that shows the proper operating range, the engine could be damaged. You should drain out the excess oil or limit driving of the vehicle and seek a service professional to remove the excess amount of oil.
See Engine Compartment Overview on page 10-5 for the location of the engine oil fill cap.
Vehicle Care
10-7
Add enough oil to put the level somewhere in the proper operating range. Push the dipstick all the way back in when through. Selecting the Right Engine Oil Selecting the right engine oil depends on both the proper oil specification and viscosity grade. See Recommended Fluids and Lubricants on page 11-11.
Specification Use and ask for licensed engine oils with the dexos1® approved certification mark. Engine oils meeting the requirements for the vehicle should have the dexos1
approved certification mark. This certification mark indicates that the oil has been approved to the dexos1
specification. See www.gmdexos.com.Chevrolet Express Owner Manual (GMNA-Localizing-U.S./Canada/Mexico- 7707481) - 2015 - CRC - 4/30/14
Black plate (8,1)
10-8
Vehicle Care
{ Caution
Failure to use the recommended engine oil can result in engine damage not covered by the vehicle warranty. Check with your dealer or service provider on whether the oil is approved to the dexos1 specification.
Viscosity Grade Use SAE 5W-30 viscosity grade engine oil. Cold Temperature Operation: In an area of extreme cold, where the temperature falls below −29°C (−20°F), an SAE 0W-30 oil may be used. An oil of this viscosity grade will provide easier cold starting for the engine at extremely low
temperatures. When selecting an oil of the appropriate viscosity grade, always select an oil of the correct specification. See “Specification” earlier in this section for more information. Engine Oil Additives/Engine Oil Flushes Do not add anything to the oil. The recommended oils with the dexos specification and displaying the dexos certification mark are all that is needed for good performance and engine protection. Engine oil system flushes are not recommended and could cause engine damage not covered by the vehicle warranty. What to Do with Used Oil Used engine oil contains certain elements that can be unhealthy for your skin and could even cause cancer. Do not let used oil stay on your skin for very long. Clean your skin and nails with soap and water, or a good hand cleaner. Wash or
properly dispose of clothing or rags containing used engine oil. See the manufacturer's warnings about the use and disposal of oil products. Used oil can be a threat to the environment. If you change your own oil, be sure to drain all the oil from the filter before disposal. Never dispose of oil by putting it in the trash or pouring it on the ground, into sewers, or into streams or bodies of water. Recycle it by taking it to a place that collects used oil.
Engine Oil Life System
When to Change Engine Oil This vehicle has a computer system that indicates when to change the engine oil and filter. This is based on a combination of factors which include engine revolutions, engine temperature, and miles driven. Based on driving conditions, the mileage at which an oil change is indicated can vary considerably.
Chevrolet Express Owner Manual (GMNA-Localizing-U.S./Canada/Mexico- 7707481) - 2015 - CRC - 4/30/14
Black plate (9,1)
For the oil life system to work properly, the system must be reset every time the oil is changed. When the system has calculated that oil life has been diminished, it indicates that an oil change is necessary. A CHANGE ENGINE OIL SOON message comes on. See Engine Oil Messages on page 5-31. Change the oil as soon as possible within the next 1 000 km (600 mi). It is possible that, if driving under the best conditions, the oil life system might indicate that an oil change is not necessary for up to a year. The engine oil and filter must be changed at least once a year and, at this time, the system must be reset. Your dealer has trained service people who will perform this work and reset the system. It is also important to check the oil regularly over the course of an oil drain interval and keep it at the proper level.
If the system is ever reset accidentally, the oil must be changed at 5 000 km (3,000 mi) since the last oil change. Remember to reset the oil life system whenever the oil is changed. How to Reset the Engine Oil Life System Reset the system whenever the engine oil is changed so that the system can calculate the next engine oil change. To reset the system: 1. Turn the ignition key to ON/RUN
with the engine off.
2. Fully press and release the
accelerator pedal slowly three times within five seconds.
3. Turn the key to LOCK/OFF. If the CHANGE ENGINE OIL SOON message comes back on when the vehicle is started, the engine oil life system has not reset. Repeat the procedure.
Vehicle Care
10-9
Automatic Transmission Fluid
When to Check and Change Automatic Transmission Fluid It is usually not necessary to check the transmission fluid level. The only reason for fluid loss is a transmission leak or overheated transmission. If a small leak is suspected, use the following procedures to check the fluid level. However, if there is a large leak, it may be necessary to have the vehicle towed to a dealer and have it repaired before driving the vehicle further. Change the fluid and filter at the intervals listed in Maintenance Schedule on page 11-3, and be sure to use the transmission fluid listed in Recommended Fluids and Lubricants on page 11-11.
Chevrolet Express Owner Manual (GMNA-Localizing-U.S./Canada/Mexico- 7707481) - 2015 - CRC - 4/30/14
Black plate (10,1)
10-10
Vehicle Care
How to Check Automatic Transmission Fluid Because this operation can be difficult, it is recommended to have this check done at your dealer, which can monitor the transmission temperature. The transmission fluid level increases with temperature. To obtain a highly accurate fluid level check, the transmission temperature must be measured. If it is decided to check the fluid level, be sure to follow all the instructions here, or a false reading on the dipstick may occur. { Caution
Too much or too little fluid can damage the transmission. Too much can mean that some of the fluid could come out and fall on hot engine parts or exhaust system parts, starting a fire. Too little fluid could cause the
(Continued)
Caution (Continued)
transmission to overheat. Be sure to get an accurate reading if checking the transmission fluid.
Wait at least 30 minutes with the engine off, before checking the transmission fluid level if the vehicle has been driven:
In hot weather, when outside temperatures are above 32°C (90°F). The vehicle is heavily loaded.
. At high speed for quite a while in
hot weather. In heavy traffic and hot weather.
. While pulling a trailer. After driving under these conditions, a hot check can be performed. The fluid should be hot, which is 71°C to 93°C (160°F to 200°F).
A cold fluid level check can be performed after the vehicle has been sitting for eight hours or more with the engine off, but this is used only as a reference. Let the engine run at idle for five minutes if the outside temperature is between 15°C to 32°C (60°F to 90°F). Should the fluid level be low during this cold check, the fluid must be checked warm or hot before adding fluid. If the outside temperature is colder than 15°C (60°F) or hotter than 32°C (90°F), a cold check cannot be performed. A warm fluid level check can be performed by driving the vehicle under lightly loaded conditions and outside temperatures between 10°C to 27°C (50°F to 80°F). The vehicle should be driven for at least 24 km (15 mi) before performing a warm check. Checking the fluid warm or hot will give a more accurate reading of the fluid level than a cold check.
Chevrolet Express Owner Manual (GMNA-Localizing-U.S./Canada/Mexico- 7707481) - 2015 - CRC - 4/30/14
Black plate (11,1)
Because the vehicle is equipped with a high-efficiency air-to-oil cooler, the transmission fluid temperature may not reach the required hot fluid level checking temperature under normal lightly loaded driving vehicle conditions.
Checking the Fluid Level Prepare the vehicle: 1. Park the vehicle on a level
place. Keep the engine running. 2. With the parking brake applied, place the shift lever in P (Park). 3. With a foot on the brake pedal,
move the shift lever through each gear range, pausing for about three seconds in each range. When M is reached, move the selector from M1
through M3. Then, position the shift lever in P (Park).4. Let the engine run at idle for
two minutes or more.
Then, without shutting off the engine, use the steps that follow.
The transmission dipstick is near the center of the engine compartment and will be labeled with the graphic shown. See Engine Compartment Overview on page 10-5 for more information on location.
1. COLD Range 2. WARM Range 3. HOT Range
1. Flip the handle up, pull out the
dipstick, and wipe it with a clean rag or paper towel.
Vehicle Care
10-11
2. Push it back in all the way, wait three seconds, and pull it back out again.
3. Check both sides of the dipstick,
and read the lower level. The fluid level must be in the COLD (1) range for a cold check, transmission temperature 27°C to 32°C (80°F to 90°F); between the COLD (1) and HOT (3) range for a WARM (2) check, 50°C to 60°C (122°F to 140°F); or in the HOT (3) cross-hatched range for a hot check, 71°C to 93°C (160°F to 200°F). Be sure to keep the dipstick pointed down to get an accurate reading. If the fluid level is in the acceptable range, push the dipstick back in all the way; then flip the handle down to lock the dipstick in place.
4.
Chevrolet Express Owner Manual (GMNA-Localizing-U.S./Canada/Mexico- 7707481) - 2015 - CRC - 4/30/14
Black plate (12,1)
10-12
Vehicle Care
How to Add Automatic Transmission Fluid Refer to Recommended Fluids and Lubricants on page 11-11 to determine what kind of transmission fluid to use.
1. WARM Range 2. HOT Range
Using a funnel, add fluid down the transmission dipstick tube only after checking the transmission fluid while it is warm or hot. A cold check is used only as a reference. If the fluid level is low, add only enough of the proper fluid to bring the level up to the middle of the WARM (1) or HOT (2) range depending on the ambient temperature and prior driving conditions. Refer to “How to Check Automatic Transmission
Fluid” earlier in this section for instructions on driving to achieve warm or hot transmission fluid. It does not take much fluid, generally less than 0.5 L (1 pt). Do not overfill.
{ Caution
Use of the incorrect automatic transmission fluid may damage the vehicle, and the damage may not be covered by the vehicle warranty. Always use the automatic transmission fluid listed in Recommended Fluids and Lubricants on page 11-11.
. After adding fluid, recheck the fluid level as described under “How to Check Automatic Transmission Fluid,” earlier in this section.
. When the correct fluid level is
obtained, push the dipstick back in all the way; then flip the handle down to lock the dipstick in place.
Engine Air Cleaner/Filter
The engine air cleaner/filter is near the center of the engine compartment. See Engine Compartment Overview on page 10-5.
Chevrolet Express Owner Manual (GMNA-Localizing-U.S./Canada/Mexico- 7707481) - 2015 - CRC - 4/30/14
Black plate (13,1)
When to Inspect the Engine Air Cleaner/Filter Inspect or replace the air cleaner/ filter at the scheduled maintenance intervals. See Maintenance Schedule on page 11-3. If driving in dusty/dirty conditions, inspect the filter at each engine oil change. How to Inspect the Engine Air Cleaner/Filter To inspect the air cleaner/filter, remove the filter from the vehicle and lightly shake it to release loose dust and dirt. If the filter remains covered with dirt, a new filter is required. Never use compressed air to clean the filter.
To inspect or replace the engine air cleaner/filter: 1. Unhook the retainer clips and
remove the cover.
2. Lift the filter out of the engine air
cleaner/filter housing. Care should be taken to dislodge as little dirt as possible.
3. Clean the engine air cleaner/
4.
filter housing. Inspect or replace the engine air cleaner/filter. Make sure that the filter fits properly into the housing.
5. Reinstall the cover and fasten
the retaining clips.
Vehicle Care
10-13
{ Warning
Operating the engine with the air cleaner/filter off can cause you or others to be burned. The air cleaner not only cleans the air; it helps to stop flames if the engine backfires. Use caution when working on the engine and do not drive with the air cleaner/filter off.
{ Caution
If the air cleaner/filter is off, dirt can easily get into the engine, which could damage it. Always have the air cleaner/filter in place when you are driving.
Chevrolet Express Owner Manual (GMNA-Localizing-U.S./Canada/Mexico- 7707481) - 2015 - CRC - 4/30/14
Black plate (14,1)
10-14
Vehicle Care
Cooling System The cooling system allows the engine to maintain the correct working temperature.
1. Radiator Pressure Cap 2. Coolant Recovery Tank 3. Engine Cooling Fan (Out
of View)
{ Warning
An electric engine cooling fan can start even when the engine is not running. To avoid injury, always keep hands, clothing, and tools away from any engine cooling fan.
{ Warning
Heater and radiator hoses, and other engine parts, can be very hot. Do not touch them. If you do, you can be burned. Do not run the engine if there is a leak. If you run the engine, it could lose all coolant. That could cause an engine fire, and you could be burned. Get any leak fixed before you drive the vehicle.
{ Caution Using coolant other than DEX-COOL® can cause premature engine, heater core, or radiator corrosion. In addition, the engine coolant could require changing sooner. Any repairs would not be covered by the vehicle warranty. Always use DEX-COOL (silicate-free) coolant in the vehicle.
Engine Coolant The cooling system in the vehicle is filled with DEX-COOL® engine coolant. This coolant is designed to remain in the vehicle for 5 years or 240 000 km (150,000 mi), whichever occurs first. The following explains the cooling system and how to check and add coolant when it is low. If there is a problem with engine overheating, see Engine Overheating on page 10-18.
Chevrolet Express Owner Manual (GMNA-Localizing-U.S./Canada/Mexico- 7707481) - 2015 - CRC - 4/30/14
Black plate (15,1)
What to Use
{ Warning
Adding only plain water or some other liquid to the cooling system can be dangerous. Plain water and other liquids, can boil before the proper coolant mixture will. The coolant warning system is set for the proper coolant mixture. With plain water or the wrong mixture, the engine could get too hot but you would not get the overheat warning. The engine could catch fire and you or others could be burned. Use a 50/50 mixture of clean, drinkable water and DEX-COOL coolant.
Use a 50/50 mixture of clean, drinkable water and DEX-COOL coolant. If using this mixture, nothing else needs to be added. This mixture: . Gives freezing protection down
to −37°C (−34°F), outside temperature.
. Gives boiling protection up to
129°C (265°F), engine temperature.
. Protects against rust and
corrosion.
. Will not damage aluminum parts. . Helps keep the proper engine
temperature.
{ Caution
If improper coolant mixture, inhibitors, or additives are used in the vehicle cooling system, the engine could overheat and be damaged. Too much water in the
(Continued)
Vehicle Care
10-15
Caution (Continued)
mixture can freeze and crack engine cooling parts. The repairs would not be covered by the vehicle warranty. Use only the proper mixture of engine coolant for the cooling system. See Recommended Fluids and Lubricants on page 11-11.
Never dispose of engine coolant by putting it in the trash, pouring it on the ground, or into sewers, streams, or bodies of water. Have the coolant changed by an authorized service center, familiar with legal requirements regarding used coolant disposal. This will help protect the environment and your health.
Chevrolet Express Owner Manual (GMNA-Localizing-U.S./Canada/Mexico- 7707481) - 2015 - CRC - 4/30/14
Black plate (16,1)
10-16
Vehicle Care
Checking Coolant The vehicle must be on a level surface when checking the coolant level. Check to see if coolant is visible in the coolant recovery tank. If the coolant inside the coolant recovery tank is boiling, do not do anything else until it cools down. If coolant is visible but the coolant level is not at or above the COLD FILL mark, add a 50/50 mixture of clean, drinkable water and DEX-COOL coolant at the coolant recovery tank, but be sure the cooling system is cool before this is done.
The coolant recovery tank cap has this symbol on it.
When the engine is cold, the coolant level should be at or above the COLD FILL mark. If it is not, there could be a leak in the cooling system. If the coolant is low, add the coolant or take the vehicle to a dealer for service. How to Add Coolant to the Recovery Tank for Gasoline Engines
{ Warning
You can be burned if you spill coolant on hot engine parts. Coolant contains ethylene glycol and it will burn if the engine parts are hot enough. Do not spill coolant on a hot engine.
{ Caution
This vehicle has a specific coolant fill procedure. Failure to follow this procedure could cause the engine to overheat and be severely damaged.
If coolant is needed, add the proper DEX-COOL coolant mixture at the coolant recovery tank. How to Add Coolant to the Radiator
{ Warning
Steam and scalding liquids from a hot cooling system can blow out and burn you badly. Never turn the cap when the cooling system, including the surge tank pressure cap, is hot. Wait for the cooling system and surge tank pressure cap to cool.
Chevrolet Express Owner Manual (GMNA-Localizing-U.S./Canada/Mexico- 7707481) - 2015 - CRC - 4/30/14
Black plate (17,1)
Vehicle Care
10-17
If coolant is needed, add the proper mixture directly to the radiator, but be sure the cooling system is cool before this is done.
1. Remove the radiator pressure cap when the cooling system, including the radiator pressure cap and upper radiator hose, is no longer hot. Turn the pressure cap slowly counterclockwise until it first stops. Do not press down while turning the pressure cap. If a hiss is heard, wait for that to stop. A hiss means there is still some pressure left.
2. Keep turning the pressure cap, but now push down as you turn it. Remove the pressure cap.
3. Fill the radiator with the proper DEX-COOL coolant mixture, up to the base of the filler neck. See Recommended Fluids and Lubricants on page 11-11 for more information about the proper coolant mixture.
4. Fill the coolant recovery tank to
the COLD FILL mark.
5. Reinstall the cap back on the
coolant recovery tank, but leave the radiator pressure cap off.
Chevrolet Express Owner Manual (GMNA-Localizing-U.S./Canada/Mexico- 7707481) - 2015 - CRC - 4/30/14
Black plate (18,1)
10-18
Vehicle Care
If the decision is made not to lift the hood when this warning appears, but instead get service help right away, see Roadside Assistance Program on page 13-5. If the decision is made to lift the hood, make sure the vehicle is parked on a level surface. Then check to see if the engine cooling fans are running. If the engine is overheating, the fan should be running. If it is not, do not continue to run the engine and have the vehicle serviced. See if the engine cooling fan speed increases when idle speed is doubled by pushing the accelerator pedal down. If it does not, the vehicle needs service. Turn off the engine.
8. Replace the pressure cap. At
any time during this procedure if coolant begins to flow out of the filler neck, reinstall the pressure cap.
{ Caution
If the pressure cap is not tightly installed, coolant loss and possible engine damage may occur. Be sure the cap is properly and tightly secured.
Engine Overheating If the vehicle has a diesel engine, see the Duramax diesel supplement. The vehicle has an indicator to warn of engine overheating. There is an engine coolant temperature gauge on the vehicle's instrument cluster. See Engine Coolant Temperature Gauge on page 5-13.
6. Start the engine and let it run
until the upper radiator hose can be felt getting hot. Watch out for the engine cooling fan.
7. By this time, the coolant level inside the radiator filler neck may be lower. If the level is lower, add more of the proper