- 1997 Chevrolet Corvette Owners Manuals
- Chevrolet Corvette Owners Manuals
- 2001 Chevrolet Corvette Owners Manuals
- Chevrolet Corvette Owners Manuals
- 2015 Chevrolet Corvette Owners Manuals
- Chevrolet Corvette Owners Manuals
- 1993 Chevrolet Corvette Owners Manuals
- Chevrolet Corvette Owners Manuals
- 2006 Chevrolet Corvette Owners Manuals
- Chevrolet Corvette Owners Manuals
- 1994 Chevrolet Corvette Owners Manuals
- Chevrolet Corvette Owners Manuals
- 2013 Chevrolet Corvette Owners Manuals
- Chevrolet Corvette Owners Manuals
- 1999 Chevrolet Corvette Owners Manuals
- Chevrolet Corvette Owners Manuals
- 2011 Chevrolet Corvette Owners Manuals
- Chevrolet Corvette Owners Manuals
- 2012 Chevrolet Corvette Owners Manuals
- Chevrolet Corvette Owners Manuals
- 2016 Chevrolet Corvette Owners Manuals
- Chevrolet Corvette Owners Manuals
- 2005 Chevrolet Corvette Owners Manuals
- Chevrolet Corvette Owners Manuals
- 2004 Chevrolet Corvette Owners Manuals
- Chevrolet Corvette Owners Manuals
- 2014 Chevrolet Corvette Owners Manuals
- Chevrolet Corvette Owners Manuals
- 2009 Chevrolet Corvette Owners Manuals
- Chevrolet Corvette Owners Manuals
- 1996 Chevrolet Corvette Owners Manuals
- Chevrolet Corvette Owners Manuals
- 2002 Chevrolet Corvette Owners Manuals
- Chevrolet Corvette Owners Manuals
- 2000 Chevrolet Corvette Owners Manuals
- Chevrolet Corvette Owners Manuals
- 2010 Chevrolet Corvette Owners Manuals
- Chevrolet Corvette Owners Manuals
- 2007 Chevrolet Corvette Owners Manuals
- Chevrolet Corvette Owners Manuals
- 2008 Chevrolet Corvette Owners Manuals
- Chevrolet Corvette Owners Manuals
- 2003 Chevrolet Corvette Owners Manuals
- Chevrolet Corvette Owners Manuals
- 1995 Chevrolet Corvette Owners Manuals
- Chevrolet Corvette Owners Manuals
- 1998 Chevrolet Corvette Owners Manuals
- Chevrolet Corvette Owners Manuals
- Download PDF Manual
-
Black plate (29,1)
Driving and Operating
9-29
N (Neutral) only. If the vehicle needs towing, see Towing the Vehicle on page 10‑86.
{ WARNING
Shifting into a drive gear while the engine is running at high speed is dangerous. Unless your foot is firmly on the brake pedal, the vehicle could move very rapidly. You could lose control and hit people or objects. Do not shift into a drive gear while the engine is running at high speed.
Notice: Shifting out of P (Park) or N (Neutral) with the engine running at high speed may damage the transmission. The repairs would not be covered by the vehicle warranty. Be sure the engine is not running at high speed when shifting the vehicle. D (Drive): This position is for normal driving. It provides the best fuel economy. If you need more
power for passing, push the pedal down to achieve the desired level of acceleration. Downshifting the transmission in slippery road conditions could result in skidding. See “Skidding” under Loss of Control on page 9‑6. S (Sport Mode): When in S (Sport Mode), the transmission will work as an automatic until you use the Manual Paddle Shift Controls, which activates driver manual gear selection. See Manual Mode on page 9‑29. While in S (Sport Mode), the transmission will have more noticeable upshifts for sportier vehicle performance.
Manual Mode
Manual Paddle Shift While in S (Sport Mode), the paddles located on the steering wheel can be used to manually up-shift or down-shift the transmission.
The Manual Paddle Shift system is activated from S (Sport Mode) by pushing the paddle, above the steering wheel spokes, to up-shift to the next gear, or pulling on the paddle, behind the steering wheel spokes, to down-shift to the next gear. When accelerating the vehicle from a stop in snowy and icy conditions, you may want to shift to 2 (Second) or 3 (Third) gear. A higher gear allows you to gain more traction on slippery surfaces. If traction control is active, upshifts are delayed to increase your control of the vehicle.
Chevrolet Corvette Owner Manual - 2011
Black plate (30,1)
9-30
Driving and Operating
See Traction Control System (TCS) on page 9‑36 Traction Control System (TCS). The Manual Paddle Shift system can be deactivated by moving the shifter from S (Sport Mode) back to D (Drive), or by holding either up‐shift paddle for more than one second. The driver may choose to briefly activate the Manual Paddle Shift system while in D (Drive). Tapping either the upshift or downshift controls will place the transmission in Manual Paddle Shift mode. The driver may then exit Manual Paddle Shift mode by holding either upshift control for two seconds. The system will return to automatic shifting after 10 seconds of cruising at a steady speed, or when the vehicle comes to a stop. While the Manual Paddle Shift gear selection system is active, the transmission will automatically downshift through the gears as the
vehicle slows. The transmission will select 2 (Second) gear as the vehicle stops. From a stop, the vehicle will start from and hold 2 (Second) gear unless the driver manually paddle shifts into a different gear or selects D (Drive). The driver can select 1 (First) gear for maximum acceleration from a stop.
The Manual Paddle Shift system will not allow either an up-shift or a down-shift if the vehicle speed is too fast or too slow, nor will it allow a start from 4 (Fourth) or higher gear. If up-shifting does not occur when needed, vehicle speed will be limited to protect the engine. When the transmission gear does not respond to a shift change, the DIC will show an X over the gear display.
When using the Manual Paddle Shift feature while in S (Sport Mode) , the current gear will be displayed in the Driver Information (DIC), or the Head-Up Display (HUD), if the vehicle has either of these features. If the vehicle has a Head-Up Display (HUD), see Head-Up Display (HUD) on page 5‑31.
When a requested shift is denied due to the speed restrictions shown, the DIC will momentarily show an X over the gear display and a chime will sound.
Chevrolet Corvette Owner Manual - 2011
Black plate (31,1)
If the vehicle has a HUD, and the transmission gear does not respond to a shift change, a chime will sound and the HUD will momentarily show an X over the gear display. Manual Paddle Shift operation is available for use with Cruise Control. See Cruise Control on page 9‑45 Cruise Control for more information. The vehicle speeds required for Manual Paddle Shift up-shifts depend on several vehicle inputs, which will vary the allowed up-shift speed by a few km/h (mph).
For vehicles with a 2.56:1 Axle Ratio (RPO GM8) . Up-shifts to 4 (Fourth) gear
require approximately 35 km/h (22 mph).
. Up-shifts to 5 (Fifth) gear require approximately 45 km/h (28 mph).
. Up-shifts to 6 (Sixth) gear
require approximately 65 km/h (41 mph).
To prevent damage to the powertrain, Manual Paddle downshifts to a lower gear cannot be done above certain speeds. The maximum speed allowed for downshifting of gears 1 (First) through 4 (Fourth) are:
Into 4 (Fourth) gear over 250 km/h (155 mph). Into 3 (Third) gear over 188 km/h (117 mph). Into 2 (Second) gear over 120 km/h (75 mph). Into 1 (First) gear over 68 km/h (42 mph).
For vehicles with a 2.73:1 Axle Ratio (RPO GU2) . Up-shifts to 4 (Fourth) gear
require approximately 31 km/h (19 mph).
. Up-shifts to 5 (Fifth) gear require approximately 39 km/h (24 mph).
. Up-shifts to 6 (Sixth) gear
require approximately 57 km/h (35 mph).
Driving and Operating
9-31
To prevent damage to the powertrain, Manual Paddle downshifts to a lower gear cannot be done above certain speeds. The maximum speed allowed for downshifting of gears 1 (First) through 4 (Fourth) are:
Into 4 (Fourth) gear over 234 km/h (145 mph). Into 3 (Third) gear over 176 km/h (109 mph). Into 2 (Second) gear over 113 km/h (70 mph). Into 1 (First) gear over 64 km/h (40 mph).
If the driver does not request an upshift as the engine speed approaches fuel shut off rpm, the engine speed will be limited to protect the engine. See Tachometer on page 5‑11 for more information.
Chevrolet Corvette Owner Manual - 2011
Black plate (32,1)
9-32
Driving and Operating
Manual Transmission
This is the shift pattern for the six-speed manual transmission. Here is how to operate the transmission: 1 (First): Press the clutch pedal and shift into 1 (First). Then slowly let up on the clutch pedal as you press the accelerator pedal.
Neutral: Use this position when you start or idle the engine. The shift lever is in Neutral when it is centered in the shift pattern, not in any gear. R (Reverse): To back up, press down the clutch pedal and shift into R (Reverse). Just apply pressure to get the lever past 5 (Fifth) and 6 (Sixth) into R (Reverse). Let up on the clutch pedal slowly while pressing the accelerator pedal. The six-speed manual transmission has a feature that allows you to safely shift into R (Reverse) while the vehicle is rolling at less than 5 km/h (3 mph). You will be locked out if you try to shift into R (Reverse) while the vehicle is moving faster than 5 km/h (3 mph).
You can shift into 1 (First) when you are going less than 64 km/h (40 mph). If you come to a complete stop and it is hard to shift into 1 (First), put the shift lever in Neutral and let up on the clutch. Press the clutch pedal back down. Then shift into 1 (First). 2 (Second): Press the clutch pedal as you let up on the accelerator pedal and shift into 2 (Second). Then, slowly let up on the clutch pedal as you press the accelerator pedal. 3 (Third), 4 (Fourth), 5 (Fifth) and 6 (Sixth): Shift into 3 (Third), 4 (Fourth), 5 (Fifth) and 6 (Sixth) the same way you do for 2 (Second). Slowly let up on the clutch pedal as you press the accelerator pedal. To stop, let up on the accelerator pedal and press the brake pedal. Just before the vehicle stops, press the clutch pedal and the brake pedal, and shift to Neutral.
Chevrolet Corvette Owner Manual - 2011
Black plate (33,1)
Shift Speeds (Manual Transmission) { WARNING
If you skip a gear when you downshift, you could lose control of the vehicle. You could injure yourself or others. Do not shift down more than one gear at a time when you downshift.
Driving and Operating
9-33
This chart shows when to shift to the next higher gear for the best fuel economy.
Manual Transmission Recommended
Shift Speeds in km/h (mph)
Acceleration Shift Speed
1 to 2
24 (15)2 to 3
40 (25)3 to 4
64 (40)4 to 5
72 (45)5 to 6
80 (50)Engine
All Engines
If the engine speed drops below 900 rpm, or if the engine is not running smoothly, you should downshift to the next lower gear. You may have to downshift two or more gears to keep the engine running smoothly or for good engine performance. Notice: When shifting gears, do not move the shift lever around unnecessarily. This may damage the transmission. Shift directly into the next gear.
One to Four Shift Light (Manual Transmission)
When this light comes on, you can only shift from 1 (First) to 4 (Fourth) instead of 1 (First) to 2 (Second). See One-to-Four Shift Light (Manual Transmission) on page 5‑22 for more information.
Chevrolet Corvette Owner Manual - 2011
Black plate (34,1)
9-34
Driving and Operating
Downshifting (Manual Transmission) Do not downshift into the gear shown below at a speed greater than shown in the table:
1 (First)
2 (Second)
80 km/h (50 mph) 119 km/h (74 mph)
3 (Third)
4 (Fourth)
163 km/h (101 mph) 209 km/h (130 mph)
Notice: If you skip more than one gear when you downshift, or if you race the engine when you release the clutch pedal while downshifting, you could damage the engine, clutch, driveshaft or the transmission. Do not skip gears or race the engine when downshifting.
The six-speed transmission has a spring that centers the shift lever near 3 (Third) and 4 (Fourth). This spring helps you know which gear you are in when you are shifting. Be careful when shifting from 1 (First) to 2 (Second) or downshifting from 6 (Sixth) to 5 (Fifth). The spring will try to pull the shift lever toward 4 (Fourth) and 3 (Third). Make sure you move the lever into 2 (Second) or 5 (Fifth). If you let the shift lever move in the direction of the pulling, you may end up shifting from 1 (First) to 4 (Fourth) or from 6 (Sixth) to 3 (Third). If the driver does not upshift as the engine speed approaches fuel shut off RPM, the engine speed will be limited to protect the engine. See Tachometer on page 5‑11 for more information.
Brakes
Antilock Brake System (ABS) This vehicle has the Antilock Brake System (ABS), an advanced electronic braking system that helps prevent a braking skid. When the engine is started and the vehicle begins to drive away, ABS checks itself. A momentary motor or clicking noise might be heard while this test is going on, and it might even be noticed that the brake pedal moves a little. This is normal.
If there is a problem with ABS, this warning light stays on. See Antilock Brake System (ABS) Warning Light on page 5‑22.
Chevrolet Corvette Owner Manual - 2011
Black plate (35,1)
Driving and Operating
9-35
If driving safely on a wet road and it becomes necessary to slam on the brakes and continue braking to avoid a sudden obstacle, a computer senses that the wheels are slowing down. If one of the wheels is about to stop rolling, the computer will separately work the brakes at each wheel. ABS can change the brake pressure to each wheel, as required, faster than any driver could. This can help the driver steer around the obstacle while braking hard. As the brakes are applied, the computer keeps receiving updates on wheel speed and controls braking pressure accordingly. Remember: ABS does not change the time needed to get a foot up to the brake pedal or always decrease
stopping distance. If you get too close to the vehicle in front of you, there will not be enough time to apply the brakes if that vehicle suddenly slows or stops. Always leave enough room up ahead to stop, even with ABS. Using ABS Do not pump the brakes. Just hold the brake pedal down firmly and let ABS work. You might hear the ABS pump or motor operating and feel the brake pedal pulsate, but this is normal. Braking in Emergencies ABS allows the driver to steer and brake at the same time. In many emergencies, steering can help more than even the very best braking.
Parking Brake The parking brake lever is located to the right of the center console. To set the parking brake, hold the brake pedal down. Pull the parking brake lever up. If the ignition is on, the brake system warning light will come on. To release the parking brake, hold the brake pedal down. Then push the release button in as you move the parking brake lever all the way down. Notice: Driving with the parking brake on can overheat the brake system and cause premature wear or damage to brake system parts. Make sure that the parking brake is fully released and the brake warning light is off before driving.
Chevrolet Corvette Owner Manual - 2011
Black plate (36,1)
9-36
Driving and Operating
Brake Assist This vehicle has a brake assist feature designed to assist the driver in stopping or decreasing vehicle speed in emergency driving conditions. This feature uses the stability system hydraulic brake control module to supplement the power brake system under conditions where the driver has quickly and forcefully applied the brake pedal in an attempt to quickly stop or slow down the vehicle. The stability system hydraulic brake control module increases brake pressure at each corner of the vehicle until the ABS activates. Minor brake pedal pulsation or pedal movement during this time is normal and the driver should continue to apply the brake pedal as the driving situation dictates. The brake assist feature will automatically disengage when the brake pedal is released or brake pedal pressure is quickly decreased.
Ride Control Systems
Traction Control System (TCS) The vehicle has a Traction Control System (TCS) that limits wheel spin. This is especially useful in slippery road conditions. The system operates only if it senses that the rear wheels are spinning too much or are beginning to lose traction. When this happens, the system works the rear brakes and reduces engine power (by closing the throttle and managing engine spark) to limit wheel spin. The TRACTION SYSTEM ACTIVE message displays on the Driver Information Center (DIC) when TCS is limiting wheel spin. See Ride Control System Messages on page 5‑44. The system may be heard or felt while it is working, but this is normal.
If cruise control is being used when TCS begins to limit wheel spin, the cruise control will automatically disengage. Cruise control may be reengaged when road conditions allow. See Cruise Control on page 9‑45.
The SERVICE TRACTION SYSTEM message and the TCS warning light will come on if there is a problem with TCS. See Ride Control System Messages on page 5‑44. When this light and the SERVICE TRACTION SYSTEM message are on, the system will not limit wheel spin. Adjust your driving accordingly.
Chevrolet Corvette Owner Manual - 2011
Black plate (37,1)
TCS automatically comes on whenever the vehicle is started. To limit wheel spin, especially in slippery road conditions, the system should always be left on. TCS can be turned off if needed.
To turn the system off, press the button located on the console. The system can be turned on or off at any time by pressing the ACTIVE HANDLING button. The DIC will display the appropriate message when the button is pushed.
Driving and Operating
9-37
Notice: When traction control is turned off, or Competitive Driving Mode is active, it is possible to lose traction. If you attempt to shift with the drive wheels spinning with a loss of traction, it is possible to cause damage to the transmission. Do not attempt to shift when the drive wheels do not have traction. Damage caused by misuse of the vehicle is not covered. See the warranty book for additional information. Adding non‐dealer accessories can affect the vehicle's performance. See Accessories and Modifications on page 10‑4 for more information.
Active Handling System The Active Handling System is a computer controlled system that helps the driver maintain directional control of the vehicle in difficult driving conditions. This is
accomplished by selectively applying any one of the vehicle's brakes. The ACTIVE HANDLING message will come on when the system is operating. See Ride Control System Messages on page 5‑44 for more information. The system may be heard or felt while it is working. This is normal.
The SERVICE ACTIVE HANDLING SYSTEM message is displayed, the instrument cluster light comes on, and a sound is heard if there is a problem with the system. See Ride Control System Messages on page 5‑44 for more information.
Chevrolet Corvette Owner Manual - 2011
Black plate (38,1)
9-38
Driving and Operating
When this light and the SERVICE ACTIVE HANDLING SYSTEM message are on, the system is not operational. Adjust your driving accordingly. The Active Handling System comes on automatically whenever the vehicle is started. To help maintain directional control of the vehicle, the system should always be left on. The system can be turned off if needed. If the Active Handling System is turned off, the Traction Control System will also be turned off. Adjust your driving accordingly.
To turn the system off, press the Active Handling button on the console until TRACTION SYSTEM AND ACTIVE HANDLING SYSTEM — OFF is displayed. The system can be turned back on at any time by pressing the button.
The DIC will display the appropriate message when the button is pushed. If the Tire Pressure Monitor (TPM) system detects a flat tire and the Driver Information Center (DIC) displays TIRE FLAT, or if the TPM system is malfunctioning and the DIC displays SERVICE TIRE MONITOR, the Active Handling System will be affected as follows:
The Active Handling System cannot be turned off by the driver. If the Active Handling System is off, it will be turned on automatically.
. Competitive Driving Mode or
Performance Traction Management is unavailable. The Active Handling System will feel different in aiding and maintaining directional control.
Chevrolet Corvette Owner Manual - 2011
Black plate (39,1)
Driving and Operating
9-39
Competitive Driving Mode Competitive Driving Mode, Performance Traction Management, and Launch Control are systems designed to allow increased performance while accelerating and/ or cornering. This is accomplished by regulating and optimizing the engine, brakes, and suspension performance. These modes are for use at a closed course race track and are not intended for use on public roads. They will not compensate for a driver’s inexperience or lack of familiarity with the race track. Drivers who prefer to allow the system to have more control of the engine, brake, and suspension are advised to turn the normal traction control and active handling systems on. See Racing or Other Competitive Driving on page 9‑7 for more information.
Notice: Do not attempt to shift when the drive wheels are spinning and do not have traction. This may cause damage to the transmission. Damage caused by misuse of the vehicle is not covered by the vehicle warranty. See the warranty book for additional information. Competitive Driving Mode (Except ZR1) Competitive Driving Mode allows full engine power while the Active Handling System helps maintain directional control of the vehicle by selective brake application. In this mode, TCS is off and Launch Control is available. Adjust your driving style to account for the available engine power. See “Launch Control” later in this section.
This light is on when the vehicle is in the Competitive Driving Mode. This optional handling mode can be selected by pressing the ACTIVE HANDLING button on the console quickly two times. COMPETITIVE DRIVING MODE displays in the Driver Information Center (DIC). See Ride Control System Messages on page 5‑44 for more information. When the ACTIVE HANDLING button is pressed again, the Active Handling and TCS systems are on. The TRACTION SYSTEM AND ACTIVE HANDLING-ON message displays briefly in the DIC and a chime is heard.
Chevrolet Corvette Owner Manual - 2011
Black plate (40,1)
9-40
Driving and Operating
Performance Traction Management (ZR1) Performance Traction Management integrates the Traction Control, Active Handling, and Selective Ride Control systems to provide improved and consistent performance when cornering. The amount of available engine power is based on the mode selected, track conditions, driver skill, and the radius of each corner.
This optional handling mode can be selected by pressing the ACTIVE HANDLING button on the console quickly two times. PERF TRAC 1 - WET ACTIVE HANDLING ON displays in the DIC. To experience the performance benefit of this system, after entering a curve and at the point where the driver would normally start to increase acceleration, the accelerator pedal can be fully pressed. The Performance Traction Management system will modify the level of engine power for a smooth and consistent corner exit.
This light is on when the vehicle is in the Performance Traction Management Mode.
To select a mode while in Performance Traction Management, turn the knob located on the console. The Performance Traction Management system contains five modes. These modes are selected by turning the Selective Ride Control/Performance Traction Management knob on the center console. The driver scrolls up or down through modes 1–5 by rotating the knob to the right or left.
Chevrolet Corvette Owner Manual - 2011
Black plate (41,1)
Driving and Operating
9-41
The following is a DIC display description and the recommended usage of each mode: PERF TRAC 1 – WET ACTIVE HANDLING ON
Intended for all driver skill levels
. Wet or damp conditions
only — not intended for use in heavy rain or standing water
. Active Handling is on and engine
power is reduced based on conditions
PERF TRAC 2 – DRY ACTIVE HANDLING ON
For use by less experienced drivers or while learning a new track
. Dry conditions only . Active Handling is on and engine
power is slightly reduced
PERF TRAC 3 – SPORT ACTIVE HANDLING ON
PERF TRAC 5 – RACE ACTIVE HANDLING OFF
For use by drivers who are familiar with the track
For use by experienced drivers who are familiar with the track
. Dry conditions only . Requires more driving skill than
. Dry conditions only . Requires more driving skill than
mode 2
in other modes
. Active Handling is on and more
. Active Handling is off and engine
engine power is available than in mode 2
power is available for maximum cornering speed
PERF TRAC 4 – SPORT ACTIVE HANDLING OFF
For use by drivers who are familiar with the track
. Dry conditions only . Requires more driving skill than
modes 2 or 3
. Active Handling is off and
available engine power is the same as mode 3
Press and release the ACTIVE HANDLING button to turn off Performance Traction Management and return to the Active Handling and Traction Control Systems. The TRACTION SYSTEM AND ACTIVE HANDLING-ON message displays briefly in the DIC and a chime is heard.
Chevrolet Corvette Owner Manual - 2011
Black plate (42,1)
9-42
Driving and Operating
Launch Control A Launch Control feature is available, within Competitive Driving Mode (except ZR1) or Performance Traction Management (ZR1), on vehicles with a manual transmission to allow the driver to achieve high levels of vehicle acceleration in a straight line. Launch Control is a form of traction control that manages tire spin while launching the vehicle. This feature is intended for use during closed course race events where consistent zero to sixty and quarter mile times are desirable.
Launch Control is only available when the following criteria are met: . Competitive Driving Mode is selected (except ZR1) or any of the Performance Traction Management modes are selected (ZR1). The TCS light comes on the instrument panel and the appropriate DIC message displays. The vehicle is not moving. The steering wheel is pointing straight. The clutch is pressed and the vehicle is in first gear. The accelerator pedal is rapidly applied to wide open throttle. The Launch Control feature will initially limit engine speed as the driver rapidly applies the accelerator pedal to wide open throttle.
A smooth, quick release of the clutch, while maintaining the fully pressed accelerator pedal, will manage wheel slip. Complete shifts as described in Manual Transmission on page 9‑32. After the vehicle is launched, the system continues in Competitive Mode (except ZR1) or Performance Traction Management (ZR1). Competitive Driving Mode, Performance Traction Management, and Launch Control are systems designed for a closed course race track and not intended for use on public roads. The systems are not intended to compensate for lack of driver experience or familiarity with the race track.
Chevrolet Corvette Owner Manual - 2011
Black plate (43,1)
Driving and Operating
9-43
Limited-Slip Rear Axle Vehicles with a limited-slip rear axle can give more traction on snow, mud, ice, sand or gravel. It works like a standard axle most of the time, but when traction is low, this feature allows the drive wheel with the most traction to move the vehicle.
Selective Ride Control The vehicle may have a ride control system called Magnetic Selective Ride Control. The system provides the following performance benefits: . Reduced Impact Harshness
Improved Road Isolation Improved High-Speed Stability Improved Handling Response
. Better Control of Body Ride
Motions
Except ZR1
This knob is located on the center console. Turn it to select the suspension of your choice. TOUR: Use for normal city and highway driving. This setting provides a smooth, soft ride. SPORT: Use where road conditions or personal preference demand more control. This setting provides more “feel,” or response to the road conditions.
The setting can be changed at any time. Based on road conditions, steering wheel angle, and the vehicle speed, the system automatically adjusts to provide the best handling while providing a smooth ride. The Tour and Sport modes will feel similar on a smooth road. Select a new setting whenever driving conditions change. Three Driver Information Center (DIC) messages (SERVICE RIDE CONTROL, SHOCKS INOPERATIVE, and MAXIMUM SPEED 129 KM/H (80 MPH) display when a malfunction occurs with the Selective Ride Control system. Refer to Ride Control System Messages on page 5‑44 for more information.
Chevrolet Corvette Owner Manual - 2011
Black plate (44,1)
9-44
Driving and Operating
ZR1
This knob is located on the center console. Turn it to select the suspension of your choice. The knob will return to the center position when released. The switch will illuminate the current suspension setting. TOUR: Use for normal city and highway driving. This setting provides a smooth, soft ride.
SPORT: Use where road conditions or personal preference demand more control. This setting provides more “feel,” or response to the road conditions. The setting can be changed at any time. Based on road conditions, steering wheel angle, and the vehicle speed, the system automatically adjusts to provide the best handling while providing a smooth ride. The Tour and Sport modes will feel similar on a smooth road. Select a new setting whenever driving conditions change. The Selective Ride knob will not display the Tour or Sport setting when the Performance Traction Management mode is selected.
When this mode is selected, turning the Selective Ride knob will change the Performance Traction Management mode and the suspension setting will be determined automatically. See Competitive Driving Mode on page 9‑39 for more information. Three Driver Information Center (DIC) messages (SERVICE RIDE CONTROL, SHOCKS INOPERATIVE, and MAXIMUM SPEED 129 KM/H (80 MPH) display when a malfunction occurs with the Selective Ride Control system. Refer to Ride Control System Messages on page 5‑44 for more information.
Chevrolet Corvette Owner Manual - 2011
Black plate (45,1)
Cruise Control With cruise control, a speed of about 40 km/h (25 mph) or more can be maintained without keeping your foot on the accelerator. Cruise control does not work at speeds below about 40 km/h (25 mph). Cruise control will not work if the parking brake is set, or if the master cylinder brake fluid level is low.
{ WARNING
Cruise control can be dangerous where you cannot drive safely at a steady speed. So, do not use the cruise control on winding roads or in heavy traffic. Cruise control can be dangerous on slippery roads. On such roads, fast changes in tire traction can cause excessive wheel slip, and you could lose control. Do not use cruise control on slippery roads.
If the vehicle is in cruise control, and has the Traction Control System (TCS), and it begins to limit wheel spin, the cruise control automatically disengages. See Traction Control System (TCS) on page 9‑36. When road conditions allow the cruise control to be safely used again, it can be turned back on.
The vehicle has cruise control. 9 (Off): Turns the system off. R (On): Turns the system on.
Driving and Operating
9-45
+ (Resume/Accelerate): Makes the vehicle accelerate or resume a previously set speed. T (Set): Press this button at the end of the lever to set the speed.
Setting Cruise Control If the cruise button is on when not in use, it could get bumped and go into cruise when not desired. Keep the cruise control switch off when cruise is not being used. 1. Move the cruise control switch
to on.
2. Get up to the speed desired. 3. Press T at the end of the lever
and release it.
4. Take your foot off the accelerator
pedal.
When the cruise control is engaged, the CRUISE SET TO XX MPH message displays on the Driver Information Center (DIC). See Cruise Control Messages on page 5‑38.
Chevrolet Corvette Owner Manual - 2011
Black plate (46,1)
9-46
Driving and Operating
Resuming a Set Speed If the cruise control is set at a desired speed and then the brakes are applied, the cruise control is disengaged without erasing the set speed from memory. Once the vehicle speed reaches about 40 km/h (25 mph) or more, move the cruise control switch briefly from R to S. The vehicle returns to the previous set speed and stays there. If the switch is held at resume/ accelerate, the vehicle keeps going faster until the switch is released or the brake is applied. Do not hold the switch at resume/accelerate, unless you want the vehicle to go faster.
Increasing Speed While Using Cruise Control If the cruise control system is already activated, . Use the accelerator pedal to get to the higher speed. Press J at the end of the lever, then release the button and the accelerator pedal. If the accelerator pedal is held longer than 60 seconds, cruise control will turn off.
. Move the cruise switch from R to
S. Hold it there until desired speed is reached, and then release the switch. To increase the vehicle speed in small amounts, move the switch briefly to S. Each time this is done, the vehicle goes about 1.6 km/h (1 mph) faster.
Reducing Speed While Using Cruise Control If the cruise control system is already activated, . Press and hold the set button
until the lower speed desired is reached, then release it. To slow down in small amounts, briefly press J. Each time this is done, the vehicle goes about 1.6 km/h (1 mph) slower.
Passing Another Vehicle While Using Cruise Control Use the accelerator pedal to increase the vehicle speed. When you take your foot off the pedal, the vehicle will slow down to the previous set cruise speed.
Chevrolet Corvette Owner Manual - 2011
Black plate (47,1)
Driving and Operating
9-47
Using Cruise Control on Hills How well the cruise control works on hills depends upon the vehicle speed, load, and the steepness of the hills. When going up steep hills, you might want to step on the accelerator pedal to maintain the vehicle speed. When going downhill, you might have to brake or shift to a lower gear to keep the vehicle's speed down. When the brakes are applied the cruise control is disengaged.
Cruise Control in Sport and Manual Paddle Shift Gear Selection When the vehicle is in S (Sport) and the manual paddle shift controls are not being used, cruise control operates in the same manner as D (Drive). When the vehicle is in S (Sport) and the manual paddle shift controls are being used, cruise control operates as follows:
If cruise control is active and a gear is selected with the manual paddle shift controls, the vehicle speed is maintained in the driver selected gear and will not automatically up-shift or down-shift the transmission while the driver’s gear selection is active.
If driving in hilly terrain, cruise control may not be able to maintain vehicle speed if an up-shift or down-shift is not selected by the driver. While driving on hilly terrain and cruise control is active with a manual paddle shift gear selection, the driver must select the proper gear for the terrain or select D (Drive) on the gear range selector for full automatic transmission operation.
Chevrolet Corvette Owner Manual - 2011
Black plate (48,1)
9-48
Driving and Operating
Fuel Use of the recommended fuel is an important part of the proper maintenance of this vehicle. To help keep the engine clean and maintain optimum vehicle performance, we recommend the use of gasoline advertised as TOP TIER Detergent Gasoline. Look for the TOP TIER label on the fuel pump to ensure gasoline meets enhanced detergency standards developed by auto companies. A list of marketers providing TOP TIER Detergent Gasoline can be found at www.toptiergas.com.
Ending Cruise Control
To disengage cruise control, step lightly on the brake pedal. If the vehicle has a manual transmission, lightly tap the clutch to end the cruise control session. To turn off the cruise control system, move the cruise control switch to 9.
When cruise control is disengaged, the CRUISE DISENGAGED message displays on the Driver Information Center (DIC). See Cruise Control Messages on page 5‑38.
Erasing Speed Memory The cruise control set speed is erased from memory by moving the switch to 9 or if the ignition is turned off.
The eighth digit of the Vehicle Identification Number (VIN) shows the code letter or number that identifies the vehicle's engine. The VIN is at the top left of the instrument panel. See Vehicle Identification Number (VIN) on page 12‑1.
Chevrolet Corvette Owner Manual - 2011
Black plate (49,1)
Driving and Operating
9-49
Recommended Fuel If the vehicle has the 6.2L V8 engine (VIN Code W), use premium unleaded gasoline with a posted octane rating of 91 or higher. You can also use regular unleaded gasoline rated at 87 octane or higher, but the vehicle's acceleration could be slightly reduced, and a slight audible knocking noise, commonly referred to as spark knock, might be heard. If the octane is less than 87, a heavy knocking noise might be heard when driving. If this occurs, use a gasoline rated at 87 octane or higher as soon as possible. Otherwise, you could damage the engine. If heavy knocking is heard when using gasoline rated at 87 octane or higher, the engine needs service.
If the vehicle has the 6.2L V8 engine (VIN Code T) or the 7.0L V8 engine (VIN Code E), use premium unleaded gasoline with a posted octane rating of 91 or higher. For best performance, use premium unleaded gasoline with a posted octane rating of 93. In an emergency, you can use regular unleaded gasoline with an octane rating of 87 or higher. If 87 octane fuel is used, do not perform any aggressive driving maneuvers such as wide open throttle applications. You might also hear audible spark knock during acceleration. Refill the tank with premium fuel as soon as possible to avoid damaging the engine. If heavy knocking is heard when using gasoline rated at 91 octane or higher, the engine needs service.
Gasoline Specifications (U.S. and Canada Only) At a minimum, gasoline should meet ASTM specification D 4814 in the United States or CAN/CGSB‐3.5 or 3.511 in Canada. Some gasolines contain an octane-enhancing additive called methylcyclopentadienyl manganese tricarbonyl (MMT). We recommend against the use of gasolines containing MMT. See Fuel Additives on page 9‑50 for additional information.
Chevrolet Corvette Owner Manual - 2011
Black plate (50,1)
9-50
Driving and Operating
Fuels in Foreign Countries Never use leaded gasoline or any other fuel not recommended in the previous text on fuel. Costly repairs caused by use of improper fuel would not be covered by the vehicle warranty. To check the fuel availability, ask an auto club, or contact a major oil company that does business in the country where you will be driving.
California Fuel Requirements If the vehicle is certified to meet California Emissions Standards, it is designed to operate on fuels that meet California specifications. See the underhood emission control label. If this fuel is not available in states adopting California Emissions Standards, the vehicle will operate satisfactorily on fuels meeting federal specifications, but emission control system performance might be affected. The malfunction indicator lamp could turn on and the vehicle might fail a smog‐check test. See Malfunction Indicator Lamp on page 5‑18. If this occurs, return to your authorized dealer for diagnosis. If it is determined that the condition is caused by the type of fuel used, repairs might not be covered by the vehicle warranty.
Fuel Additives To provide cleaner air, all gasolines in the United States are now required to contain additives that help prevent engine and fuel system deposits from forming, allowing the emission control system to work properly. In most cases, nothing should have to be added to the fuel. However, some gasolines contain only the minimum amount of additive required to meet U.S. Environmental Protection Agency regulations. To help keep fuel injectors and intake valves clean and avoid problems due to dirty injectors or valves, look for gasoline that is advertised as TOP TIER Detergent Gasoline. Look for the TOP TIER label on the fuel pump to ensure gasoline meets enhanced detergency standards developed by the auto companies. A list of marketers providing TOP TIER Detergent Gasoline can be found at www.toptiergas.com.
Chevrolet Corvette Owner Manual - 2011
Black plate (51,1)
Driving and Operating
9-51
However, E85 (85% ethanol) and other fuels containing more than 10% ethanol must not be used in vehicles that were not designed for those fuels. Notice: This vehicle was not designed for fuel that contains methanol. Do not use fuel containing methanol. It can corrode metal parts in the fuel system and also damage plastic and rubber parts. That damage would not be covered under the vehicle warranty.
Some gasolines that are not reformulated for low emissions can contain an octane-enhancing additive called methylcyclopentadienyl manganese tricarbonyl (MMT); ask the attendant where you buy gasoline whether the fuel contains MMT. We recommend against the use of such gasolines. Fuels containing MMT can reduce spark plug life and affect emission control system performance. The malfunction indicator lamp might turn on. If this occurs, return to your dealer for service.
For customers who do not use TOP TIER Detergent Gasoline regularly, one bottle of GM Fuel System Treatment PLUS, added to the fuel tank at every engine oil change, can help clean deposits from fuel injectors and intake valves. GM Fuel System Treatment PLUS is the only gasoline additive recommended by General Motors. It is available at your dealer. Gasolines containing oxygenates, such as ethers and ethanol, and reformulated gasolines might be available in your area. We recommend that you use these gasolines, if they comply with the specifications described earlier.
Chevrolet Corvette Owner Manual - 2011
Black plate (52,1)
9-52
Driving and Operating
Filling the Tank
{ WARNING
Fuel vapor burns violently and a fuel fire can cause bad injuries. To help avoid injuries to you and others, read and follow all the instructions on the fuel pump island. Turn off the engine when refueling. Do not smoke near fuel or when refueling the vehicle. Do not use cellular phones. Keep sparks, flames, and smoking materials away from fuel. Do not leave the fuel pump unattended when refueling the vehicle. This is against the law in some places. Do not re-enter the vehicle while pumping fuel. Keep children away from the fuel pump; never let children pump fuel.
The tethered fuel cap is located behind a hinged fuel door on the driver side of the vehicle.
The fuel door release button is located on the instrument panel to the left of the steering wheel. Push the button to release the fuel door.
Chevrolet Corvette Owner Manual - 2011
Black plate (53,1)
Driving and Operating
9-53
When replacing the fuel cap, turn it clockwise until it clicks. Make sure the cap is fully installed. The diagnostic system can determine if the fuel cap has been left off or improperly installed. This would allow fuel to evaporate into the atmosphere. See Malfunction Indicator Lamp on page 5‑18. The CHECK GAS CAP message displays on the Driver Information Center (DIC) if the fuel cap is not properly installed. See Fuel System Messages on page 5‑41 for more information.
{ WARNING
Fuel can spray out on you if you open the fuel cap too quickly. If you spill fuel and then something ignites it, you could be badly burned. This spray can happen if the tank is nearly full, and is more likely in hot weather. Open the fuel cap slowly and wait for any hiss noise to stop. Then unscrew the cap all the way.
Be careful not to spill fuel. Do not top off or overfill the tank and wait a few seconds after you have finished pumping before removing the nozzle. Clean fuel from painted surfaces as soon as possible. See Exterior Care on page 10‑87.
There is also a manual fuel door release tab. It is located against the upper trim in the rear compartment on the driver side of the vehicle. Pull the tab to release the fuel door. To remove the fuel cap, turn it slowly counterclockwise. While refueling, let the cap hang by the tether below the fuel fill opening.
Chevrolet Corvette Owner Manual - 2011
Black plate (54,1)
9-54
Driving and Operating
{ WARNING If a fire starts while you are refueling, do not remove the nozzle. Shut off the flow of fuel by shutting off the pump or by notifying the station attendant. Leave the area immediately.
Notice: If you need a new fuel cap, be sure to get the right type. Your dealer can get one for you. If you get the wrong type, it may not fit properly. This may cause the malfunction indicator lamp to light and may damage the fuel tank and emissions system. See Malfunction Indicator Lamp on page 5‑18.
Filling a Portable Fuel Container
{ WARNING
Never fill a portable fuel container while it is in the vehicle. Static electricity discharge from the container can ignite the fuel vapor. You can be badly burned and the vehicle damaged if this occurs. To help avoid injury to you and others:
. Dispense fuel only into
approved containers.
. Do not fill a container while
it is inside a vehicle, in a vehicle's trunk, pickup bed, or on any surface other than the ground.
(Continued)
WARNING (Continued)
. Bring the fill nozzle in contact
with the inside of the fill opening before operating the nozzle. Contact should be maintained until the filling is complete.
. Do not smoke while
pumping fuel.
. Do not use a cellular phone
while pumping fuel.
Chevrolet Corvette Owner Manual - 2011
Black plate (55,1)
Towing
General Towing Information The vehicle is neither designed nor intended to tow a trailer.
Driving and Operating
9-55
Add-on equipment can drain the vehicle's 12‐volt battery, even if the vehicle is not operating. The vehicle has an airbag system. Before attempting to add anything electrical to the vehicle, see Servicing the Airbag-Equipped Vehicle on page 3‑34 and Adding Equipment to the Airbag-Equipped Vehicle on page 3‑35.
Conversions and Add-Ons
Add-On Electrical Equipment Notice: Do not add anything electrical to the vehicle unless you check with your dealer first. Some electrical equipment can damage the vehicle and the damage would not be covered by the vehicle's warranty. Some add-on electrical equipment can keep other components from working as they should.
Chevrolet Corvette Owner Manual - 2011
Black plate (56,1)
9-56
Driving and Operating
2 NOTES
Chevrolet Corvette Owner Manual - 2011
Black plate (1,1)
Vehicle Care
10-1
Vehicle Care
General Information
General Information . . . . . . . . . . 10-3
California Proposition65 Warning . . . . . . . . . . . . . . . . . 10-3
California Perchlorate
Materials Requirements . . . . 10-3
Accessories and
Modifications . . . . . . . . . . . . . . . 10-4
Lifting the Vehicle . . . . . . . . . . . . 10-5Vehicle Checks Doing Your Own
Service Work . . . . . . . . . . . . . . . 10-8
Hood . . . . . . . . . . . . . . . . . . . . . . . . 10-9
Engine CompartmentOverview . . . . . . . . . . . . . . . . . . 10-10
Engine Oil . . . . . . . . . . . . . . . . . . 10-15
Engine Oil Life System . . . . . 10-22Automatic Transmission
Park Brake and P (Park)
Fluid . . . . . . . . . . . . . . . . . . . . . . 10-23
Mechanism Check . . . . . . . . 10-45
Manual Transmission
Fluid . . . . . . . . . . . . . . . . . . . . . . 10-23
Hydraulic Clutch . . . . . . . . . . . . 10-24
Engine Air Cleaner/Filter . . . . 10-24
Cooling System (Engine) . . . 10-28
Cooling System(Intercooler) . . . . . . . . . . . . . . . 10-29
Engine Coolant . . . . . . . . . . . . . 10-29
Engine Overheating . . . . . . . . 10-34
Overheated EngineProtection Operating Mode . . . . . . . . . . . 10-35
Power Steering Fluid . . . . . . . 10-36
Washer Fluid . . . . . . . . . . . . . . . 10-37
Brakes . . . . . . . . . . . . . . . . . . . . . 10-38
Brake Fluid . . . . . . . . . . . . . . . . . 10-41
Battery . . . . . . . . . . . . . . . . . . . . . 10-43
Rear Axle . . . . . . . . . . . . . . . . . . 10-44
Starter Switch Check . . . . . . . 10-44
Automatic Transmission ShiftLock Control Function Check . . . . . . . . . . . . . . . . . . . . . 10-45
Wiper Blade
Replacement . . . . . . . . . . . . . . 10-46
Windshield Replacement . . . 10-47Headlamp Aiming
Headlamp Aiming . . . . . . . . . . 10-48
Bulb Replacement
Bulb Replacement . . . . . . . . . . 10-48
Halogen Bulbs . . . . . . . . . . . . . . 10-48
High Intensity Discharge(HID) Lighting . . . . . . . . . . . . . 10-48
Headlamps, Front Turn
Signal and Parking Lamps . . . . . . . . . . . . . . . . . . . . 10-49
Taillamps, Turn Signal, and
Stoplamps . . . . . . . . . . . . . . . . 10-50
Replacement Bulbs . . . . . . . . . 10-50Chevrolet Corvette Owner Manual - 2011
Black plate (2,1)
10-2
Vehicle Care
Electrical System
Electrical System
Overload . . . . . . . . . . . . . . . . . . 10-50
Fuses and Circuit
Breakers . . . . . . . . . . . . . . . . . . 10-51
Engine Compartment Fuse
Block . . . . . . . . . . . . . . . . . . . . . 10-52
Instrument Panel Fuse
Block . . . . . . . . . . . . . . . . . . . . . 10-55
Wheels and Tires
Tires . . . . . . . . . . . . . . . . . . . . . . . . 10-58
Winter Tires . . . . . . . . . . . . . . . . 10-59
Run-Flat Tires . . . . . . . . . . . . . . 10-59
Low-Profile Tires . . . . . . . . . . . 10-60
Tire Sidewall Labeling . . . . . . 10-61
Tire Designations . . . . . . . . . . . 10-62
Tire Terminology andDefinitions . . . . . . . . . . . . . . . . 10-63
Jump Starting
Jump Starting . . . . . . . . . . . . . . 10-82
Towing
Towing the Vehicle . . . . . . . . . 10-86
Recreational VehicleTowing . . . . . . . . . . . . . . . . . . . . 10-86
Appearance Care
Exterior Care . . . . . . . . . . . . . . . 10-87
Interior Care . . . . . . . . . . . . . . . . 10-90
Floor Mats . . . . . . . . . . . . . . . . . . 10-95Tire Pressure . . . . . . . . . . . . . . . 10-66
Tire Pressure for High-SpeedOperation . . . . . . . . . . . . . . . . . 10-67
Tire Pressure Monitor
System . . . . . . . . . . . . . . . . . . . 10-68
Tire Pressure Monitor
Operation . . . . . . . . . . . . . . . . . 10-69
Tire Inspection . . . . . . . . . . . . . . 10-72
Tire Rotation . . . . . . . . . . . . . . . 10-72
When It Is Time for NewTires . . . . . . . . . . . . . . . . . . . . . . 10-72
Buying New Tires . . . . . . . . . . . 10-73
Different Size Tires andWheels . . . . . . . . . . . . . . . . . . . 10-75
Uniform Tire Quality
Grading . . . . . . . . . . . . . . . . . . . 10-76
Wheel Alignment and Tire
Balance . . . . . . . . . . . . . . . . . . . 10-77
Wheel Replacement . . . . . . . . 10-78
Tire Chains . . . . . . . . . . . . . . . . . 10-80
If a Tire Goes Flat . . . . . . . . . . 10-80Chevrolet Corvette Owner Manual - 2011
Black plate (3,1)
General Information For service and parts needs, visit your dealer. You will receive genuine GM parts and GM-trained and supported service people. Genuine GM parts have one of these marks:
California Proposition 65 Warning Most motor vehicles, including this one, contain and/or emit chemicals known to the State of California to cause cancer and birth defects or other reproductive harm. Engine exhaust, many parts and systems, many fluids, and some component wear by-products contain and/or emit these chemicals.
Vehicle Care
10-3
California Perchlorate Materials Requirements Certain types of automotive applications, such as airbag initiators, seat belt pretensioners, and lithium batteries contained in Remote Keyless Entry transmitters, may contain perchlorate materials. Special handling may be necessary. For additional information, see www.dtsc.ca.gov/hazardouswaste/ perchlorate.
Chevrolet Corvette Owner Manual - 2011
Black plate (4,1)
10-4
Vehicle Care
Accessories and Modifications Adding non‐dealer accessories to the vehicle can affect vehicle performance and safety, including such things as airbags, braking, stability, ride and handling, emissions systems, aerodynamics, durability, and electronic systems like antilock brakes, traction control, and stability control. Some of these accessories could even cause malfunction or damage not covered by the vehicle warranty.
Damage to vehicle components resulting from the installation or use of non‐GM certified parts, including control module modifications, is not covered under the terms of the vehicle warranty and may affect remaining warranty coverage for affected parts. GM Accessories are designed to complement and function with other systems on the vehicle. Your GM dealer can accessorize the vehicle using genuine GM Accessories.
When you go to your GM dealer and ask for GM Accessories, you will know that GM-trained and supported service technicians will perform the work using genuine GM Accessories. Also, see Adding Equipment to the Airbag-Equipped Vehicle on page 3‑35.
Chevrolet Corvette Owner Manual - 2011
Black plate (5,1)
Lifting the Vehicle { WARNING
Lifting a vehicle can cause an injury. The vehicle can slip off the jack and roll over you or other people. You and they could be badly injured. Find a level place to lift your vehicle. To help prevent the vehicle from moving:
1. Set the parking brake
firmly.
2. Put an automatic
transmission shift lever in P (Park), or shift a manual transmission to 1 (First) or R (Reverse).
3. Turn off the engine.
To be even more certain the vehicle won't move, put blocks in front of and behind the wheels.
{ WARNING
Getting under a vehicle when it is jacked up is dangerous. If the vehicle slips off the jack, you could be badly injured or killed. Never get under a vehicle when it is supported only by a jack.
{ WARNING Raising the vehicle with the jack improperly positioned can damage the vehicle or the vehicle may fall and cause you or others injury.
If you ever use a jack to lift your vehicle, follow the instructions that came with the jack, and be sure to use the correct lifting points to avoid damaging your vehicle.
Vehicle Care
10-5
Notice: Lifting your vehicle improperly can damage your vehicle and result in costly repairs not covered by your warranty. To lift your vehicle properly, follow the advice in this part. To help prevent vehicle damage:
. Be sure to place a block or
pad between the jack and the vehicle.
. Make sure the jack you are
using spans at least two crossmember ribs.
. Lift only in the areas shown
in the following pictures.
For additional information, see your dealer and the Chevrolet Corvette service manual.
Chevrolet Corvette Owner Manual - 2011
Black plate (6,1)
10-6
Vehicle Care
Lifting From the Front
The front lifting points can be accessed from either side of your vehicle, behind the front tires.
1. Locate the front lifting points (A),
according to the illustration shown.
2. Be sure to place a block or pad
between the jack and the vehicle.
3. Lift the vehicle with the jack,
making sure the jack spans at least two of the crossmember ribs (B).
Chevrolet Corvette Owner Manual - 2011
Black plate (7,1)
Lifting From the Rear
Vehicle Care
10-7
The rear lifting points can be accessed from the rear of the vehicle, on either the driver's or passenger's side.
1. Locate the rear lifting points (A),
3. Lift the vehicle with the jack,
according to the illustration shown.
2. Be sure to place a block or pad
between the jack and the vehicle.
making sure the jack spans at least two of the crossmember ribs (B).
For more information, see Doing Your Own Service Work on page 10‑8.
Chevrolet Corvette Owner Manual - 2011
Black plate (8,1)
10-8
Vehicle Care
Vehicle Checks
Doing Your Own Service Work
{ WARNING You can be injured and the vehicle could be damaged if you try to do service work on a vehicle without knowing enough about it.
. Be sure you have sufficient knowledge, experience, the proper replacement parts, and tools before attempting any vehicle maintenance task.
(Continued)
WARNING (Continued)
. Be sure to use the proper
nuts, bolts, and other fasteners. Metric and English fasteners can be easily confused. If the wrong fasteners are used, parts can later break or fall off. You could be hurt.
If doing some of your own service work, use the proper service manual. It tells you much more about how to service the vehicle than this manual can. To order the proper service manual, see Service Publications Ordering Information on page 13‑15.
This vehicle has an airbag system. Before attempting to do your own service work, see Servicing the Airbag-Equipped Vehicle on page 3‑34. Keep a record with all parts receipts and list the mileage and the date of any service work performed. See Maintenance Records on page 11‑9.
Chevrolet Corvette Owner Manual - 2011
Black plate (9,1)
Vehicle Care
10-9
Hood To open the hood:
1. Pull the hood release lever with
this symbol on it. It is located inside the vehicle below the instrument panel on the driver side.
2. Go to the side of the vehicle and
pull up on the rear edge of the hood, near the windshield.
Before closing the hood, be sure all the filler caps are on properly. Then, just pull the hood down and close it firmly.
Chevrolet Corvette Owner Manual - 2011
Black plate (10,1)
10-10
Vehicle Care
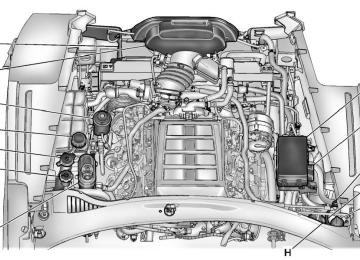
Engine Compartment Overview
6.2 L LS3 V8 Engine (Without dry sump engine oil tank)
Chevrolet Corvette Owner Manual - 2011
Black plate (11,1)
Vehicle Care
10-11
A. Clutch Master Cylinder
Reservoir (If Equipped). See Hydraulic Clutch on page 10‑24.
G. Engine Oil Fill Cap. See “When to Add Engine Oil” under Brake Fluid on page 10‑41.
B. Windshield Washer Fluid
H. Engine Oil Dipstick. See
Reservoir. See “Adding Washer Fluid” under Washer Fluid on page 10‑37.
C. Brake Fluid Reservoir. See
“Brake Fluid” under Brakes on page 10‑38.
D. Coolant Surge Tank and
Pressure Cap. See Engine Coolant on page 10‑29.
E. Engine Air Cleaner/Filter on
page 10‑24.
F. Power Steering Fluid Reservoir.
See Power Steering Fluid on page 10‑36.
“Checking Engine Oil” under Engine Oil on page 10‑15. Engine Compartment Fuse Block on page 10‑52.
I.
J. Passenger Compartment Air
Filter (Out of View). See Passenger Compartment Air Filter on page 8‑7.
K. Battery on page 10‑43. If the vehicle has the 6.2 L LS3
V8 engine (without the dry sump engine oil tank) and you are facing the front of the vehicle.